

PaddlePaddle: Welcome to our guide of machine learning frameworks, where we’ll examine PaddlePaddle, TensorFlow, and PyTorch. Recent benchmark tests have revealed PaddlePaddle as a potential frontrunner, showcasing benchmark speeds that outpace its better-known competitors.
In this blog, we’ll discuss the factors contributing to PaddlePaddle’s impressive efficiency and speed. Further, we’ll delve into its applicability in real-world scenarios, particularly object detection, pose estimation, and segmentation within the sphere of computer vision.
Prepare yourself as we unravel the mysteries of these fascinating computational conundrums and shed light on why PaddlePaddle could be an invaluable skill to acquire.
What is PaddlePaddle?
PaddlePaddle (PArallel Distributed Deep LEarning) is an open-source deep learning framework released by Baidu in 2016. It offers a unified platform for various machine learning tasks.
Considering you already know Pytorch and Tensorflow, is it worth learning PaddlePaddle?
The answer is YES. Here’s why
PaddlePaddle vs PyTorch or Tensorflow
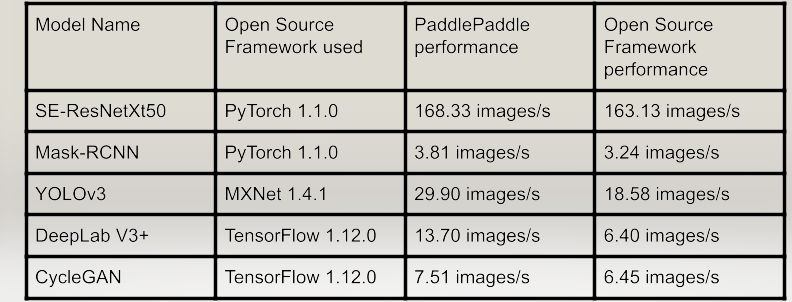
- The superior benchmark speed compared to other frameworks ensures efficient and high-performance deep learning computations. The results are included directly from the PaddlePaddle paper.
- More than 400 pretrained models are available in PaddlePaddle from multiple domains like Object detection, Image segmentation, and Natural Language Processing, etc are ready to be used with just a few lines of code.
The subsequent article will offer a comprehensive insight into how PaddlePaddle attains its impressive benchmark speed and will also guide you on using models straight from the PaddlePaddle repository. This will be illustrated with three specific examples.
Table of Contents
- How PaddlePaddle Achieves Superior Speed
- PaddlePaddle for Object Detection
- PaddlePaddle for Keypoint Detection
- PaddlePaddle for Image Segmentation
- Conclusion
1. How PaddlePaddle Achieves Superior Speed
PaddlePaddle achieves superior benchmark speed using techniques as
- Data Parallelism
- Model Parallelism
- TensorRTs
- Supported Models
Data Parallelism
Data parallelism in deep learning involves splitting the training data across multiple devices or machines, enabling parallel computation and faster training by independently processing subsets of data and aggregating gradients for updating shared model parameters.

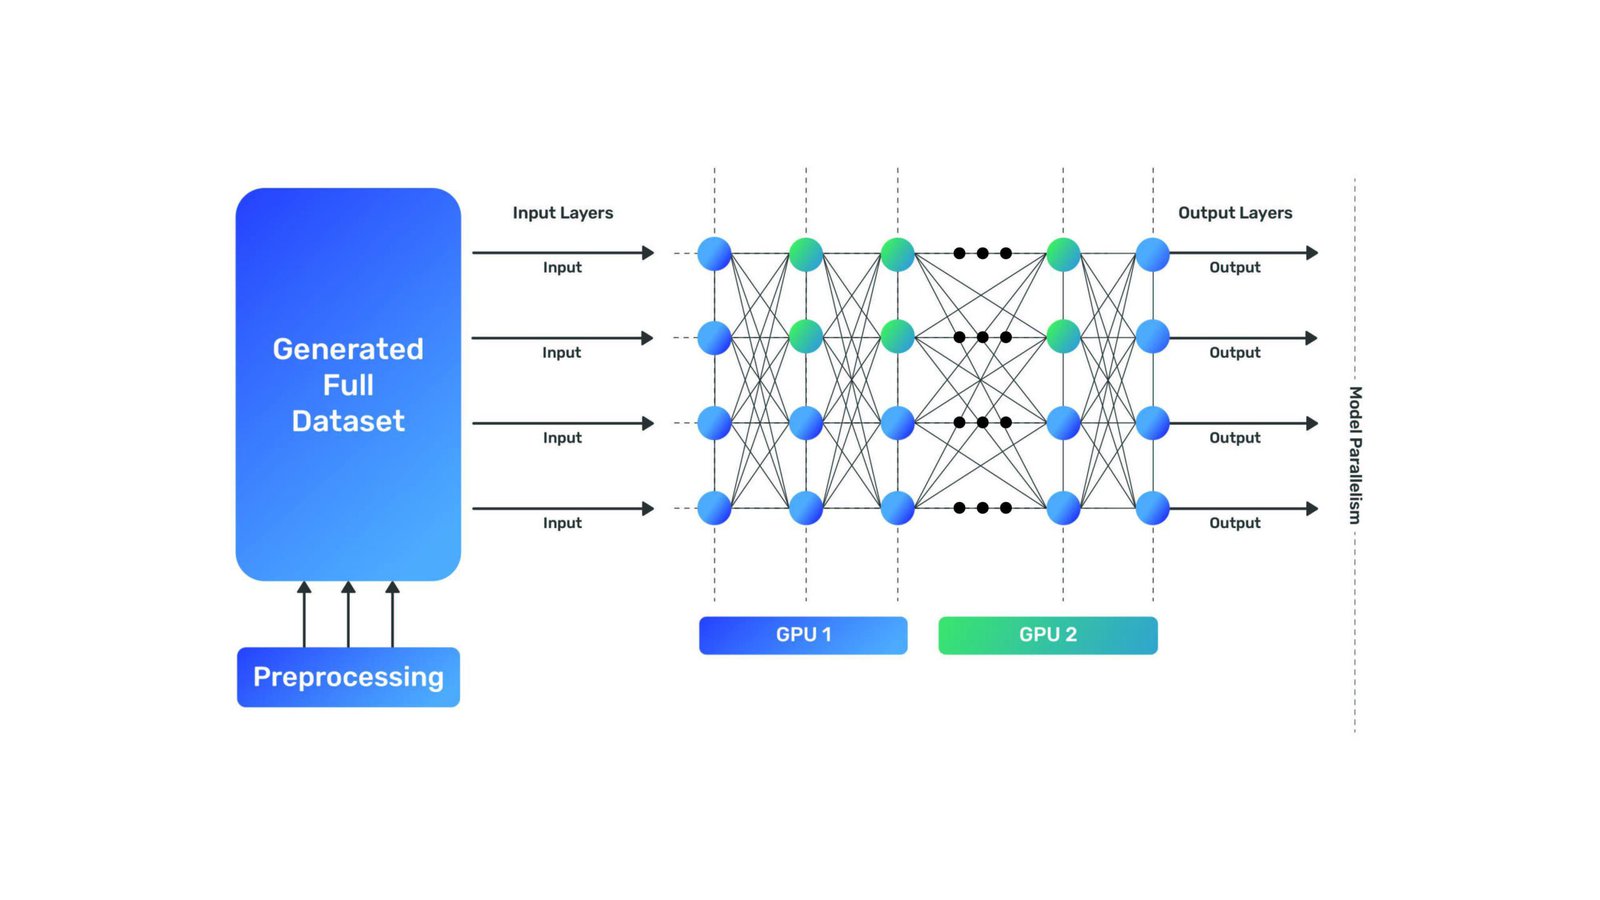
Model Parallelism
Model parallelism in deep learning involves dividing a single model across multiple devices or machines, enabling parallel computation by splitting different parts of the model across devices to handle larger models or memory constraints efficiently.
TensorRT
TensorRT is a high-performance deep learning inference optimizer and runtime library developed by NVIDIA. It is helpful for deep learning as it optimizes and accelerates inference tasks by optimizing network architectures, reducing precision, layer fusion, and leveraging GPU-specific optimizations, resulting in faster and more efficient execution of deep learning models on NVIDIA GPUs.

Utilizing these techniques to the fullest, PaddlePaddle is able to outperform the benchmark speeds set by PyTorch and Tensorflow.
Supported Models
- More than 400 models are available on PaddlePaddle from different fields of AI.
- PaddlePaddle has started integrating its libraries with Huggingface; however, as of January 2023, 75 of the 400+ models have been implemented.
- Thus let us use models available directly from PaddlePaddle
2. PaddlePaddle for Object Detection
PaddlePaddle offers PaddleDetection, a repository containing state-of-the-art object detection, tracking, and pose estimation algorithms, among others. Let us use PaddleDetection for inference on image and video samples.
However before using paddledetection we need to install paddlepaddle on our system.
How do you install a PaddlePaddle?
Since we would be using paddlepaddle on cuda we need to install paddlepaddle-gpu. We will be using it on colab, its command is
!pip install paddlepaddle-gpu==2.4.2.post117 -f https://www.paddlepaddle.org.cn/whl/linux/mkl/avx/stable.html
If using a local computer for implementation please select the appropriate paddlepaddle-gpu.
After installation is completed we can check if the paddlepaddle is able to access cuda using
import paddle
paddle.utils.run_check()
It should output

After installation is done, we are set to clone the repository as
!git clone https://github.com/PaddlePaddle/PaddleDetection.git
Move within the directory using the cd command and install the requirements as
!pip install -r requirements.txt
Now we can get started with object detection.
PaddlePaddle Detection
For performing detection using a pretrained model we first need to export it.

!python tools/export_model.py -c configs/dino/dino_r50_4scale_1x_coco.yml --output_dir=./inference_model \
 -o weights=https://paddledet.bj.bcebos.com/models/dino_r50_4scale_1x_coco.pdparams
Here we are using a dino model with resnet50 backbone; we can use any model available on the PaddleDetection repository by specifying
-c: path to model’s configuration file–output_dir: where the model will be exported toWeights: link or a local file to weights of the model
The aforementioned code will create one folder with the same name as the configuration yml file in the inference_model folder containing 4 files namely infer_cfg.yml, model.pdiparams, model.pdiparams.info and model.pdmodel
The main purpose of these files are:
model.pdiparams: contains model weightsmodel.pdiparams.info: contains information about parametersmodel.pdmodel: contains model structure descriptioninfer_cfg.yml: preprocessing configuration file
After this, we can get the model’s predictions on the image using the following code.
!python deploy/python/infer.py --model_dir=./inference_model/dino_r50_4scale_1x_coco --image_file="object-detection_input_image.jpg" --device=GPU
Here model_dir must point to the folder where the model was exported to, image_file points to the image we want to get predictions of and specify the device to use in the device field we want to run the model on.
However, since the font size is hardcoded in the file making the texts nearly impossible to read for high-resolution images, thus we would write our own code for plotting the results. For this, we would use the following function
def draw_box(im, np_boxes, labels, threshold=0.5):
    im = Image.fromarray(im)
    np_boxes=np_boxes['boxes']
    draw_thickness = max(round(sum(im.size) / 2 * 0.01), 2)
    draw = ImageDraw.Draw(im)
    clsid2color = {}
    color_list = get_color_map_list(len(labels))
    expect_boxes = (np_boxes[:, 1] > threshold) & (np_boxes[:, 0] > -1)
    np_boxes = np_boxes[expect_boxes, :]

    for dt in np_boxes:
        clsid, bbox, score = int(dt[0]), dt[2:], dt[1]
        if clsid not in clsid2color:
            clsid2color[clsid] = color_list[clsid]
        color = tuple(clsid2color[clsid])

        xmin, ymin, xmax, ymax = bbox
        draw.line(
            [(xmin, ymin), (xmin, ymax), (xmax, ymax), (xmax, ymin), (xmin, ymin)],
            width=draw_thickness // 2,
            fill=color,
        )
        font = ImageFont.truetype(
            "LiberationSans-Regular.ttf", draw_thickness * 2
        )

        # draw label
        text = "{} {:.4f}".format(labels[clsid], score)
        new_box = draw.textbbox((0, 0), text, font=font)
        tw = new_box[2] - new_box[0]  # bottom-top
        th = new_box[3] - new_box[1]  # right-left
        draw.rectangle([(xmin + 1, ymin - th), (xmin + tw + 1, ymin)], fill=color)
        draw.text((xmin + 1, ymin - th), text, fill=(255, 255, 255), font=font)
    return im
This function is adapted from the original files with minor changes, most specifically the font variable, where we adjust the font and the font size.
Because we calculate the font size based on the image’s size, the text will remain visible regardless of the image’s size.
Since we are updating a function, we would no longer be able to use the Command Line Interface(CLI) and thus use the following code to get the predictions and call the previously mentioned function for plotting.
model_dir = "inference_model/dino_r50_4scale_1x_coco"
image_file="detection_pose/object-detection_input_image.jpg"
device = "GPU"
deploy_file = os.path.join(model_dir, "infer_cfg.yml")
with open(deploy_file) as f:
    yml_conf = yaml.safe_load(f)
arch = yml_conf["arch"]

paddle.enable_static()
detector = Detector(model_dir=model_dir, device=device)
image_array = cv2.imread(image_file)[..., ::-1]
results = detector.predict_image([image_array], visual=False)
detector.det_times.info(average=True)

im = draw_box(
    image_array, results, PredictConfig(model_dir).labels, threshold=0.5
)
im = np.array(im)
plt.figure(figsize=(4,6))
plt.imshow(im)
plt.show()
We will be using the same function for pose detection inference on video.
A sample prediction is shown below.
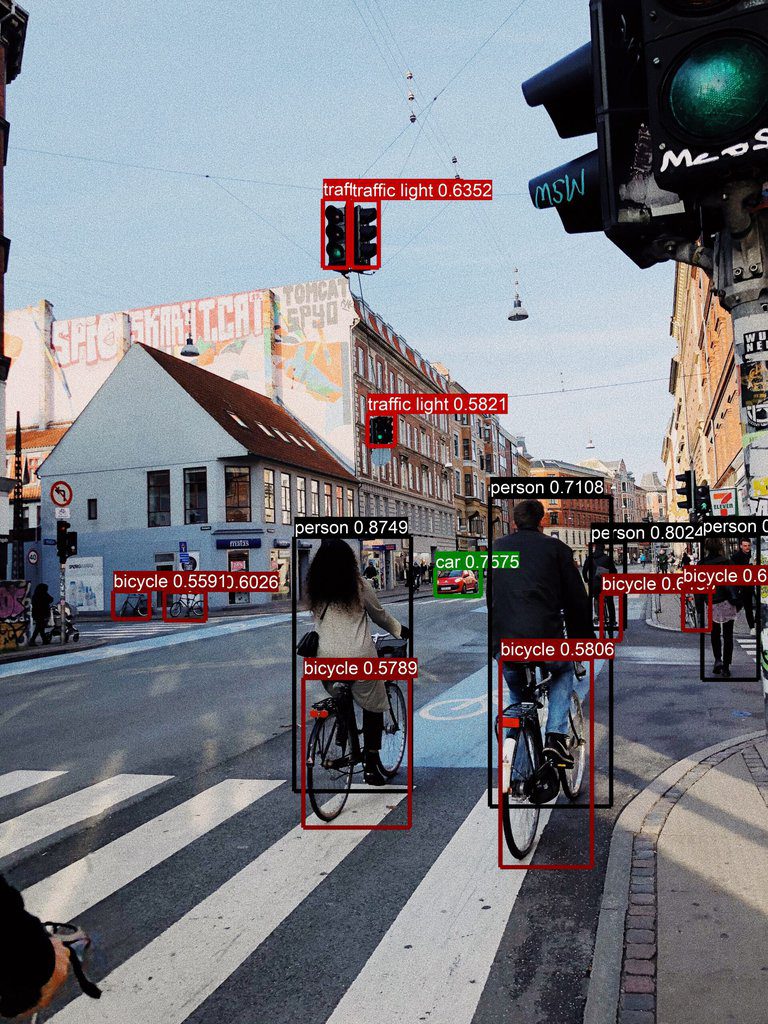
If you look at the image closely, you will see that the model misses detection for some small objects. You could take a look at how we can improve upon this using Slicing Aided Hyper Inference(SAHI).
For inference on the video file, we can use the CLI as
!python deploy/python/infer.py --model_dir=./inference_model/dino_r50_4scale_1x_coco --video_file=object-detection.mp4 --device=GPU
The same issue arises for video thus, we would be using the following function for video inference
def video_inference(video_file, detector, keypoint_or_object, output_name):
  capture = cv2.VideoCapture(video_file)
  width = int(capture.get(cv2.CAP_PROP_FRAME_WIDTH))
  height = int(capture.get(cv2.CAP_PROP_FRAME_HEIGHT))
  fps = int(capture.get(cv2.CAP_PROP_FPS))
  out_path = output_name
  fourcc = cv2.VideoWriter_fourcc(*"mp4v")
  writer = cv2.VideoWriter(out_path, fourcc, fps, (width, height))
  index = 1
  while 1:
      ret, frame = capture.read()
      if not ret:
          break
      print("detect frame: %d" % (index))
      index += 1
      results = detector.predict_image([frame[..., ::-1]], visual=False)
      if keypoint_or_object=="object":
        im = visualize_box_mask(
            frame, results, PredictConfig(model_dir).labels, threshold=0.5
        )
      else:
        im_results = {}
        im_results["keypoint"] = [results["keypoint"], results["score"]]
        im = visualize_pose(frame, im_results, visual_thresh=0.3, returnimg=True)

      im = np.array(im)
      writer.write(im)

  writer.release()
The function can be called as
video_inference("detection_pose/object-detection_input_video.mp4", detector, "object", "objects_in_vide.mp4")
We will be using the same function for video inference for pose detection.
PaddleDetection supports tasks apart from detection, such as Tracking, Pedestrian Analysis, Attribute Analysis, etc. Let us look at keypoint detection inference using PaddleDetection.
3. PaddlePaddle for Keypoint Detection
Keypoint detection is the task of locating the key object parts in an image. PaddlePaddle provides various models to perform tasks in both a top-down and bottom-up manner. Let us look at HRNet for this task.
First, export the model as
!python tools/export_model.py -c configs/keypoint/higherhrnet/higherhrnet_hrnet_w32_512.yml --output_dir=outut_inference -o weights=detection_pose/higherhrnet_hrnet_w32_512.pdparams
Then use CLI for inference as
!python deploy/python/infer.py
--config output/inference_models/deploy.yaml \
--image_path detection_pose/pose-detection_input_image.jpg
This saves an image containing the pose estimation. However, the stickwidth is hard coded, which makes it difficult to visualize high-resolution images; hence we will be writing our own code for plotting. This code is adapted from the original repository for plotting. We will draw a circle at the key points, followed by an ellipse to connect these key points.
First, based on the predictions, we define a function for connecting the edges and define the edge color as
def get_variables(skeletons, scores):
    skeletons = np.array(skeletons)
    kpt_nums = 17
    if len(skeletons) > 0:
        kpt_nums = skeletons.shape[1]

    if kpt_nums == 17:
        EDGES = [
            (0, 1),
            (0, 2),
            (1, 3),
            (2, 4),
            (3, 5),
            (4, 6),
            (5, 7),
            (6, 8),
            (7, 9),
            (8, 10),
            (5, 11),
            (6, 12),
            (11, 13),
            (12, 14),
            (13, 15),
            (14, 16),
            (11, 12),
        ]
    else:  # plot mpii keypoint
        EDGES = [
            (0, 1),
            (1, 2),
            (3, 4),
            (4, 5),
            (2, 6),
            (3, 6),
            (6, 7),
            (7, 8),
            (8, 9),
            (10, 11),
            (11, 12),
            (13, 14),
            (14, 15),
            (8, 12),
            (8, 13),
        ]
    NUM_EDGES = len(EDGES)

    colors = [
        [255, 0, 0],
        [255, 85, 0],
        [255, 170, 0],
        [255, 255, 0],
        [170, 255, 0],
        [85, 255, 0],
        [0, 255, 0],
        [0, 255, 85],
        [0, 255, 170],
        [0, 255, 255],
        [0, 170, 255],
        [0, 85, 255],
        [0, 0, 255],
        [85, 0, 255],
        [170, 0, 255],
        [255, 0, 255],
        [255, 0, 170],
        [255, 0, 85],
    ]

    return EDGES, NUM_EDGES, colors, kpt_nums
Then we plot the key points using circles as
def draw_circles(canvas, kpt_nums, skeletons, visual_thresh, colors, color_set, ids):
    for i in range(kpt_nums):
        for j in range(len(skeletons)):
            if skeletons[j][i, 2] < visual_thresh:
                continue
            if ids is None:
                color = (
                    colors[i]
                    if color_set is None
                    else colors[color_set[j] % len(colors)]
                )
            else:
                color = get_color(ids[j])

            cv2.circle(
                canvas,
                tuple(skeletons[j][i, 0:2].astype("int32")),
                2,
                color,
                thickness=-1,
            )
Followed by drawing the ellipse to connect these key points
def draw_polygons(
    canvas,
    NUM_EDGES,
    skeletons,
    EDGES,
    visual_thresh,
    stickwidth,
    ids,
    colors,
    color_set,
):
    for i in range(NUM_EDGES):
        for j in range(len(skeletons)):
            edge = EDGES[i]
            if (
                skeletons[j][edge[0], 2] < visual_thresh
                or skeletons[j][edge[1], 2] < visual_thresh
            ):
                continue

            cur_canvas = canvas.copy()
            X = [skeletons[j][edge[0], 1], skeletons[j][edge[1], 1]]
            Y = [skeletons[j][edge[0], 0], skeletons[j][edge[1], 0]]
            mX = np.mean(X)
            mY = np.mean(Y)
            length = ((X[0] - X[1]) ** 2 + (Y[0] - Y[1]) ** 2) ** 0.5
            angle = math.degrees(math.atan2(X[0] - X[1], Y[0] - Y[1]))
            polygon = cv2.ellipse2Poly(
                (int(mY), int(mX)), (int(length / 2), stickwidth), int(angle), 0, 360, 1
            )
            if ids is None:
                color = (
                    colors[i]
                    if color_set is None
                    else colors[color_set[j] % len(colors)]
                )
            else:
                color = get_color(ids[j])
            cv2.fillConvexPoly(cur_canvas, polygon, color)
            canvas = cv2.addWeighted(canvas, 0.4, cur_canvas, 0.6, 0)
    return canvas
The driver code used to call these functions is as follows
def visualize_pose(
    imgfile,
    results,
    visual_thresh=0.6,
    save_name="pose.jpg",
    save_dir="output",
    returnimg=False,
    ids=None,
):
    skeletons, scores = results["keypoint"]
    EDGES, NUM_EDGES, colors, kpt_nums = get_variables(skeletons, scores)

    img = cv2.imread(imgfile) if type(imgfile) == str else imgfile

    color_set = results["colors"] if "colors" in results else None

    canvas = img.copy()
    draw_circles(canvas, kpt_nums, skeletons, visual_thresh, colors, color_set, ids)

    to_plot = cv2.addWeighted(img, 0.3, canvas, 0.7, 0)

    stickwidth = max(round(sum(img.shape[:2]) / 2 * 0.004), 2)

    canvas = draw_polygons(
        canvas,
        NUM_EDGES,
        skeletons,
        EDGES,
        visual_thresh,
        stickwidth,
        ids,
        colors,
        color_set,
    )
    return canvas
An example of results generated from code looks like this.


If you are interested in working on pose estimation, take a look at our Pose Estimation blog.
For pose estimation in video, we will be using the function previously defined as
detector = KeyPointDetector(model_dir=model_dir, device=device)
video_inference("detection_pose/pose_detection_input_video.mp4", detector, "pose", "pose_in_video.mp4")
4. PaddlePaddle for Image Segmentation
PaddleSeg supports multiple segmentation tasks such as semantic segmentation, interactive segmentation, Panoptic segmentation, Image matting, etc. As an example, let us use semantic segmentation to classify each possible pixel in an image and video.
For using PaddleSeg we need to clone the repository as
!git clone https://github.com/PaddlePaddle/PaddleSeg.git
Followed by installing paddleseg as
!pip install paddleseg
Similar to previous tasks, we will begin by exporting the model as
!python tools/export.py \
       --config configs/hrnet_w48_contrast/HRNet_W48_contrast_cityscapes_1024x512_60k.yml \
       --model_path segmentation/hrnet_seg.pdparams \
       --input_shape 1 3 1024 512 \
       --save_dir output/inference_models
Here the model_path field replaces the weights field previously used, but its use remains the same. An important point to note is that the input_shape must match the resolution specified in the readme for the model that we would be using for the weights to load correctly. For example, in our case, the model.pdparams is the weight of a HRNet model trained on 1024*512 resolution images; thus, the image_shape field receives the same.
Following this, we can use the model for inference as
!python deploy/python/infer.py \
    --config output/inference_models/deploy.yaml \
    --image_path segmentation/segmentation_input_image.png
Please note we are specifying the yaml file path directly to the config field instead of the path of the folder containing it.

The mentioned command would create an output folder containing the segmentation map.
We can overlap this map on the input image as
predBlend = cv2.addWeighted(image, 1 - seg_weight, segPred, seg_weight, 0)
cv2.addWeighted is a function in OpenCV that blends or merges two images according to specified weights. Here the image is the input image used, and segPred is the segmentation map, and we are performing a weighted addition between the input image and the segmentation map according to seg_weight.

If you are interested in learning more about segmentation, take a look at our blog on Segment Anything Model(SAM).
Now that we can perform segmentation using Command Line Interface(CLI) let us also do segmentation using code. For this, we would need some helper functions as
def get_pseudo_color_map(pred, name, color_map=None):
    pred_mask = PILImage.fromarray(pred.astype(np.uint8), mode='P')
    if color_map is None:
        color_map = get_color_map_list(256)
    pred_mask.putpalette(color_map)
    pred_mask.save(name)

def get_color_map_list(num_classes, custom_color=None):
    num_classes += 1
    color_map = num_classes * [0, 0, 0]
    for i in range(0, num_classes):
        j = 0
        lab = i
        while lab:
            color_map[i * 3] |= (((lab >> 0) & 1) << (7 - j))
            color_map[i * 3 + 1] |= (((lab >> 1) & 1) << (7 - j))
            color_map[i * 3 + 2] |= (((lab >> 2) & 1) << (7 - j))
            j += 1
            lab >>= 3
    color_map = color_map[3:]

    if custom_color:
        color_map[:len(custom_color)] = custom_color
    return color_map
To perform the prediction along with preprocessing and postprocessing, use the following class.
class Predictor:
    def __init__(self, config, name='segmentation_map.png'):
        self.name = name
        self.cfg = DeployConfig(config)
        self._init_base_config()
        self._init_gpu_config()
        self.predictor = create_predictor(self.pred_cfg)

    def _init_base_config(self):
        self.pred_cfg = PredictConfig(self.cfg.model, self.cfg.params)
        self.pred_cfg.enable_memory_optim()
        self.pred_cfg.switch_ir_optim(True)

    def _init_gpu_config(self):
        self.pred_cfg.enable_use_gpu(100, 0)

    def run(self, img_path):
        input_names = self.predictor.get_input_names()
        input_handle = self.predictor.get_input_handle(input_names[0])
        output_names = self.predictor.get_output_names()
        output_handle = self.predictor.get_output_handle(output_names[0])
        results = []
        frame = img_path
        data = np.array([self._preprocess(frame)])
        input_handle.reshape(data.shape)
        input_handle.copy_from_cpu(data)
        self.predictor.run()
        results = output_handle.copy_to_cpu()
        self._postprocess(results)

        return cv2.imread(self.name)

    def _preprocess(self, img):
        data = {}
        data["img"] = img
        return self.cfg.transforms(data)["img"]

    def _postprocess(self, results):
        get_pseudo_color_map(results[0], self.name)
Following this, we can use the class as
image_inference = Predictor("output/inference_models/deploy.yaml")
prediction = image_inference.run("segmentation/segmentation_input_image.png")
this will generate the segmentation map, which we can then overlap on the input image to get the final prediction.
Since video segmentation is not supported as of writing this blog, we will be using custom code as shown below
The driver code is used to call the other functions for per frame predictions.
def video_inference(video, seg_weight, PaddleEngine, video_name):
    video = cv2.VideoCapture(video)
    i = 0
    while True:
        ret, frame = video.read()
        if not ret:
            break
        if i == 0:
            shape = frame.shape
            out = cv2.VideoWriter(
                video_name,
                cv2.VideoWriter_fourcc(*"mp4v"),
                video.get(cv2.CAP_PROP_FPS),
                (shape[1], shape[0]),
            )

        segPred = PaddleEngine.run(frame)
        frame_resized = frame
        predBlend = cv2.addWeighted(
            frame_resized, 1 - seg_weight, segPred, seg_weight, 0
        )
        out.write(predBlend)
        i += 1

    video.release()
    out.release()
We can call the video_inference function as
CONFIG = "output/inference_models/deploy.yaml"
VIDEO = "segmentation/segmentation_input_video.mp4"
video_inference(VIDEO, 0.3, Predictor(CONFIG), "segmentation_output_video.mp4")
When using the code, we will have to modify the config and video paths to point to the exported model’s deployment file and video file for inference on other videos, respectively.
5. Conclusion
Apart from the repositories mentioned, PaddlePaddle contains repositories for other tasks, such as PaddleOCR for optical character recognition, deepspeech synthesis using PaddleSpeech, among others. The code presented in the work can be easily adapted to use all these models for inference. If you are interested in PaddleOCR, we recommend checking out our Optical Character Recognition using PaddleOCR, which provides step-by-step instructions for setting up a functional OCR engine.
References
- Yanjun Ma,Dianhai Yu,Tian Wu,Haifeng Wang. PaddlePaddle: An Open-Source Deep Learning Platform from Industrial Practice[J]. Frontiers of Data and Computing, 2019, 1(1): 105-115.
- https://huggingface.co/blog/paddlepaddle