Italian Bread Recipe
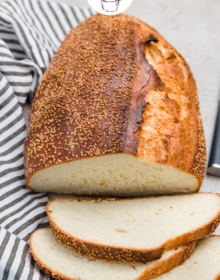
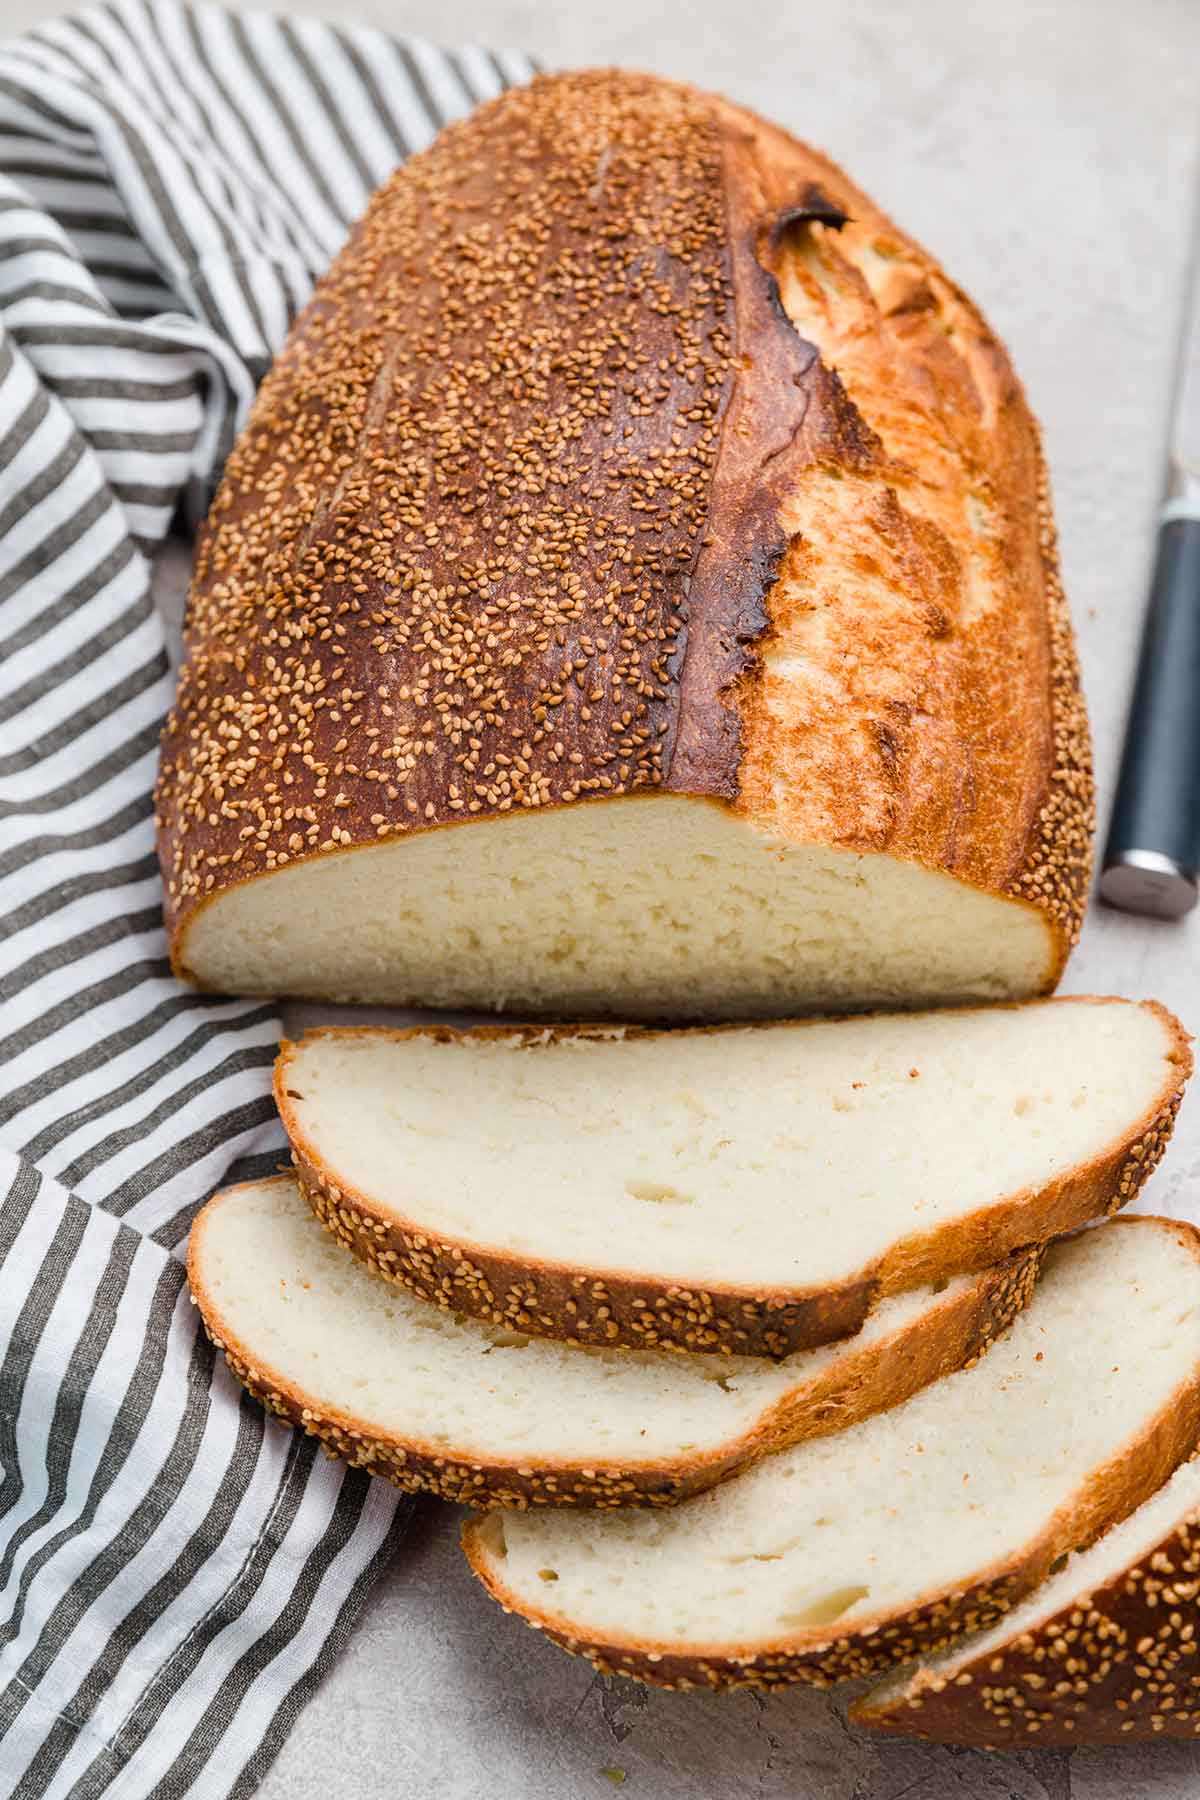
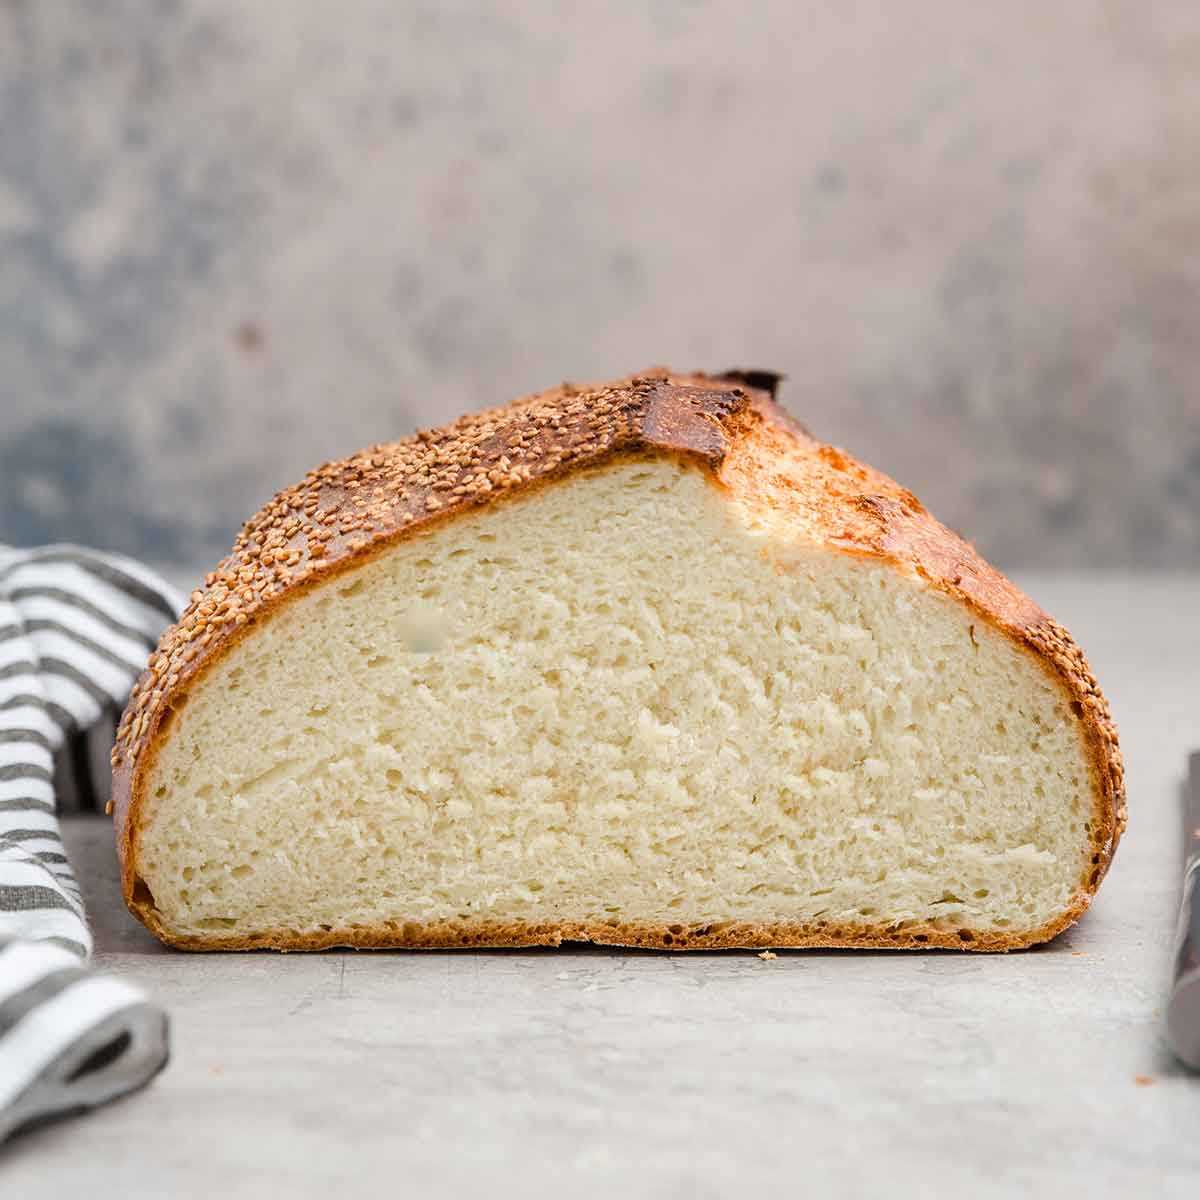
You won’t believe how easy this Italian bread recipe is to make! With its soft interior and crusty exterior, it tastes like a loaf straight from your favorite bakery. With hardly any hands-on time and a very forgiving dough, this is a perfect beginner yeast recipe. Be sure to have a lot of softened butter ready to slather on these slices!
Well over a decade ago, I had planned to make spaghetti and meatballs on a Sunday afternoon when I was suddenly hit with the craving for a loaf of Italian bread to soak up all of the extra sauce on the plate.
Not wanting to venture to the grocery store while in the middle of the meal, I began looking up recipes. I mashed a couple together and ended up with the most enormous, most delicious loaf of homemade Italian bread. For the very first time making Italian bread, I had seriously hit the jackpot. I’ve never wavered from this recipe and it remains a favorite of many of my friends.
It’s easy to see why – with a perfectly crisp outer crust and a soft, chewy interior with a tight crumb, it’s a bread dream come true!
Why We Use Bread Flour
If you’ve made my favorite white bread recipe, you may remember that I opt for all-purpose flour because it produces a super light and fluffy bread.
In contrast, we want to use bread flour for this Italian bread due to its higher protein content, which will create a bread that is chewier in texture and a bit denser. Since this is a free-form loaf of bread, using bread flour also helps the bread to retain its shape while rising.
Creating Steam for a Crisp Crust
The one unconventional step to this recipe comes during the baking step. While the oven is preheating, you’ll place a metal baking pan on the bottom rack of your oven. Once you place the bread in the oven, you’ll pour a cup of water into the pan, which will create a ton of steam, resulting in a wonderfully crisp crust on the bread.
Important Note: Please be sure to use a metal pan, NOT GLASS. If you pour water into a glass pan that has been heated, it has the potential to shatter. Go ahead and ask me how I know this ;-)

How to Make This Italian Bread
You won’t believe how many times I’ve received the comment, “I couldn’t believe how easy this was to make, and it was just like a loaf from the bakery!” It truly is incredibly simple and mostly hands-off; even better is that you can have fresh-baked homemade bread in just a few short hours.
Here’s what you’ll need to do:
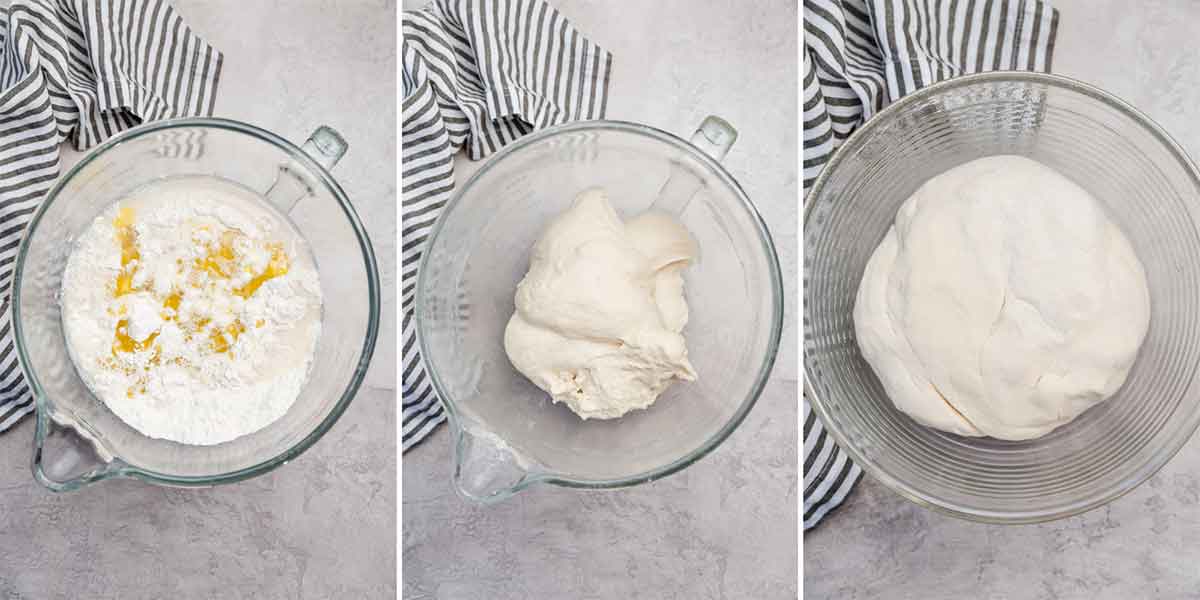
- Combine the yeast in warm water, then add it to the flour, salt, brown sugar, and olive oil in the bowl of a stand mixer.
- Mix on low speed until a dough starts to form (you may need to add more flour here!).
- Knead for 7 minutes, then do a couple of minutes by hand for a smooth, firm, and elastic dough.
- Rise! Put the dough in an oiled bowl and allow to rise at room temperature until doubled in size.
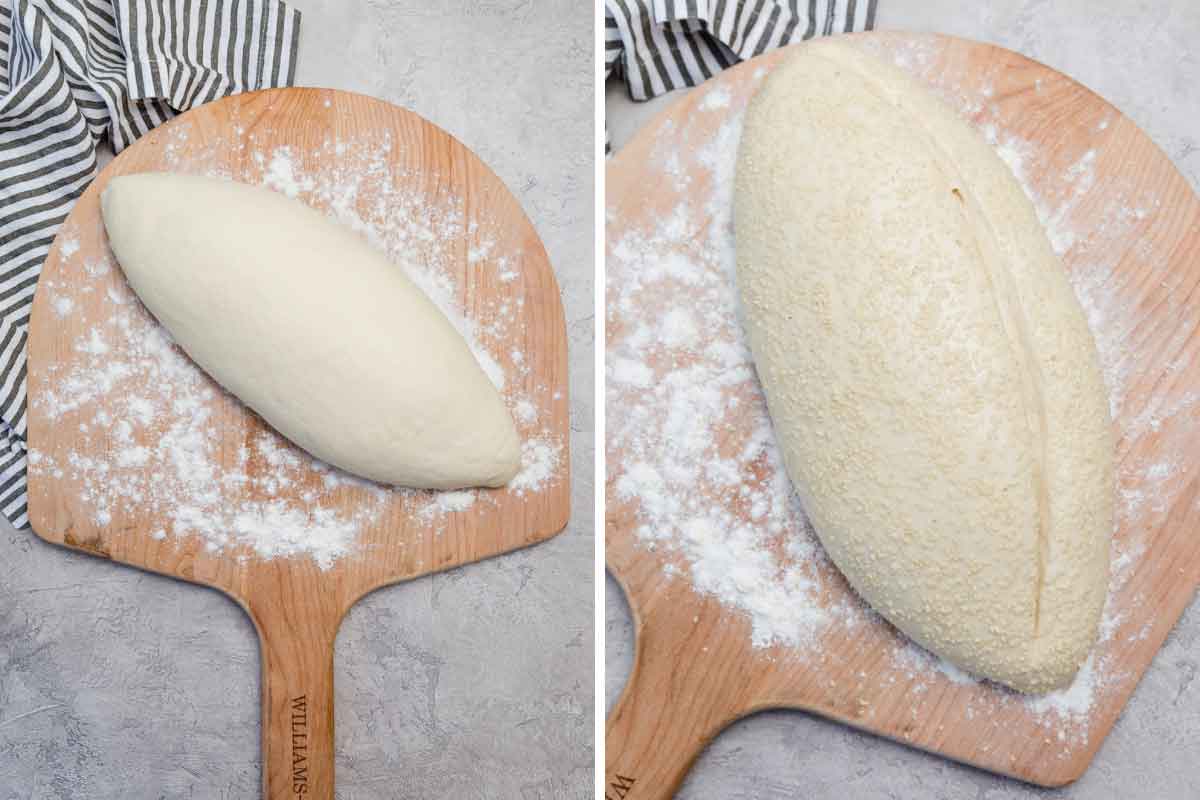
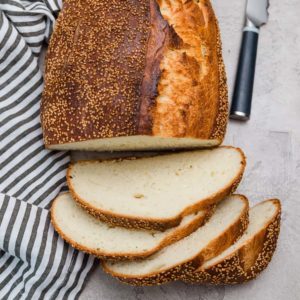
- Shape & Rise – The bread dough will be shaped into a torpedo and left to rise once more until doubled in size again.
- Top & Bake – Brush the dough with egg wash and sprinkle with sesame seeds (if desired), then pop it into the oven.
Tips for Bread Success
- Bread Flour – I outlined above why I’m a big advocate of bread flour for this particular recipe; you can find it in nearly all grocery stores or can buy it online. If you substitute all-purpose flour, the bread will still turn out, but there will be a definite difference in texture.
- Yeast – This recipe calls for active dry yeast, but you can substitute instant yeast without an issue or any modifications.
- Mixing by Hand – While using a stand mixer with a dough hook makes this easier, you can absolutely use a large mixing bowl and mix and knead entirely by hand.
- Extra Flour – Note that the recipe states you may need to add a little extra flour during the mixing process to get a dough to come together. I find that this varies during different times of the year, as well as what the weather is like. If it’s warmer/more humid, you may need more flour. When it’s colder and drier, I rarely, if ever, need to add more flour.
- Metal Pan – I want to emphasize once more that the pan you place on the bottom rack of the oven to create steam needs to be METAL and not glass. If you don’t already have one, I recommend this one.
- Baking Stone – This is the baking stone that I use, and this is the pizza peel you see pictured above. If you don’t have a baking stone, you can flip a baking sheet upside down, put a sheet of parchment paper on top, and bake the bread on there (you would not need to place the upside-down pan in the oven during preheating).
Freezing Bread Dough and Baked Bread
You can successfully freeze both unbaked bread dough and completely baked bread. Below are instructions for both:
Freezing Bread Dough
You can freeze the unbaked bread dough by following steps #1-4 in the recipe below, finishing with shaping the dough.
Immediately place the shaped dough on a parchment-lined baking sheet, cover with plastic wrap, and place in the freezer for 12 hours to freeze completely. Once completely frozen, remove the dough from the baking sheet, wrap the frozen bread dough tightly in plastic wrap, then in a layer of aluminum foil, and place in a ziploc freezer bag. Freeze the dough for up to 3 months.
When ready to bake, remove the dough from the freezer and allow to thaw in the refrigerator overnight. Remove from the refrigerator and proceed with step #5, getting the oven ready and allowing the bread to do its final rise. It may take a little longer for that second rise since the dough will be cold. Bake as directed.
Freezing Baked Bread
Once the bread has cooled completely, you can decide to freeze it sliced or unsliced. I prefer to freeze my loaves sliced, which makes it easier to remove just a couple of pieces at a time, but you can do either.
If you want to freeze the whole loaf unsliced, simply wrap it tightly in plastic wrap, then place in a ziploc freezer bag for up to 3 months. Thaw in the refrigerator or at room temperature before slicing and serving.
To freeze a sliced loaf, wait until the bread has cooled completely, then slice evenly. Keep the loaf pushed together as well as you can and wrap it in a double layer of plastic wrap, then store and thaw as directed above for the whole loaf.
How to Enjoy This Italian Bread
While you can absolutely use this to make sandwiches, it’s also a wonderful accompaniment to hearty meals with rich sauces and gravies. Serve it alongside these dishes with salted butter for spreading:
- Cheesy Lasagna Bolognese
- Italian Meatballs
- Hearty Beef Stew
- Homestyle Chicken Noodle Soup
- Use it as a base for your own homemade garlic bread
More Bread Recipes
If you love to bake bread, you will thoroughly enjoy these recipes as well:
Watch the Recipe Video Below:
If you make this Italian bread recipe and love it, remember to stop back and give it a 5-star rating – it helps others find the recipe! ❤️️
Italian Bread Recipe
Ingredients
For the Dough
- 2 cups (480 ml) lukewarm water, ~100°F
- 1 package active dry yeast, (2.25 teaspoons)
- 5 cups (600 g) bread flour
- 1 tablespoon light brown sugar
- 2 tablespoons olive oil
- 2½ teaspoons salt
For the Topping (Optional)
- 1 egg white, lightly beaten
- 2 tablespoons sesame seeds
Instructions
- Stir the yeast into ½ cup of the warm water. Let proof as you measure out the dry ingredients.
- Combine 5 cups flour, sugar and salt in the bowl of an electric mixer. Add the yeast mixture, remaining water, and olive oil. Using a dough hook attachment, mix on the lowest speed of electric mixer (stir setting on a KitchenAid) until a dough starts to form, adding more flour as needed, up to an additional ¾ cup. Knead on low speed (2 on a KitchenAid) for 7 minutes. Transfer dough to a lightly floured surface and knead by hand for 1 to 2 minutes, or until a smooth, firm, elastic dough is formed.
- Transfer the dough to a lightly oiled bowl and spray the dough with a thin coating of cooking spray. Wrap the bowl with plastic wrap and set aside to proof in a warm, draft-free place for 1½ hours or until doubled in size.
- Remove the plastic wrap, punch down and flatten the rounded dough with the heel of your hand. Roll the dough up tightly, sealing the seam well after each roll. The dough should be elongated and oval-shaped, with tapered and rounded (not pointed) ends.
- Place a baking stone on the center oven rack and preheat the oven to 425°F. Place a metal baking pan on the lowest rack.
- Place the dough on a baker's peel heavily dusted with flour, or alternately on an inverted baking sheet. Allow the dough to proof, loosely covered with a floured dish towel, for 30 minutes, or until doubled in size.
- If using the topping, brush the dough with the egg white and sprinkle the sesame seeds over the top. Using a razor blade or sharp knife, slash the dough lengthwise about 1/4-inch deep, keeping the blade at a 45-degree angle.
- Just prior to placing the bread in the oven, pour 1 cup of water into the metal pan you placed on the bottom rack of the oven. Then, transfer the loaf from the peel to the stone in the oven.
- Bake the dough until golden brown and a hollow thud is heard when tapping the bottom of the bread (it should register at least 195 degrees F on an instant-read thermometer), about 30 to 40 minutes. Allow the bread to cool on a wire rack before slicing.
Notes
- Bread Flour – I outlined above why I’m a big advocate of bread flour for this particular recipe; you can find it in nearly all grocery stores or can buy it online. If you substitute all-purpose flour, the bread will still turn out, but there will be a definite difference in texture.
- Yeast – This recipe calls for active dry yeast, but you can substitute instant yeast without an issue or any modifications.
- Mixing by Hand – While using a stand mixer with a dough hook makes this easier, you can absolutely use a large mixing bowl and mix and knead entirely by hand.
- Extra Flour – Note that the recipe states you may need to add a little extra flour during the mixing process to get a dough to come together. I find that this varies during different times of the year, as well as what the weather is like. If it’s warmer/more humid, you may need more flour. When it’s colder and drier, I rarely, if ever, need to add more flour.
- Metal Pan – I want to emphasize once more that the pan you place on the bottom rack of the oven to create steam needs to be METAL and not glass. If you don’t already have one, I recommend this one.
- Baking Stone – This is the baking stone that I use, and this is the pizza peel you see pictured above. If you don’t have a baking stone, you can flip a baking sheet upside down, put a sheet of parchment paper on top, and bake the bread on there (you would not need to place the upside-down pan in the oven during preheating).
- Freezing Bread Dough – Once the dough is shaped, it can be placed on a lined baking sheet and placed in the freezer for 12 hours. Wrap tightly in plastic wrap and freeze in a ziploc freezer bag for up to 3 months. Thaw in the refrigerator overnight, then remove and proceed with step #5 of the recipe. The final rise may take longer since the dough has been cold.
- Freezing Baked Bread – Once the bread has been completely cooled, you can wrap a whole sliced or unsliced loaf in a double layer of plastic wrap, place in a ziploc freezer bag, and freeze for up to 3 months. Thaw in the refrigerator or at room temperature.
Did you make this recipe?
Leave a review below, then snap a picture and tag @thebrowneyedbaker on Instagram so I can see it!
[photos by Ari of Well Seasoned]
Recipe originally published in August 2008.


This wonderful recipe makes wonderful, delicious, chewy bread! I am an avid bread baker and this is my favorite bar none. It is easy and quick to make but tastes like something special!
I made this for the first time for a dinner party and everyone raved about it! One even mentioned it was the best bread he’s had in a long time. It’s easy and so, so good!
Easiest recipe comes out amazing every time. I also used it to make the most amazing green onion rolls with garlic and Asiago cheese.
This was my first time making homemade bread. The bread was delicious and had a beautiful crust.
I make bread regularly and this is by far our favorite! It is so delicious, with the yummy, chewy interior and amazing crispy crust! 5 stars!⭐️ ⭐️⭐️⭐️⭐️
Becky McGeorge
Absolutely perfect big loaf of Italian bread. Flavor, texture and size were spot on. I will throw out all my other sub-par recipes. I baked it on a cookie sheet with parchment paper and had no problems. Very simple recipe to make this bread. Having had quite a bit of experience using a peel and baking stone might I suggest not using flour under the loaf on the peel as it will not freely slide. Use cornmeal or better yet just a piece of parchment paper which can just be transferred to the stone by sliding the paper with the loaf on it. No mess, no frustration. Thank you for a perfect recipe.
The bread came out great! Even though I heavily floured the pizza peal, the loaf stuck and wouldn’t easily transfer onto the stone so it was a bit misshaped. The dough might have been too wet as I’m used to making sourdough which is generally a wetter dough. Next time, I’ll shoot for a dryer dough or to refrigerate for a few hours after proofing to make the loaf more solid which should be easier to transfer.
There is no video and I checked on both my computer and on my phone. On my phone, this was almost unusable because of being flooded with ads. At least on my computer, with the aid of ad blockers, I was able to read the recipe.
I don’t have a hand mixer -so can use my hand for mixing ?
Yes, you can absolutely mix and knead by hand!
This bread is amazing I love the recipe it’s easy doesn’t take long to make and it is the best recipe that I’ve used in a long time thank you
Just an added comment. I always sift my flour. I also add my yeast to flour then add liquids, this way I never kill my yeast
Great and easy recipe. Dough was soft and easy to work with. Followed recipe did have to add more flour. Bread baked up chewy on the inside and crunchy on the outside. Will definitely make again. Recipe could make 2 smaller loaves.
This recipe is amazing! I use it all the time for chili and I also make rolls with it too! I divide the dough into 8 equal pieces and let it rise for the 30 mins and cook it the same way 😊
This recipe looks sooo good. I recently bought a bread machine and I would love to make this Italian Bread recipe using the bread maker. Do you have a recipe for it using the bread machine? Thanking you in advance I remain.
Very truly yours,
Mrs Rose Luongo
Hi Rose, I think you would be able to use your bread maker. I’ve never used one, so I would follow its instructions on how to add the ingredients, knead, etc. Let me know how it goes!
This bread is great! I’ve tried a lot of Italian bread recipes, and they are usually good, but none have come close to the Italian bread we get at a pizza place in my husband’s hometown… until now! I did a few extra water spritzes during baking to get a crispier crust but otherwise followed the recipe exactly (no topping version because of my picky kid). My bread did stick a little to the peel so next time I’ll make sure to use more flour or put it on parchment.
Hello,
Table salt or can I use diamond kosher salt? I will add a little more olive oil on the top and bottom before I wrap to rise. Yum!
Thank you.
I baked this bread yesterday and my husband was thrilled about it,he ate half the loaf lol
I have followed this recipe to the letter many times; the bread, rises, looks great, has a wonderful crust but it is dense and BLAND and nowhere near as tasty or texturally light as what I get from a good Italian bakery. What am I doing wrong? Advice?
Absolutely THE very best Italian bread recipe. And, I am an Italian bread snob.
The most beautiful feeling dough!!! Absolutely delicious and very easy to make, fantastic recipe, thanks so much!
I agree, Way too many ads. While the recipe and accompanying information is well thought out and presented, it’s impossible to watch the video. … and the beginning looks informative, but nobody’s jumping through hoops to watch it after the second switchover…PITA. Yup you lost me and I’m sure many more to the overwhelming junkyard of advertising. You need to reconsider your presentation.
Hello Michele ,
I muddled through mountains of you tube videos and came to your brilliant website. Thank you for sharing your delicious recipes and know -how. Your recipes are packed full with useful information and I have learnt so many new terms and methods. Brilliant !
I made your lovely Italian bread and it came out so well…. I have not made a lot of bread but this truly has given me inspiration. Next time that I make it, l will send a photo and review. I also am hoarding loads of your cake and pie recipes and look forward to a journey of scrumptious bliss.
Best regards, Sarah Trigás.
With the 420ml water and a little extra flour the recipe makes exactly 1 liter of dough. This is really nice if you use a rising bucket so you can see exactly when the dough has doubled; high power yeast like SAF red instant will rise quickly, often doubling in 40 minutes. It will keep on rising too, so you could do 2 rises, shape the loaf and let it rise a third time. This will improve the structure and the taste.
As written this is an 80% hydration recipe, plus the oil. This is one of those No Knead recipes, and your dough will be close to flour soup. Typical Italian bread is 65-68% hydration.
A lower hydration level will give you less crumb – the bread word for all the air bubbles inside – but it is much easier to work with. Also, it takes 4 units of flour to offset 1 unit of water. I suggest starting at 70% hydration, 420ml. I did that and just 1/4c extra flour made it firm as a typical soft dough. Firm enough to hand knead, and just a bit sticky.
So don’t just throw the ingredients in blindly, as the weather and your flour will make each dough different.
Need recipe assholes
Where was the video?
Way too many ads on the this page that is very disruptive. Unable to read the recipe without things constantly popping up. Watching the video is impossible. Even if you get it to play after 10 seconds a second ad plays and then the video changes to another recipe, so you only can watch the first bit.
I get trying to make money through ads, but I am happy to support it, but not when it becomes this disruptive. Never seen it this bad before. As someone else commented, plenty of other recipe site out there that are more reasonable with the ads.
Could you use Einkorn flour in this recipe? Thanks!
Just made it.
So much better homemade.
Thank you. Delicious. Cut it down and made garlic bread to finish. Everyone loved it. Before and after making the garlic bread.
Hi Michelle, my first time trying this and it flopped not your receipe, it was my baking mistakes, I gave it a 5 anyway, since it wasn’t your fault. I have never had to add so much flour and it would never tighten up, I added 1 1/2 cups more and the dough was still out of control, it must be the New Orleans humidity, I could never get it to from a ball in the mixer, I took it out and kneaded it by hand adding more flour as I went along. Anyway I will try it again but half the receipe so it will fit on my pizza peal and not overtake it, LOL.
First thing I have tried from you that my lack of bread skills showed up.
Have a great rest of the year and looking forward to making more of your recipes.
Mike
Fabulous
Making this bread right now I just checked in the oven and the bread is huge. Don’t know why it’s so big. I hope it turns out OK.
I loved this bread! It tastes great and it was really fast and easy to make! It’s also double the size of what I’d get at a grocery store. I couldn’t figure out how to shape it the way you did but that didn’t matter cus it was still amazing lol will definitely make this again!
I have been making bread for 35 yrs. All types. Hand mixed and kneaded as well as stand mixer.
This recipe is absolutely the best recipe ever!!! Easy. I used stand mixer…even easier. Comes out perfect every time doing just as recipe says! Crusty outside, just right inside without any big air bubbles. Just FANTASTIC.
Super easy and so delicious! Another family favorite!
So thrilled to hear you enjoyed it!
Can you substitute some semolina flour for bread flour? If so, how much would you recommend?
Hi Richard, You can, as semolina flour has a high protein content like bread flour. I would probably start by substituting ¼ to ⅓ of the bread flour, see how you like that texture, and then go on experimenting from there. I hope that helps, enjoy the bread!
Could you tell me where the video is making the ital. bread? Says to watch below and there is none.
Hi Laura, Hmmm I see the video right below that heading that you mentioned. Do you have anything turned off on your browser that may prohibit you from viewing a video?
I use this recipe every week , I make 8 loaves . I reduced the oven temp to 375. My friends and family insist that our sandwiches are made on ‘MY’ bread. Thanks for the great recipe!
Didn’t quite get the shaping of the loaf but the bread is delicious. Recipe is easy to follow .
Fabulous loaf of bread
Hi looking for a video? way to many ads on your site, littered with them it’s a real turn off. There are way to many other sites that have a more appropriate amount of ads that I can enjoy the site. Going to pass on this mess.
This has been my go-to recipe for a few years now. I am typically a fickle baker and alternate among several recipes for any one item. But not Italian bread after finding this one!
Today I divided the dough into fourths and baked in a baguette pan for 30 minutes. We’re having meatball heroes tonight 😁.
Every BrownEyedBaker recipe I’ve used has been terrific. Thank you for sharing your recipes.
Recipe good, but make sure to NOT PRINT IT OUT. All comments print and I wasted over 100 printed sheets (and that’s double-sided printing).
Mine printed fine, on one double-sided paper, with a couple of edits, and no extra stuff. Did you click for ‘Print’ option?
As a displaced Pittsburgher, I have to say this reminds me of home! It’s like the Mancini’s I grew up on only 100x better! All I need now is some Henry Grasso sausage, some prosciutto genoa from Penn Mac … and I’ll feel like I came home … so easy, so tasty … my new favorite! Thank you!
The best ever after a zillion recipes and shots this is the keeper will make 2 next time going to freeze the leftover for tomorrow. I am from NJ been in SC for almost 2 years and they have nothing that I am used t. so now make Chinese food, Italian I am proficient but never the bread, tastes like an Italian store up North, now if only I could get a pizza bread with is an Italian hot dog Bread anyone from NJ knows this bread also have not perfected, there is a whole website discussing the best breads and that is one if them
This is a great recipe, thank you very much!!! I’ve made a lot of different breads, but I haven’t had a recipe for Italian bread that I was happy with. I just made it today, was going to let the dough sit covered in the fridge overnight to develop more flavor, but then decided I didn’t have the patience to wait. And it still tasted sooo good! I’m sure I will make a biga or refrigerate overnight a different time if I plan it better, but it is great to know that it also can be made the same day and taste wonderful!!
My dough was very wet, so I did add some extra flour, and next time I’ll add a bit more to make it easier to get good surface tension during shaping. I just think getting it good and tight during shaping is so important for dough that is very wet / soft, otherwise it will spread out instead of up. And that was my worry. But after working with it a bit I got it, and it rose up so nicely and was actually quite fluffy in the end. I did use bread flour, King Arthur.
Instead of kneading in the stand mixer and by hand I did two sets of stretch & folds, waiting around a half hour between them. Since my dough was so slack it took quite a bit of folding each time, but I kept working until it started tightening. It still was done in only a minute or so each time, and that was sufficient to get the gluten properly developed. It’s amazing how easy it is to do stretch and folds, and how incredibly well it works if the dough is soft enough for it. The bread was nice and chewy, great consistency.
The crust was also awesome! Like I usually do for crusty breads, they tend to soften a bit during cooling, so after cooling down I stick them back in the oven at whatever temperature for a few minutes to crisp them again. We just love the crispy crusts! And the interior was very soft and creamy. Such a delicious bread! Thank you for posting this recipe!
PS! I can not find the video. Where is it located?
Bread sounds yummy and I look forward to making it BUT I got faked out when I saw the recipe on the website. AT LAST both volume and weight measurements are shown … but when I went to print (save) it I could only get one type of measurement into the file. PLEASE PLEASE provide both measurements in the print version of the recipe.
Can I cut this into smaller pieces ok dough to make rolls for Italian beef sandwiches?
In am going to do this may get 4 rolls out of this batch
This is a great recipe, the bread turned out perfect. Thank you!
Prior to trying this recipe, I was intimidated by working with yeast. This recipe is easy to follow, the dough is a pleasure to work with and the outcome is perfect and delicious.
Thank you, Michelle.
Started making my own organic bread during pandemic. This is an outstanding recipe; we add a little more salt but that’s us.
Question for anyone out there–I’m ordering 00 italian flour to try my hand at New Jersey hard rolls. Has anyone used that flour for this bread? How was it?
I love all your recipes and your tips are always welcome I have loads of cookery books but rarely follow a recipe baking moreso I just love reading other peoples recipes it’s my therapy to do that and then cook or bake!So glad to hear your wee lad is coming along nicely you have such cute children and yes I do enjoy hearing about the life you lead and what you get up to and also your furry members of the familyI live in Cornwall in the UK and it’s always nice I think to hear how other families get in.My children are a lot lot older in fact my son and wife had their second daughter last Saturday the 21st August so time is certainly moving on!!Stay strong and thank you for keeping on with your wonderful recipes Sending love and hugs and keeping all crossed that Dominic continues to improve and stays strong xxxxxxxxxxx
This recipe is perfect! It is now my go to recipe.
Thank you, this bread was the best bread I have ever made, it turned out better than the bakery at Publix. The crust wasn’t too hard and the inside wasa (Italian accent) so soft and moist, it has now become my go to bread recipe. I will admit I purchased a couple of 25# bags of bread flour from my favorite pizza shop. I don’t know how much of a difference that made but I use nothing but bread flour for my bread and 00 semolina flour for my pasta. Thank you again for your contribution. No photo’s, I’m not on Instagram , sorry but it was beautiful.
This recipe was easy to make. As always the recipes are right one and well instructed. The bread was delicious! 👍👍👍
This is a great, easy recipe especially when you don’t want or need a long complicated recipe with a starter etc. We actually prefer not-sourdough type Italian bread. We’ve already eaten a warm nub after baking, had slices with pasta and just made French bread for breakfast with it. Made as directed. We use a steel baking stone, and since I read about the dough sticking a little, I did the 2nd rise on a piece of parchment paper and just slid the whole thing including the parchment (a little awkward due to size) directly onto the peel and from the peel to the steel. Probably baked closer to 40 minutes. Just grabbed a corner of the parchment paper to slide the thing back out when done. This makes a huge single loaf. Posted and tagged on Insta
This bread is my new favorite thanks for the recipe
I’m not the best bread baker, but this bread was so easy and came out amazing!! Crusty on the outside and light and airy in the inside. I made this several times now and this will be my “go to” Italian bread recipe from now on! Try it!! You and your family will not be disappointed!! Love or!! ❤️
While the bread may have been good, the approach was awful.. I had put a lot of flour on the peel… but in trying to get it off onto the stone, it’s rise fell.
I do not recommend the approach as it is very very dependent on how dry your dough is… if it is at all moist, it will absorb the flour and not come off the peel.. I had to throw mine out and start over..
First time making Italian bread and it’s awesome!!
We love this bread. I make it using the upside down baking. I have used both parchment paper and semolina flour on the pan but cannot get the bottom of the bread brown and crispy. Any suggestions?
I’ve just waited till it’s just about done baking and flipped it over. Just keep in mind, if you’ve used the sesame seed, some will fall off. I also make two smaller loaves from this recipe.
Followed these instructions and produced a very good bread. Would ypu believe this was my first time baking bread! Wish I could post pictures of it.
Can I leave it rise then leave it overnight and fridge and bake it next day? Any reccomendations?
Yes you can. I do it all the time
Metric amounts incorrect. Dough definitely needs more structure/ gluten. Will adjust the liquid slightly lower next time.
It does have good flavor.
Your Italian bread is my go-to recipe! I have been experimenting lately with substituting whole wheat flour, flax seed meal, ground oats and coarse wheat bran increasing the whole wheat percentage each time. Every version has been absolutely awesome!
Going to try your cinnamon raisin bagels next! Bagels have always scared me a little but I have been very successful with all of your recipes!
I bake for all my non baker friends and during COVID have established a regular list of folks to experiment on. Everyone loves when a surprise treat gets dropped off.
Thanks so much for your wonderful expertise!
This italian bread recipe is exactly as expected. The recipe is definitely easy and you end up with a large!!! loaf of bread. It is my go to recipe for bread every time I need bread. I keep it in the freezer til I need to make another loaf. It tastes exactly like the day I made it.
Thanks for another great recipe.
If I could give this a 10 rating I would. This bread is so good. y husband eats all his sandwiches with this bread. It is the best. I have made a lot of bread but this is the first time my husband lets me know that the bread is getting low It is time to make more. I freeze it and is stays fresh as when I made it Only a Pittsburghlady could come up with a good recipe for Italian bread. Thanks for this recipe and many others.
This is my “go to” Italian bread recipe – my family loves it. I’ve made it with water, as the recipe calls for, but also with milk when I’m trying to use it up. I’ve made it with active dry yeast and rapid rise yeast at other times and it always comes out perfectly! Yesterday, I used this recipe to make rolls for sausage and pepper sandwiches and they were awesome! I divided the dough into eight large sandwich rolls, but this recipe could easily make ten to twelve smaller rolls. I really recommend this recipe to everyone; from people just learning to bake bread to experienced bakers.
Turned out perfect first time
Great recipe.
Now I would like to make it with whole wheat flour and white flour mixed. Can I follow the same recipe?
Thank you.
What are the weight measurements used? I’m guessing that the standard 120 g of flour per cup is not what you use. That would yield 80% hydrating with the amount of water called for.
I really like this bread and have stopped buying Italian bread at the store. I did not change a thing. It stays fresh in the fridge and it is just the right consistency between Italian bread (bought in Italy) and American bread.
Now I would like to make it with whole wheat flour and white flour mixed. Can I follow the same recipe?
Thank you.
Hi Lynn, I’m so thrilled that you enjoy this bread! I would start with replacing 25% of the flour with whole wheat and go from there.
I’m new to bread making. When you refer to low speed on the stand mixer does that mean the stir setting, or the first speed above stir? Mahalo.
Hi Trudi! Yes, I indicate in the instructions above that the lowest setting is “stir” and then when I mention low, that is number “2”. Enjoy the bread!
Made this early in the week and thought it was great. Later in the week I got a Jones for some rye bread, and didn’t want to wait for a 2 day process, so I used this recipe switching out 1 and 3/4 cups of the bread flour for rye flour and adding a couple of tablespoons of caraway seeds. It was fabulous…perfect for the ruebens we has that night, and just as good for toast the next morning. Going to be a regular in the rotation moving forward.
Delicious, beautiful loaf! Only issue I had was about 10 minutes into baking my baking stone cracked right in half! It didn’t bother the bread as was a clean break so I left it. Wondering if the steam could have had anything to do with it. It’s quite old and has been used a lot. Everything was -preheated and I added the water just after I transferred the loaf. No worries, I will get another and will be making this bread again! We loved it! Another great BEB recipe😋
Perfection! I’m familiar with the steam trick because I’ve made Pan de Agua – a Puerto Rican bread – before. But your recipe is incredibly awesome for a real crusty Italian-style loaf. I don’t have a stand mixer so I did it all by hand, and I don’t have a baking stone so I used the upside down baking pan with parchment paper. Thank you! :)
Serving it with a Tuscan White Bean and Kale Soup.
I meant to give this 5 stars!
This bread is amazing and so easy to make! I make 2 loaves instead of one-easier to manage when there are only 2 people. This bread freezes very well.
First time I’ve ever made Italian bread & it turned out fabulous. I’m not an Instagram person or I’d share the photo of “absolute heaven in a slice.” Now I have to go get a pizza peel because I’ll be making this many more times. Thank you so much for a real heritage recipe.
Hi Michelle,
Do you sift your flour before adding it to bread recipes?
Thanks
Hi Doug, I do not.
This is a fantastic recipe.
Omg, this was THE BEST loaf of bread I’ve ever made! Being a ‘Pittsburgh girl’, I thought I’d take a short cut for dinner tonight & pick up a Tuscan round at our local Enrico’s Biscotti Company. However, tired and not wanting to get immersed in traffic and chaos in The Strip, I decided to make this Italian loaf instead. So glad I did because theirs couldn’t touch yours- will be making this again & again! Thank you so much for this and all of your absolutely delicious recipes!!😘😘
I made the recipe by the hand kneading method and i found that i only had to use 1 3/4 cups of water to bring the dough together plus the olive oil and the other ingredients that you used for the recipe….The electric mixer will handle more water in the mix but if mixing by hand 2 cups of water would be just a little much and the person making the bread will have a tendency to keep adding flour to bring the dough together,,,Anthony Spinelli.
Beautiful and delicious . Crusty on the outside and soft on the inside
I made this bread without the egg whites and sesame seeds on top. It was great!! I don’t have a picture this time around, because there is not much left. 😊 I definitely want to make this recipe again!!
This bread is outstanding. Normally I prefer a slow ferment but there are times when you want a quick loaf! I followed the recipe exactly and the results were fabulous. Thank you Michelle, another winner!
Thank you for the recipe. I have taken the recipe to the next level. After punching down I take a 6” peeled stalk of rosemary chopped, two (2) cloves of elephant garlic rough chopped and kneed before the final 30 minute rise. After cooling I cut and dip in olive oil and spices mixture.
I LOVE this recipe – have tried so many and this is it -can I make sandwich rolls using this same recipe?
Hi Donna, Yes, I don’t see why not!
I made this bread weekly since March! Love it. I make 2 loaves because it’s so big. Is there any part that can be done in advance?
Haven’t made it yeti because you didn’t include oven temp
In directions!!!
Yes she did.
425 degrees
Can you please let me know how many grams of flour to use?
Best Italian bread recipe. I make it in the bread machine on the dough cycle and bake it on a baking stone. Everyone who tastes this bread loves it.
Really good recipe and doesn’t take up the whole day! I was surprised how much dough it created and how large the loaf was. So I had to cut it in half to fit on my pizza stone. It worked out just fine.
Amazing bread! The recipe was perfect as written. Definitely will be my go to recipe for a long while. Thank you!
I like your recipe and want to try it, but would like to use Organic Italian Flour.. 👌
Your regular bread is the only white bread recipe I use ….until now! Omgoodness this bread is fabulous. I’m going to email you a picture, my husband sent it to all of his friends! Thank you for sharing.
Can I use extra virgin olive oil?
Best bread recipe I’ve ever made! It comes out perfect every time! I make it often, slice it up and keep in the freezer. Just wanted to take the time to say thank you for this beautiful bread recipe!
The bread is delicious! My loaf is really big compared to the pictures on the blog. It looks amazing and tastes even better. Soft crumb and chewy crust. I used my Instant Pot to proof (1/2 the recommended time) and that was my only change. I used a trick I learned making pizza, and that is I use a silicon mat for the second rise. I lift the mat with bread onto the baking stone,. I removed the mat from underneath about 10 minutes into baking. No transfer issues.
This is one delicious bread! I added some thyme, garlic and onion to ours the second time I make it for a herbed Italian loaf. I am wondering if there is a way to get a thinner, crispier crust on this though. (similar to the loaves bought at the grocery store) Ours was delicious but thicker than I wanted and a little chewy.
Tried this recipe this afternoon. It worked out wonderfully well first time. Love, love, love it.
Thank you so much.
This is now a family favourite. Fantastic!.
The video seems to have disappeared.
So easy, makes a huge loaf, great texture
Excellent outcome using hand mixing and kneading! Great tips
I made this Italian bread and it is to die for. I love it and so does my husband. I will be making it all the time. The recipe was very easy and I have made Italian bread from another recipe and it was definitely not as good as yours. It didn’t turn out as good as yours.
What type of bread flour? Bleach or unbleach?
Hi Mary, Either one will work!
Omg , I have been trying all different bread recipes this was awesome! The BEST bread ever! This will definitely going to be my go to bread recipe!
Seriously the simplest, most delicious recipe. Thank you so much for sharing it!
I made the recipe today for the first time. Great taste and will definitely make it again. I have to say that mine didn’t look at all like the one in the picture. My crust was crunchy but smooth.
I don’t have a baking stone and used a shallow foil pan, lightly oiled and dusted with flour which is what I’ve used for other recipes. However, I found that in this recipe the bottom of the bread was not crusty and too white; thinking that the pan of water might have contributed to this?
I made 2 loaves and although the dough had a good rise, i found that after shaped and while baking, they spread out more than they rose up. Any idea/suggestions regarding this? (I used King Arthur bread flour and dry active yeast.
I had the exact same experience. Bread was not brown on the bottom and didn’t rise like I thought it would. I also made two loaves.
Super bread
This bread was good!
I did so many times this bread is amazing and delicious. Recommend!
This bread is delicious. I’ve made it several times now. I usually cut it into 2 smaller loaves.
On the second rise, it rises mostly out instead of up. Id there a way to make it rise up more?
I made this and it came out amazing! I did do the egg white wash but didn’t add seeds, and the crust was perfect.
The only thing I would recommend is changing the recipe to say you need a 6 quart stand mixer. I have the artisan one that’s 5 quarts and some of the dough was flopping around above the dough hook because it was too much for it to handle. I ended up having to pull it out and hand knead it so my stand mixer didn’t break.
So the bread came out amazing! Thank you so much.
My question is – if I want the bread to have a finer texture in the middle (more light and fluffy, very very tiny holes, less dense etc.) – what would I need to do? I added flour (quite a lot; probably 1.5 cups instead of 3/4 cups extra when the dough looked like batter after several minutes of kneading) – would omitting the extra flour help to achieve this?
Or is it more about doing a third rise – instead of forming the loaf after the first rise, have it rise in the bowl a second time before forming the loaf and proofing?
Any suggestions would be appreciated!
So very good!
Soooo easy to make and worked at high altitude, 6509ft, too!!!
Dough made a huge loaf here so I am diving it in half for (2) loaves today.
Use the egg wash, without sesame seeds, if you want it crispy on outside or leave it off and it is more like traditional sandwich bread! MY 87 year old Mom, hubby and I all gave this a 5 STAR KEEPER RECIPE!
Love this recipe! Question from a busy mom – could the first rise be overnight in the fridge?
Hi Michelle, if I could give ten stars I would. The taste and crunch of this Italian bread is so good. Everyone in my household is raving about it. I never made bread before and I found your blog. I’m so glad I did because the flavor of the Italian bread is just wonderful. I made a great big loaf and then made pizza crust with the rest of the bread Dough. Both were exceptional. One question however, I had trouble moving the proofed bread onto the heated stone. It didn’t hold the rise, unfortunately. I Don’t have a peel so I inverted a cookie sheet and floured it heavily, but the risen dough didn’t slide off so I had to give it a little help, and well, It deflated. It still tasted amazing.
I have made this twice. It came out fantastic both times! I am 100% Italian and love my bread, so that is a high compliment. This will be my only bread recipe moving forward. Bravo, brown-eyed baker!
PS. I used regular flour.
This recipe has become a staple in our home. My friends (roommates) and I cannot get enough of it. I actually split the recipe into 2 loaves and we use it for good homemade garlic bread. Or ill make the one big loaf for sandwiches. With everything on lower production due to Covid-19. We are seeing a difference in the bread quality from local stores. So i went ahead and started looking for a good day to day recipe. This is Definitely the one I’ve been looking for. Thank you so much!!!! Also once thing I’ve noticed. The quality of the olive oil you use will make a MASSIVE difference in flavor. Ive been using Laconiko Evoo and it works wonders.
The bread came out great. Thank you.
There is no video included even though it says there is
I’ve baked this bread twice! It’s a great recipe and easy to follow instructions. My family loves it! Thank you fir sharing!!
I have made this bread several times now and it is an excellent recipe to try for bakers who are just starting out. I do not use the peel or stone with the pan of water. That being said, it turns out beautifully. I use milk to wash the top and not egg. I also brush butter on the crust after I pull it from the oven which also makes a nice color texture on the crust. Definitely recommend this recipe.
Really liked this recipe. Question: thinking about making two smaller loaves with it. Thoughts?
Hi Mike, Glad you enjoyed it! And yes, two smaller loaves are definitely doable.
Would there be a change in baking time when making two smaller loaves instead of one big loaf?
Beautiful bread. Keeps greasy, two loaves cooked every Sunday, one in the bread bin one in freezer.really easy to make.i prefer fresh yeast as the result is even better than dried. Thank you for your recipe.
I live this recipe. One question when I try and cut the dough prior to cooking oats too gummy, even with a razor sharp knife, any thoughts would be great.
Hi Jimmy, Try a serrated bread knife. I have the best luck with those! Use a quick motion to “slash” and try not to drag the knife through the dough, if that makes sense.
This is my first ever Italian bread. It came out FABULOUS and delicious! Thanks so much for sharing the recipe!!!!
I’m so glad you enjoyed it!
Can you split dough and bake as 2 smaller loafs?
Does baking time change?
Hi Geri, Yes, you can make two smaller loaves, and yes, the bake time will be shorter. Enjoy!
can this recipe be divided in half without impacting the final product?
Hi Laurel, Yes definitely!
This bread turned out amazing! Is it possible to make it in two smaller loaves instead one really large loaf? Would the baking time change?
Hi Karen, Yes you could definitely make two smaller loaves. The baking time would be less.
Beautiful 😍 My family was shocked I could create such a masterpiece without a mixer😅. Thanks for sharing this recipe!
Is there a way to make the dough beforehand and bake the next day. Have time today for all the prep but want the bread tomorrow
Hi Ellen, I have not tried splitting this up, but you MIGHT be able to mix the dough, then pop it in the fridge, take it out tomorrow and let it finish rising, then shape and rise, then bake.
This bread was delicious!!! Just the texture that I’ve been looking for in a homemade bread and with good flavor! The only issue I had was that my loaf was too big for my pizza stone so next time I’ll make 2 loaves out of the recipe and put them side by side on the stone.
Thanks for this recipe! I’ve tried others that needed a starter and whatnot that took forever and yours is by far the EASIEST recipe and makes the most delicious bread. ever. My entire family loves it too and it’s perfect for sandwiches. I didn’t even knead it by hand at all and let my mixer do everything. (Not a KitchenAid)
Hi! I wonder how this bread would turn out if I added raisins to it. I love the texture of this bread and would also like it as a raisin bread. What do you think?
Hi Sarah, I think that would work just fine!
I made this Italian Bread last weekend as my first yeast bread in about 25 years. It turned out beautifully! And delicious. It was a great big loaf and has a wonderful slightly chewy texture, just like a really good bakery loaf. Had a question… you recommend covering with plastic wrap for the 90 minute rise. Any reason for that? I typically would cover with a clean kitchen towel.
I’m thinking about making your ciabatta recipe sometime soon. I love your site, so many great recipes.
Hi Lisa, I usually do plastic wrap over my first rise just to keep the top from drying out and creating a “crust” on the dough. The first rise is typically longer than the second, and for that one I will often use a kitchen towel, too. I hope that helps!
OMG!…made this during quarantine. This was the best bread ever and so easy to make!
I tried making this together in my mixer not a KitchenAid but dough was all sticky almost like a batter. I couldn’t get it together into a ball. What am I doing wrong?
Hi Kathy, Did you try adding a little extra flour to get the dough to come together as it notes in the recipe?
My dough also came out much stickier than your video. I had to add more than 3/4 cup of extra flour just to make it manageable. It still came out great though. I’ll be making it again. Wonder what I did wrong though !
The bread was delicious! Thank you for sharing the recipie. It turned out exactly how it looked in the picture. Very easy to make.
I have made a number of your recipes and all have been great, thank you! I want to try this Italian bread next, but can’t find bread flour right now. I do, however, have some vital wheat gluten on hand. Would it help to add some to the AP flour I have? I’m pretty new to bread baking so still learning about flour protein, gluten, etc. Thank you!
Hi Nancy, I actually haven’t experimented with vital wheat gluten, so I can’t give you a definitive answer on how it would work with this particular recipe. If you try it, please stop back and let us know!
I’ve done this 3 times, and I’ve always gotten a loaf of Italian bread that’s better than what I can buy at my local bakery.
Here’s what I did: I measured out the 5 cups of flour, removed 7.5 teaspoons of it, and replaced it with 7.5 teaspoons of vital wheat gluten. Make sure to give it a good whisk to mix it all together before adding to the wet ingredients!
That is what I did not much malt a few tablespoons
I was thrilled when I made it. It wasn’t hard to make and it was delicious ….. especially when it was warm.
My son just said this was the best bread he’s ever eaten in his entire life! (13years).
The texture and taste was phenomenal! Definitely making this again.
Hi! I have made this fantastic bread five times now. My quest is the first time I made it, the load came out beautifully! It baked high and not wide! Every time after though, it has spread out and not risen high like a loaf. Any advice would be appreciated!!!
Thank you!
I never leave reviews but I made and shared and now all my extended family has made, with the same incredible results. My husband told me to get rid of any other recipe I have. Thanks so much. Made as per recipe. I am in the south, needed a little more flour. My family in Canada needed a little less.
The bread came out just as the picture.very nice.My only comment is that the bread is just to dense for me. I would like it a bit airy. Next time I think I’ll try reg. Flour instead of bread flour.
That may make a difference.otherwis it was easy and made a beautiful loaf.
Can’t find video and if kneading all of it by hand how long should it be kneaded. I don’t have a mixer.
Made it and turned out pretty good. Not sure if I kneaded it enough .
Just kneed for around 6-7 min by hand or when you can play with the dough, and stretch it and it doesn’t spilt too much 😊 Although I have a mixer, to me it’s bread that you’ve made with your hands and a little love. Whilst we have been through some tough and unusual times, this isolation time at home has made us realise what my Nonna did all day every day Back in the day and made bread with much heart and passion. If it ain’t about family, what is it about. 🙏🏻
How do you store cooled bread
This looks delicious and I’m anxious to try it. My question is since we’re stuck at home amid the lock down can all purpose flour be used? Or perhaps a blend of all purpose and cake flour (since those are the two in my pantry)? I’m not normally one for substitutions but I can’t get out to get bread flour and I NEED this bread! =)
I only used all purpose and it turned out just as great :)
Me too. I only used all purpose and even my very persnickety husband was wowed.
Since the Covid stay at home order I have been trying new recipes to feed the family~ lots of bread since our grocery store only has it sporadically. I baked this bread exactly as the recipe was written while I was making a classic bolognese sauce. I wish I could have posted a picture of my huge, beautiful loaf but it was DEVOURED by my family in minutes! One of my boy’s said it was absolute “genius” and the best I had ever made. It didn’t even get a chance to cool…. fantastic recipe from BEB!
I hadn’t made this in years but I live this recipe! I made it this way, with the pan of water but we much preferred the spray bottle method. I cannot remember the timing of that method and it seems to have disappeared since I last made this. Will you refresh my memory please?
This made a massive loaf of bread. We loved it. I’m going to email you a pic be it was so pretty!
So you made a loaf of bread in the middle of eating as opposed to going to the bakery in the middle of eating?
I think she said in the middle of cooking….the sauce😊
This came out great!I added the additional 3/4 cup flour and let rise in my warm oven. Made a very large and delicious loaf!
I made the bread today. One loaf was way too much so I cut into two loafs. I also didn’t have a stone to cook on so I used a flat baking pan. My crust browned but nothing like yours. Also can I freeze the other loaf. It is cooked?
Thanks, RoseAnne
PS. Tastes great
Great recipe and very easy to follow. Can’t wait to taste it!
Would baking this in a loaf pan work?
I know, im wierd ;-)
I think it would be too much dough for one loaf pan, but not quite enough to split it between two unless you make rather small loaves.
I spent hours making this to only have it ruined in the last step. I tried to transfer it before putting in the oven and ruined the whole thing:( It says in step 8 to transfer from peel to stone but in the video I do not see this transfer. My bread could not handle the transfer, looked great before and horrible after. How do you do this? Can you add a video of what this looks like?
Make sure the pizza peel you are using is well floured particularly under the dough. Open the oven and shimmy the dough from the peel onto the hot pizza stone. Because the dough is particularly long I placed the dough on a diagonal across the stone to fit it all without it going over the edge of the stone.
I hope that helps
Steven L
I’ve never had luck with the pizza peel transfer. So I use parchment paper. Form loaf on the parchment (NOT wax paper) on a baking sheet, then just drag the paper onto the pizza stone to bake, then drag off onto pan again when removing from oven. MUCH easier!
Can you tell me what kind of salt you use
Hi Lisa, I use ground Himilayan sea salt from Costco!
Love this recipe, with the altitude I only needed 25 min. cook time.
This recipe came out perfect. Great taste, Great crust. Made exactly as directed. Baked 30 min in oven on parchment and aluminum flat/grill stove topper because I was unsure of turning a baking sheet upside down. This is a good amount of bread and great for large family or sharing, Thank you!
We loved this recipe! It made one huge, impressive loaf of bread. I loved that the crust wasn’t tough, and the bread was the perfect texture. Very easy to make. This will be my go-to Italian bread recipe from now on.
First time making Italian bread and it couldn’t have been easier. It came out great. I proofed it in the same oven I was baking it in so it flattened out a bit as the oven was preheating. I’ll use my second oven to proof next time so I can bake it right away. The crust was nice and the inside was airy and soft.
I would love to see the video so I can know if I did everything right.
This was by far the best and easiest bread I have ever made! I wish I could upload my picture!
This recipe easily makes a very tasty, attractive, and delicious large loaf. For some reason, although the crust browned well and looked crispy, it was actually on the soft side. Not a serious problem but I prefer a crispy crust. I used a lot of steam over the first ten minutes of baking. Maybe that was the problem.
Can I just say that this recipe is absolutely brilliant! I make all my own bread, but have never added olive oil and what a difference it makes! Have made this bread three times and it has turned out so well. It has a nice light, but chewy texture.
Will be making this as often as I can. Thank you Michelle!
Hi. I made it last week, had to split it in two parts, and it came out beautifully. My question is, could I make it all the way to step 4, and then put it in the fridge so I can bake them next morning? I want to make it fresh Saturday morning so I can drop it off at my mom’s.
I’ve made this twice with my 6-year-old grandson as part of our quarantine home-schooling. He loves it and feels so accomplished! We are having the rest for breakfast, as it makes delicious toast.
I made this bread and it is really good. I’ve made a lot of bread and this one is the best!
I have a picture of it and it’s perfect. A little sweet , big fat loaf. I used 5 cups flour and the used about 2/3c. whole wheat flour for the extra to smooth it out.
My husband made this yesterday and it is amazing! All done by hand with regular flour as all we have at home(stay home, stay safe). It was picture perfect and tastes as good as it looks!
I think it is the most easiest bread receipt I have ever made, and delicious.
No video!
I made it with a 6-year-old, and it was amazing!
Long time reader, first time poster. All of your recipes are great. I make often make bread but am going a little overkill during the Covid outbreak … so I tried your Italian Bread recipe and it’s awesome. Beautiful crumb and texture. Thank you for the recipe!
I love this recipe. This is the first time I have made Italian bread on my journey of bread baking. The only thing I did different was it was done in 30 minutes. I’m not sure if the high altitude has anything to do with it but it was so easy. I also will use just a baking pan instead of my stone because after transferring my loaf to bake, the stone was too small and had to transfer back to the pan. Fortunately the extra transferring didn’t interfere with the rise. Other than that it was easy peasy. Thank you!!
Horrible loaf of bread. Followed recipe to a T. Internal temp 190 degrees on instant read. Used bread flour Tasted nothing but yeast and weighed a ton. Very discouraging.
Hi Carolyn, I’m sorry you had a bad experience with the bread. Please do note, though, that the recipe indicates baking it to an internal temperature of at least 195 degrees. If taken out too early, the bread will definitely be denser.
Where is the video? I can’t seem to find it.
Fantastic recipe. Huge loaf of Italian bread, who couldn’t love that. Enjoyed making and really enjoy eating. Bread as bread or toast.
Thank you!
I make a LOT of bread and rolls…this recipe is excellent! Super easy to put together. I found it easiest to shape the bread on parchment paper on top of a sheet pan turned upside down. I simply slide the parchment from the pan to the baking stone. When removing it from the oven, I again slide the parchment off the baking stone right into my cooling rack. The bread looks like the perfect loaf of crusty Italian bread. The inside has an excellent chew but is soft. I like using the brown sugar rather than granulated sugar. Really, really great recipe!
This bread was the perfect project for a cold rainy day. The bread turned out perfectly even though it looked a little more crescent shape since it stuck to the bread peel as I was transferring it to the baking stone. The proof is in the eating and it was great. Thank you for sharing.
This is a great recipe, I have made it twice now, first time I did one one loaf….it was huge , second time I did two loaves, both times it was a challenge transferring the loaves to the baking stone. Any suggestion ?
Hi Kathy, Just be sure the peel is well floured. You could also try a little semolina flour or cornmeal underneath.
Thanks for getting back to me Michelle! I actually made this recipe for the third time over the weekend…….I did six hoagie rolls and used your recipe for Philly cheese steak subs…..they were awesome! Probably my favourite bread recipe. I have made several of your recipes with great results. I love your blog, your family is beautiful and of course your goldens are pretty special too!
…made this loaf yesterday. I only did a half recipe for the two of us and I used my bread machine to do the mixing and kneading. Then I baked it on my pizza stone with the metal pan of water underneath. It made a lovely loaf of bread and it is a definite keeper recipe.
Hi Linda, I’m so glad you enjoyed it!
Thank you for posting this recipe! I am going to try making it tomorrow. Silly as it sounds, it’s my husbands birthday and he is a sucker for a good loaf of Italian bread. I am going to surprise him with this recipe. Let’s hope I don’t mess it up :). I love your blog and your recipes! Thank you!
A few people have been referring to a spray bottle. Am I missing this part of the recipe? I made this loaf and it turned out great but didn’t darken as much as the bread in the photo. Should I have misted it with water?
Hi Julie, An older version of the recipe had you mist the dough with a spray bottle in 3 minute intervals for the beginning part of the baking process, but I simplified it by pouring water into the pan on the bottom of the oven; a little more hands off :)
You have no idea how much I appreciate that you put the water temp for the yeast as part of your recipe. I can’t wait to try this; I love Italian bread.
I’m a novice bread baker, so I need more detailed instructions on how to use the pizza peel and baking stone. How do you get the loaf from the peel to the stone? And do you make a slit in the top of the load with a knife before you bake it? Thanks!
Have you ever tried substituting half the bread flour with Semolina?
I substituted about 20% whole wheat and it came out great.
Well, yes, this IS an enormous loaf ! I divided the dough into 2 loaves so it would fit on my stone. It came out looking beautiful. My sister took both to a dinner party & it got raves. Didn’t alter the recipe at all (BTW, I live at 6,000 ft). Thank you for sharing your recipe. Will make it again so I can try it too!
You’re right; this is one massive loaf. It reminded me of the “I Love Lucy” episode where Lucy and Ethel add a few too many cakes of yeast to their bread dough and the resulting behemoth bursts out of the oven pinning Lucy against her kitchen counter.
Thanks to my new KitchenAid mixer and my Brod & Taylor proofing box, the dough came together nicely and rose like a dream. I added the egg wash and sesame seeds and darn if the taste and texture of this bread don’t remind me of the Italian bakery products I remember quite fondly as a kid. It even freezes better than I thought possible.
I will definitely be making this again. Thank you for this wonderful recipe!
I followed the recipe exactly, almost, don’t have a spray bottle, so put a pan in the bottom of the oven and poured water in just before butting bread in. Also, didn’t do egg wash and sesame seeds. Beautiful crust, tender loaf. LOVED it. Family ate it before I could get a picture.
I have this loaf in the oven now, fourth time I’ve made it. I’ve baked about six or seven different bread recipes, this one is the most foolproof, right down the middle excellent bread, slightly tight crumb, perfect for toast, sandwiches, bruchetta, midnight snacking and general breadfulness
I accidentjy set the temp..to 450 and baked for 30-35 minutes. Turned out great.Thanks for the recipe,loved it.
Why does my bread deflate after the 2nd rising just before I put it in the oven?
Thanks;
Heidi
Hi Heidi, Are you letting it raise for too long? If that happens, it will start to collapse on itself and deflate.
Here are a couple of pictures of the finished product. I split the dough in half once to yield two smaller loaves instead of one huge one
This has been my go to recipe for bread , it has always turned out great, does make a huge loaf but that’s good because it usually doesn’t last long.
Thank You, I’ve made this recipe several times now without fail and many friends have enjoyed it. It’s delicious especially if allowed to cool for a few hours. I also put a pan of water under the rack of bread. I’m going to try your anadama bread recipe next to go with my Boston baked beans.
Ciao!
I don’t see a degree to cook anywhere? Help!
it should register at least 195 degrees F .
I tried making this today and the dough was very stiff and crumbly after kneading it. It wouldn’t even come together into a nice ball. Should I have used less flour and added more as needed? I followed everything to a tee, what could have happened?
not sure about the baking time, as i left mine in for only 25 min and any longer it would have been way overdone. I have a gas stove, not sure if that made a difference.
I just ordered a French bread pan that hold two loaves and I intend to try it out using your Italian Bread recipe, since it is a very large loaf. I am relatively new to bread baking and was wondering, when putting dough on a stone to bake, should I line the stone with parchment paper? (I do not have a peel.) Thank you.
Hi Jan, As long as you have a large spatula or something else that you can move the loaves with, you don’t need parchment. If you don’t have a way to move the loaves, however parchment will probably make it easier.
This bread was great! So easy to make, dense, and the crust was incredible. I, uh, made the mistake of just chucking the water into my oven due to speed-reading the directions. My husband was mad but didn’t remain so after tasting this delicious bread! Next time around I’ll put a pan in. :D
I was all set to try this but you lost ne at the stone and tile oven stuff
hi could you convert the recipe into grams or ounces please. cant wait to try it
Hi chef,
I never make bread before, want to try this recipe.
Just wondering “1 package active dry yeast” is how many grams or tablespoon?
can not figure out how much us a package
Thanks so much for your reply so that I can try it this weekend.
Best regards,
Jenny Nguyen
Hi Jenny, 1 package is 2.25 teaspoons.
Hi Chef,
Appreciate your kind feedback.
Have tried the recipe for the first time in my life :), the bread outside was very crunchy when it was just brought out of the oven, when it cools down in some hours later, it became so hard and thick. What should I do to make it softer but still crunchy, not become so hard later on.
Millions thanks to you!
Best regards,
Jenny
Hi Jenny, If you prefer a less crisp crust, don’t spray the loaf after it goes into the oven – that facilitates the hard crust.
I’ve never made bread before, but have been wanting to try and replicate one I grew up eating. Stumbled on to this site while looking for a recipe that only needed 1 pack of yeast, as that’s all I had. I must say it turned out well for a first attempt. The interior was dense, like you said, and that’s one thing I need to copy. Next time, I won’t do the the water spraying- made the crust too crunchy-thick. Also, I will need to play with cooking times/temps, as the crust was way too brown, so I lowered the heat to 375°because there was still 30 minutes of cook time left. Even so, I took it out with 8 minutes remaining as it had the proper bread ‘sound’. All in all, this recipe was easy to follow, very good instructions, the extra hint info was a nice reference. I’m also glad that you had a good photo of the interior of the bread- that actually sold me on trying it.
I made this yesterday and it was delicious! Nice and crusty on the outside and soft inside. I mixed and kneaded all by hand as I do not, currently, have a kitchenaid. It was a very easy dough to work with and is very soothing to do by hand. We had it with the lasagna I made as well. Thanks for the yummy recipe!
I’ve made your Italian loaf 3Xs these past cpl weeks. Awesome!!! Thank you. We’ve been experimenting and substitute bout 1 /2 cups whole wheat flour. SOOOO YUMMY. Tonights vsion has added rosemary. Thank you so much for this great bread. The crust is so crunchy and the inside is just perfect. Gave such great inspiration for a beginner breadmaker.
How do you make the crust softer, mine came out hard as a rock the insides was still soft and lovely. I like my crust crisp just not that hard ps I used the roasting pan with boiling water instead of a spray bottle
Hi Victoria, For a softer crust, eliminate the spray bottle (or roasting pan with boiling water, in your case).
Great flavor and a beautiful loaf. I divided the dough in two and baked them at the same time.
My only issue was that the top & bottom weren’t crusty enough.
I’m going to try a slightly dryer dough today & cooling them in the oven with the door propped open.
I couldn’t find the video either.
Can I use this recipe, but shape the dough into bread bowls?
Thank you in advance for your response.
Hi Virginia, I have never tried to do that with this recipe, so I’m not sure how it would work out. If you try it, please let me know!
What else can be done to achieve th super crunchy crust other than spraying it with water? Say you don’t happen to have a spray bottle
Hi Jessica, You can place a roasting pan on the bottom rack of the oven and fill it with boiling water right before you place the bread in. Be sure to use a metal roasting pan and not glass – I’ve shattered a glass pan doing that once!
When you say “kitchenaid” are you referring to the artesian mixer or the 575 watt pro 600? I bought this beast so I don’t have to knead by hand!
Hi Jeff, I was referring to any KitchenAid stand mixer.
Great recipe! Made the bread today and it was a huge success! Thank you =)
What do the sesame seeds add to this recipe? Usually, I like my bread seedless but in the picture it looks like there are no seeds. Also, if I choose to leave out the seeds does that mean I can nix the egg whites, too?
These questions might be a little dumb, but I’m pretty new to baking.
Hi Meghan, Some folks like sesame seeds on the crust of their Italian bread. It’s an optional step, and yes you can omit the egg whites, too, unless you prefer a more glossy, golden crust.
Just made this to go with my baked shrimp for dinner. Great recipe! Easy to follow. Perfect the way written, especially if you follow the hints or (****). Great dipper bread consistensy. Instead of spraying the bread with wate, I put my cast iron grill in the oven on the bottom rack and used a turkey baster to splash water on that every 3 minutes as instructed. You won’t be sorry you made this bread. Thank you!
So I just made this today and it was my first attempt at making bread. I really don’t know the differences in flours and I didn’t have bread flour. I used 4 cups all purpose and 1 cup wheat. What are your thoughts on different types of flour. I also cooked mine on a Traeger pellet smoker. (I do a fair amount of bbq.) it came out really good. It finished like two hours ago and it’s mostly gone already. It his was my first attempt at branching out into baked goods on my smoker and it was a success.
will a normal home oven (lined with metal) work for this recipe?
Yes, I make this in a regular, residential oven.
thank you!
I made two loaves of this bread yesterday, and it came out SO GOOD! The only thing is that my oven read 425 dead on with an oven thermometer, but the bread was a bit too brown at 39 minutes, so I didn’t bake it for 45. Once it came out of the oven, I let it sit for 15 minutes before I cut into it, and it was cooked perfectly inside. I baked my bread on an inverted cookie sheet, so I don’t know if that perhaps bakes a bit differently than a baking tile. the crust was really dark brown but for the most part not so brown that we couldn’t eat the crust. & the sesame seeds were perfect too. eating the bread was an experience of a perfect match between my idea of bread and the yeasty goodness I was wolfing slathered with butter.
i am baking two more loaves today, and they rose differently than yesterday, even though I think I did everything the same. It took longer to rise today for some reason, and also in the second rise the bread rose outwards rather than upwards!
This recipe is wonderful and it looks beautiful!! Not to mention it tastes amazing. My husband said we no longer have to buy bread downtown any more!! Thank you so much. I just started a blog on baking, please check it out and let me know what you think. http://www.apinchofluv.com Thanks again !!
I am new to the bread baking world and I just made this during a Nor’easter here and it came out so wonderful. It is a very dense dough, so I am glad the comment was there.
Bread turned out amazing. Wad really good made into garlic cheese bread w/ a bulb of roared garlic in the bread too
When did you incorporate the roasted garlic n the dough?
This bread is absolutely delicious. I was looking for something close to what my store sells. This is close to it, maybe even better. I’ll definitely be making this bread again. It’s not crispy, but next time I would like it to be. Definitely recommended.
A ver dense dough, indeed! The inexplicable has happened. It actually broke the hook off my dough hook for my KA!! Amazing. I hope this bread is amazing. I’ll keep you posted.
Ack! A verY dense dough.
Pulled it out to prep for the second rise and it looked incredibly happy. Can’t wait for the lovely aroma from the oven. Soon!
Amazing. Thank you so much for sharing this recipe! It will definitely be a keeper for me! I will be replacing the standard KA dough hook with one that’s made from stainless steel.
I’d like to try this recipe soon. I recently tried your white bread recipe and it turned out great! Hoping the same with the Italian loaf. One question though. I dont have a baking stone. Can I use just the inverted baking sheet or do I need to get a stone? Thanks and keep up the delicious work.
Hi Blake, I think a stone is the best for these types of bread, but you’ll still get a good loaf using an inverted baking sheet with parchment paper.
Made this Bread Saturday night it’s Moday and it’s gone (just me and my wife) it was great. crisp crunch outside soft dense inside. Just a grat recipie. Fairly simple and not all that time consuming. Will make over and over again.
This recipe is great. Really impressed my girlfriend with this one, and its easy to make!
I’m going to be working with fresh yeast to make this bread. Can you tell me the conversion? I’m looking forward to trying this out.
Hi Monika, I have some yeast conversions here: https://www.browneyedbaker.com/conversions/
The yeast is doing it’s “thing” as I type this. I will keep you updated….
What type of flour do you use for the Italian bread?
Matt, As stated in the recipe above, bread flour.
Yeah, get with the program, Matt # 2
I loved the bread, very tasty and it looked just as good as yours. Great for bruschetta or with pesto! Now my bread was a bit dry, any advise to make it a bit more moist?
Hi Jorge, I’m glad you enjoyed the bread! I’m wondering if the bread was overbaked a bit if you found it to be dry?
This was my first time baking bread from scratch. My loaf looked just like yours. I used regular unbleached flour and it still came out very well. The measurements, baking time and temp are perfect. I sprayed my crust 4X but I would of liked it if my crust came out a little thicker and crunchier. Will spraying a few more times do the trick? It was relaxing and fun kneading the dough and smelling fresh yeast. Now I can’t wait to try your other bread recipes :)
Hi Debbie, So glad you liked the bread! More steam should produce a crisper crust. You could also put a roasting ban with boiling water on the bottom rack when you put the bread into the oven.
This bread was amazing, and I was surprised at how easy it was to make! I found that it only too 30 minutes to bake, though. I posted about it on my blog and would love if you’d take a look: http://piesandplots.net/italian-bread/ Thanks!
Such a great recipe!!!
Just made 2 loaves this afternoon in our 300 room hotel. Fantastic recipe,great crust & texture,easy to train my staff on how to prepare.
Just a comment but i reduced the temperature from 220c to 190 after the third steam injection but we use professional sized baking ovens.
Thank you for sharing this great recipe! I was shocked that I could produce a bread that turned out so well. Great directions! This will be my go to Italian bread recipe.
Very easy to make. The result was splendid and it really had a taste of Italy. Great recipe. Thank you for sharing.
This was my first attempt at bread-making and it turned out beautifully! Thanks for the clear directions and great tips. If I decided to make two smaller loaves, do you think I could freeze half the dough after the first rise? I’ve done that with pizza dough, but I’m not sure the same rules apply here. Thanks!
Hi Annie, I’ve never done that actually. Usually with bread, I will bake the full recipe and then freeze a loaf once it has been baked and cooled. Then I just let it sit at room temperature to thaw when I’m ready to use it.
yes, you can freeze bread dough. Shape it, wrap in plastic wrap and they in foil. Freeze it. Before you use it, take it out the night before and let it rise as normal. It will take several hours to thaw and then rise. Bake as usual.
Hope this helps
Hi Beth,
Yes, you could certainly divide this into loaves. Just be sure to adjust the baking time, as two smaller loaves won’t take as long to bake. The crisp outer crust is created by spraying the crust with water, as indicated in the recipe. Enjoy the bread!
Hi, do you think this could be devided for two small loaves? Usually, bread dough can be shaped however one wants, but I just wanted your opinion on this please. BTW, hopemine looks this good. How do you get the crust such a pleasing brown without drying out the inside?
ROLA — So sorry to ruin your diet, but glad that you enjoyed the bread! :) My bread was definitely dense, so I think your rise time was probably just fine.
I came upon your recipe on my second day of a diet….needless to say, the diet was forgotten and the bread won….My kids woke up to the smell of it and really enjoyed it before school. My question is: is it supposed to be on the dense side or I did not let it rise enough?
Thanks
I tried out this recipe and it turned out gorgeously! I’m going to have to make it again soon because it disappeared so quickly. Also, I tried your tip and left my spray bottle on the counter, using the roaster with water in it worked very well. I might have to try that method with another bread recipe.
Cheers!
I just made this the other night and it turned out fantastic! Thanks for sharing the recipe. Your loaf looks wonderful with its perfect slash!
Hi Lori – I’m so glad that you enjoyed the spaghetti and meatballs! I have only ever frozen cooked meatballs, but I don’t see any reason why you couldn’t freeze them raw! If you try it let me know how it turns out!
Your bread does look amazing, and I plan on making it soon! But I’m actually posting here because I made your Spaghetti & Meatballs tonight and OH MY….that was so incredibly good. My husband and I greatly enjoyed them and will be making it again with fresh Italian Bread!
One question though, have you ever tried freezing the raw meatballs? I just thought that may be an easy way to be able to throw this together, even though it really didn’t take that long anyway. Thanks so much for the recipe!
I have a fear of yeast but I think this might have to be the first bread recipe I try. It looks fantastic!
OMG
I CANNOT wait to eat like 10 sandwiches Thursday night when you come home with this deliciousness!! I’m going to stop at the Italian store and get the good stuff to go on it as well :)
ooh loving the new site!
The bread looks so good! I will definitly have to try this one I think, I haven’t had a nice slice of homemade bread in aages! mmmmm
Hi Heather – By inverting the baking sheet, I mean just turning it over. My largest pan has a lip the whole way around, so I flip it over so there is nothing preventing air from reaching the bread. I usually do this for free form loaves that are too big for my stone.
that loaf has an absolutely GORGEOUS color to it! I love making bread on weekends, too… and I also have a Nick that is just a sucker for a warm loaf of bread :) What do you mean by inverted pan? I’ve always just shaped mine and made them on parchment paper… is there a better way I don’t know about??
You have to be the queen of bread! this is awesome!! I’m bookmarking this one to!
Yum. Your bread looks fabulous. I’ve made a couple of Italian bread recipes in the past month, but still haven’t found time to blog about either of them… *sigh*
I love carbs. I love bread. I love ginormous portions of it.
I meant to give this five stars!!
I totally am going to bookmark this recipe, my last Italian bread was a failure.