
Adapted from my favorite pizza crust, this homemade flatbread pizza bakes up into a thin and chewy base for your favorite flatbread toppings. Quicker, easier, and thinner than pizza, this flatbread dough takes about 1 hour start to finish and is perfect for beginners. I always love adding garlic and Italian seasonings for extra flavor!
If you’ve ever wanted to try making restaurant-style thin crust flatbreads, I have the perfect starting point for you. This is my EASY homemade flatbread dough, and the starting point for recipes like zucchini & herbed ricotta flatbread and cold veggie pizza. Have you tried it yet?
Here’s why you must…
Make This Flatbread Pizza Because:
- You don’t need many ingredients
- It’s quicker than homemade pizza
- The dough yields 2 flatbreads
- 1 full recipe is perfect for 2-4 people
- It’s easier to shape than regular pizza dough
- You can eat it plain or with toppings
In other words, it’s the easier, quicker, and more convenient version of pizza dough.

What’s the Difference Between Flatbread Pizza and Regular Pizza?
Flatbread can be made with or without yeast. My version requires yeast for the smallest bit of rise, similar to a thin crust pizza. If you want a no-yeast flatbread, I recommend searching for another recipe that’s modified without its addition. (Don’t simply leave the yeast out of this one!)
My regular pizza dough bakes into a thick, chewy, and soft-centered bed for your favorite toppings. It’s a deeply loved recipe on this website and the only pizza dough recipe I use. Flatbread pizza is just that—flatter pizza. Since it’s flatter, it doesn’t require as much yeast or rise time and is perfectly manageable if you’ve never made homemade bread before.
This flatbread is similar to my focaccia, another simple homemade bread recipe.
*PS: Don’t forget about Chicago-style deep dish pizza when weighing your different pizza options!
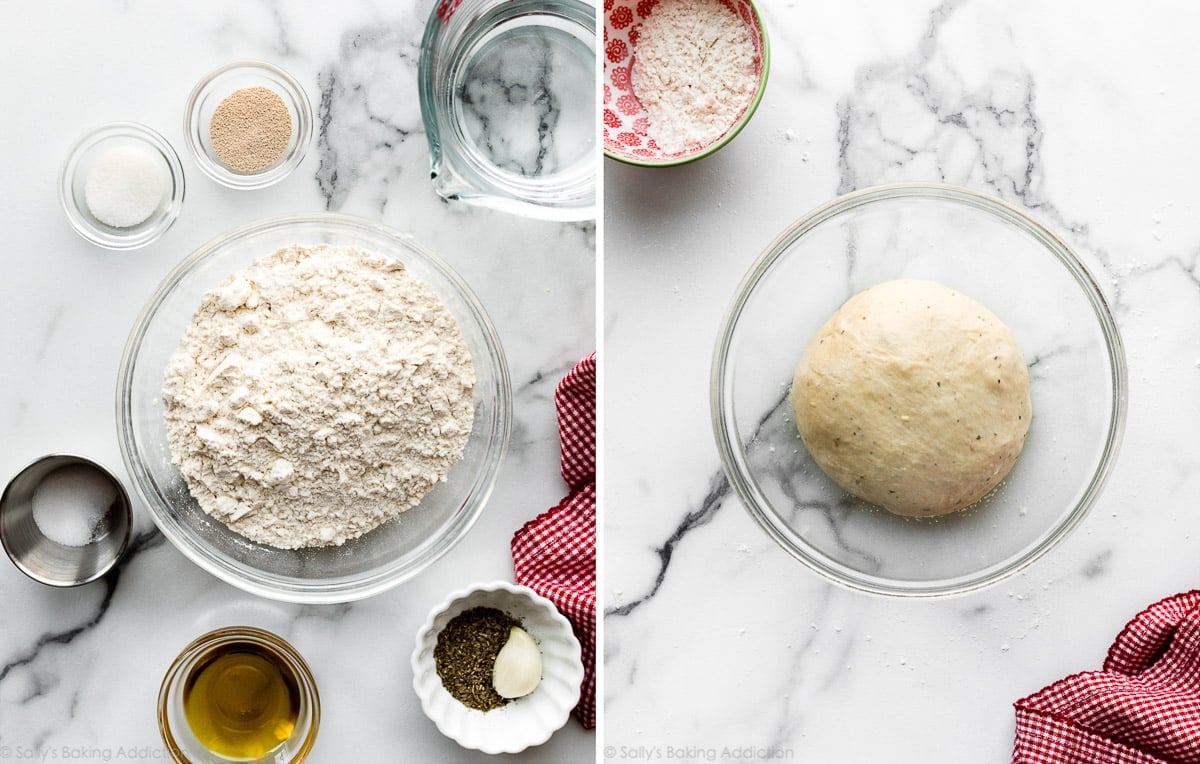
6 Ingredient Yeast Flatbread Pizza Dough
- Yeast: You can use instant or active-dry yeast with zero changes. If you’re new to working with yeast, I recommend reviewing my Baking with Yeast guide. I used to make flatbread with 1 and 1/2 teaspoons of yeast, but recently reduced it down to 1 teaspoon. This is plenty for a thin flatbread crust. Note that 1 teaspoon is less than 1 standard packet.
- Sugar: Granulated sugar feeds the yeast. You only need 1 teaspoon.
- Water: Flatbread and pizza dough are lean doughs, meaning there isn’t a lot of fat present. While I make rich overnight cinnamon rolls and glazed doughnuts dough with milk, we don’t need that extra fat here. We’re aiming for chewy and crisp, not voluptuous and soft.
- Flour: You can use bread flour or all-purpose flour. Bread flour leaves a slightly chewier texture, but the difference is barely noticeable since the crust is so thin.
- Olive Oil: Adds flavor. We’ll also brush the dough with olive oil before baking, too.
- Salt: Adds flavor.
Optional Additions: You can also add some flair to this dough with a little garlic and/or Italian seasoning like we often do when making homemade breadsticks. Or add chopped fresh herbs or freshly ground pepper, too.
Overview: How to Make Flatbread Pizza Dough
- Mix the dough ingredients together by hand or use a stand mixer.
- Knead by hand or beat the dough with your mixer. Reference my How to Knead Dough video tutorial if you need extra help with this step.
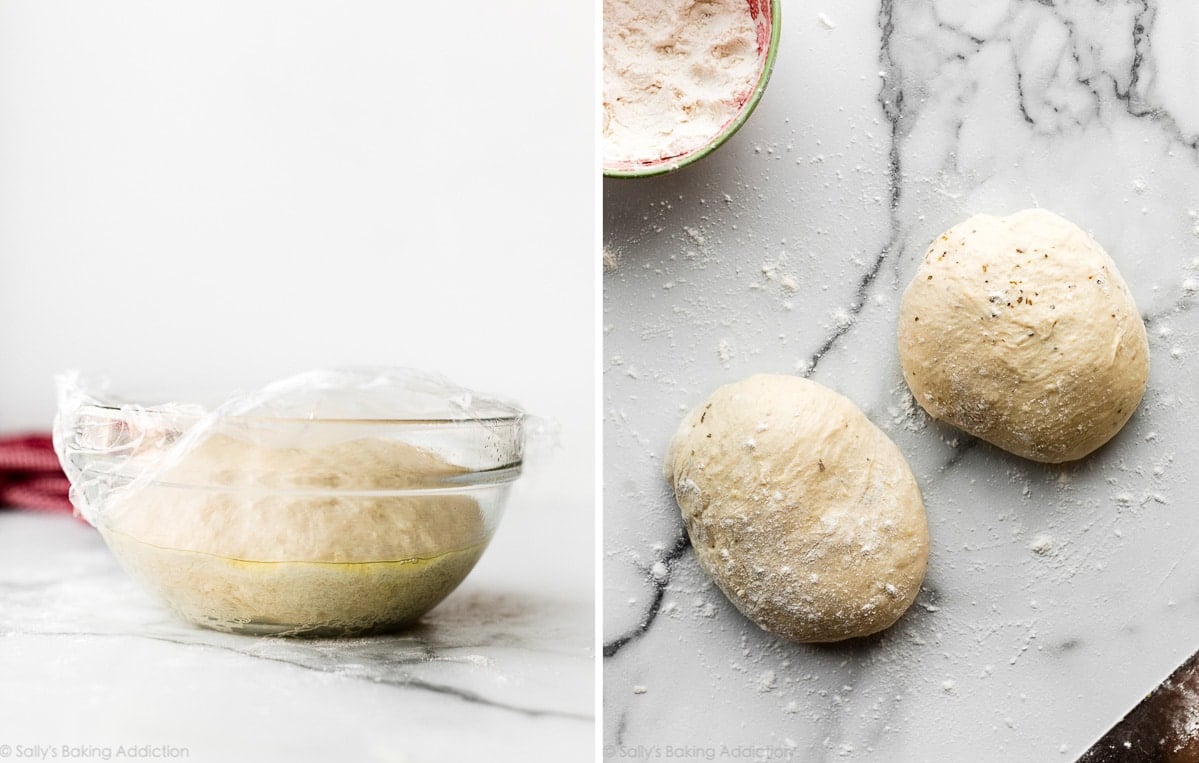
- Place dough into a greased mixing bowl, cover tightly, and let it rise for 45 minutes.
- Punch down the slightly risen dough to release air bubbles. Divide in half.
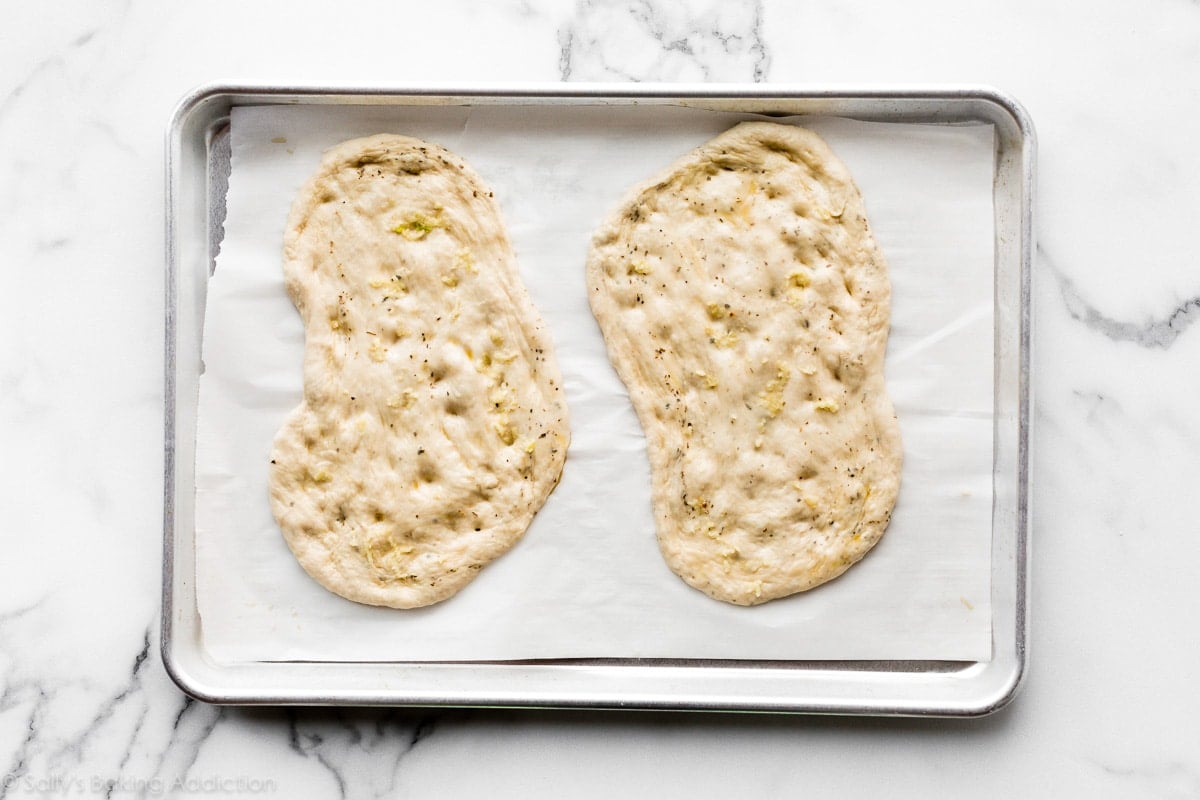
- Flatten the two doughs with your hands or with a rolling pin. The flatbreads can be any shape you want as long as they’re about 1/4-inch thick. (Very thin!) Dimple with your fingers or with a fork. Brush with olive oil, which helps protect the crust from any sogginess lingering from the toppings.
- Top with favorite flatbread toppings.
- Bake at a very high temperature for only about 15 minutes or until lightly browned.
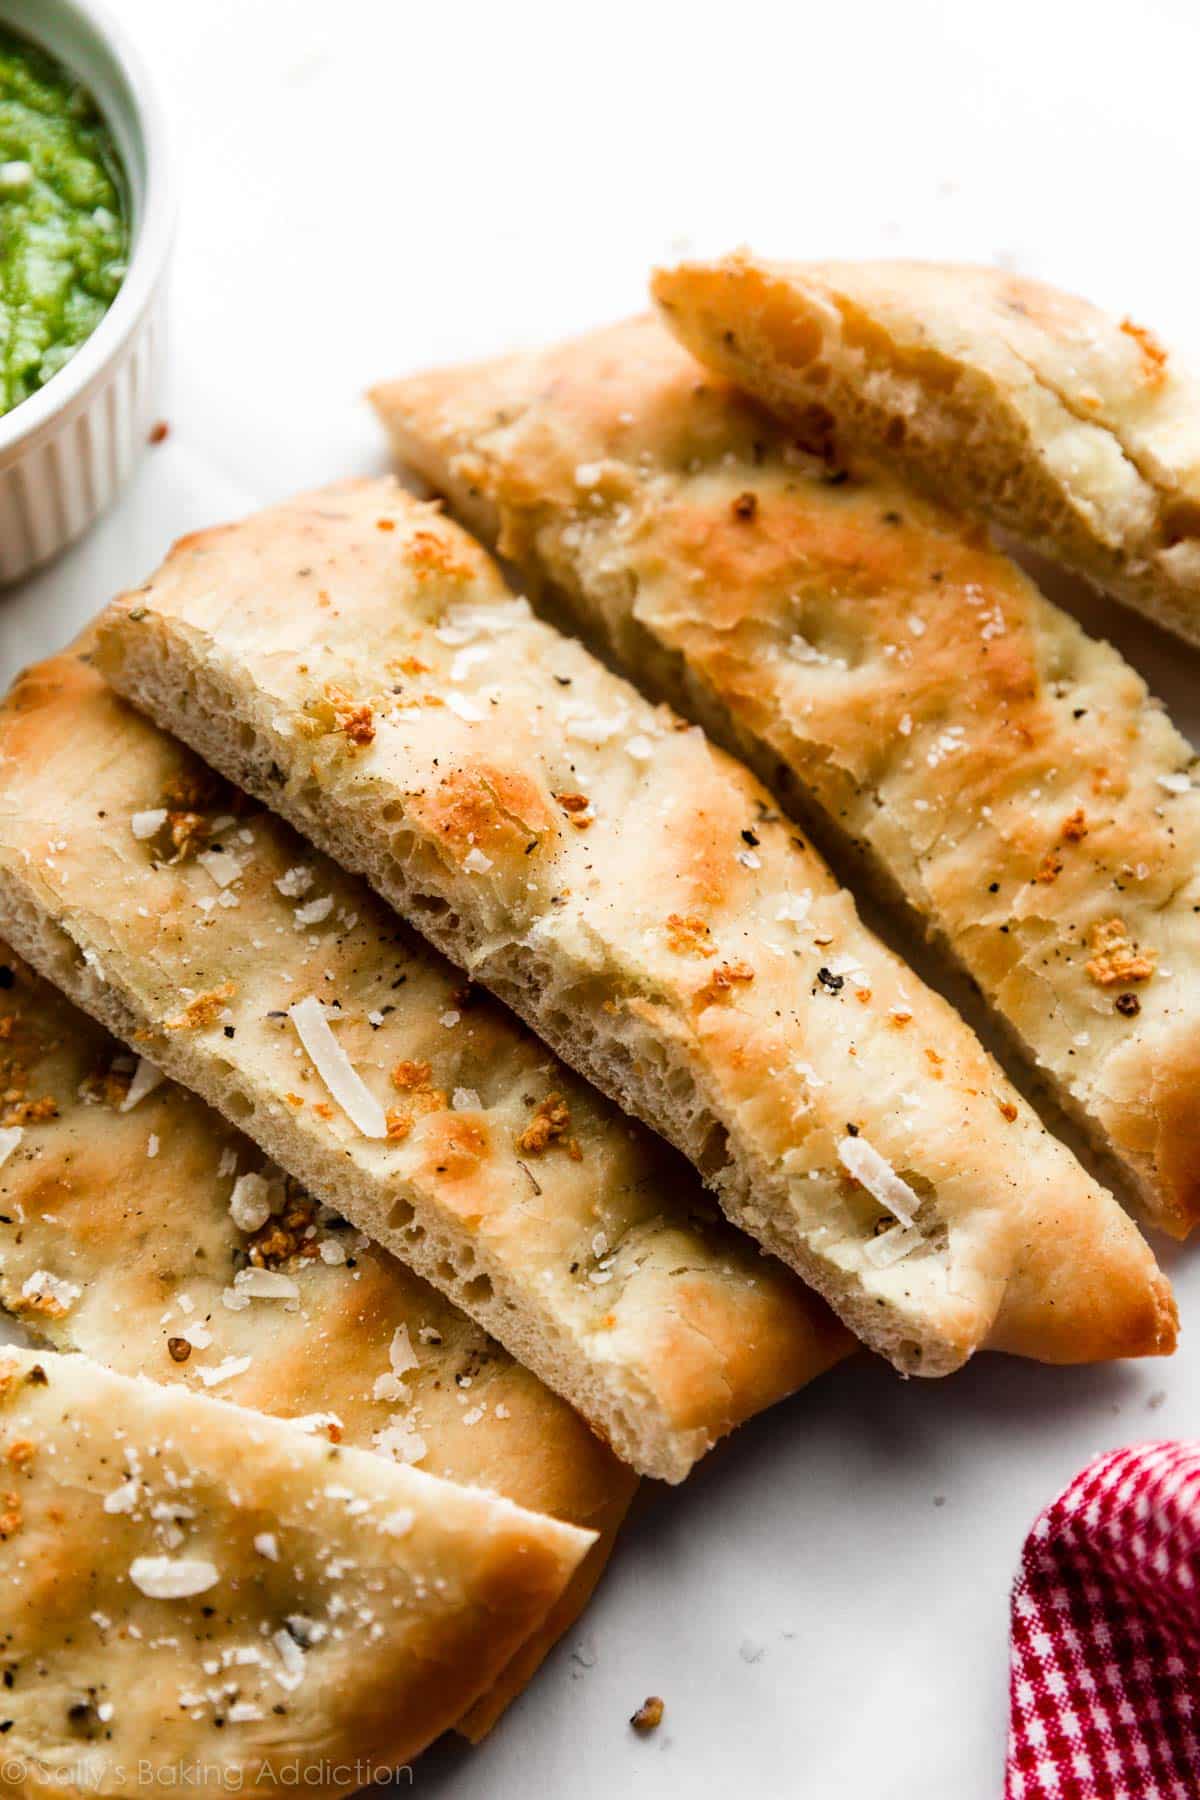
You Can Enjoy it Plain
If desired, you can skip the toppings and leave the flatbread plain. In the next two pictures, I topped the doughs with fresh garlic, sea salt, and freshly ground pepper. After baking, I sprinkled with fresh parmesan cheese. Freshly baked plain flatbread feels like a total treat when served with marinara sauce, hummus, homemade pesto, or even mashed avocado and fried eggs (for an avocado toast variation!).
Flatbread Pizza Toppings
Or you can get creative with various toppings. Add these before baking.
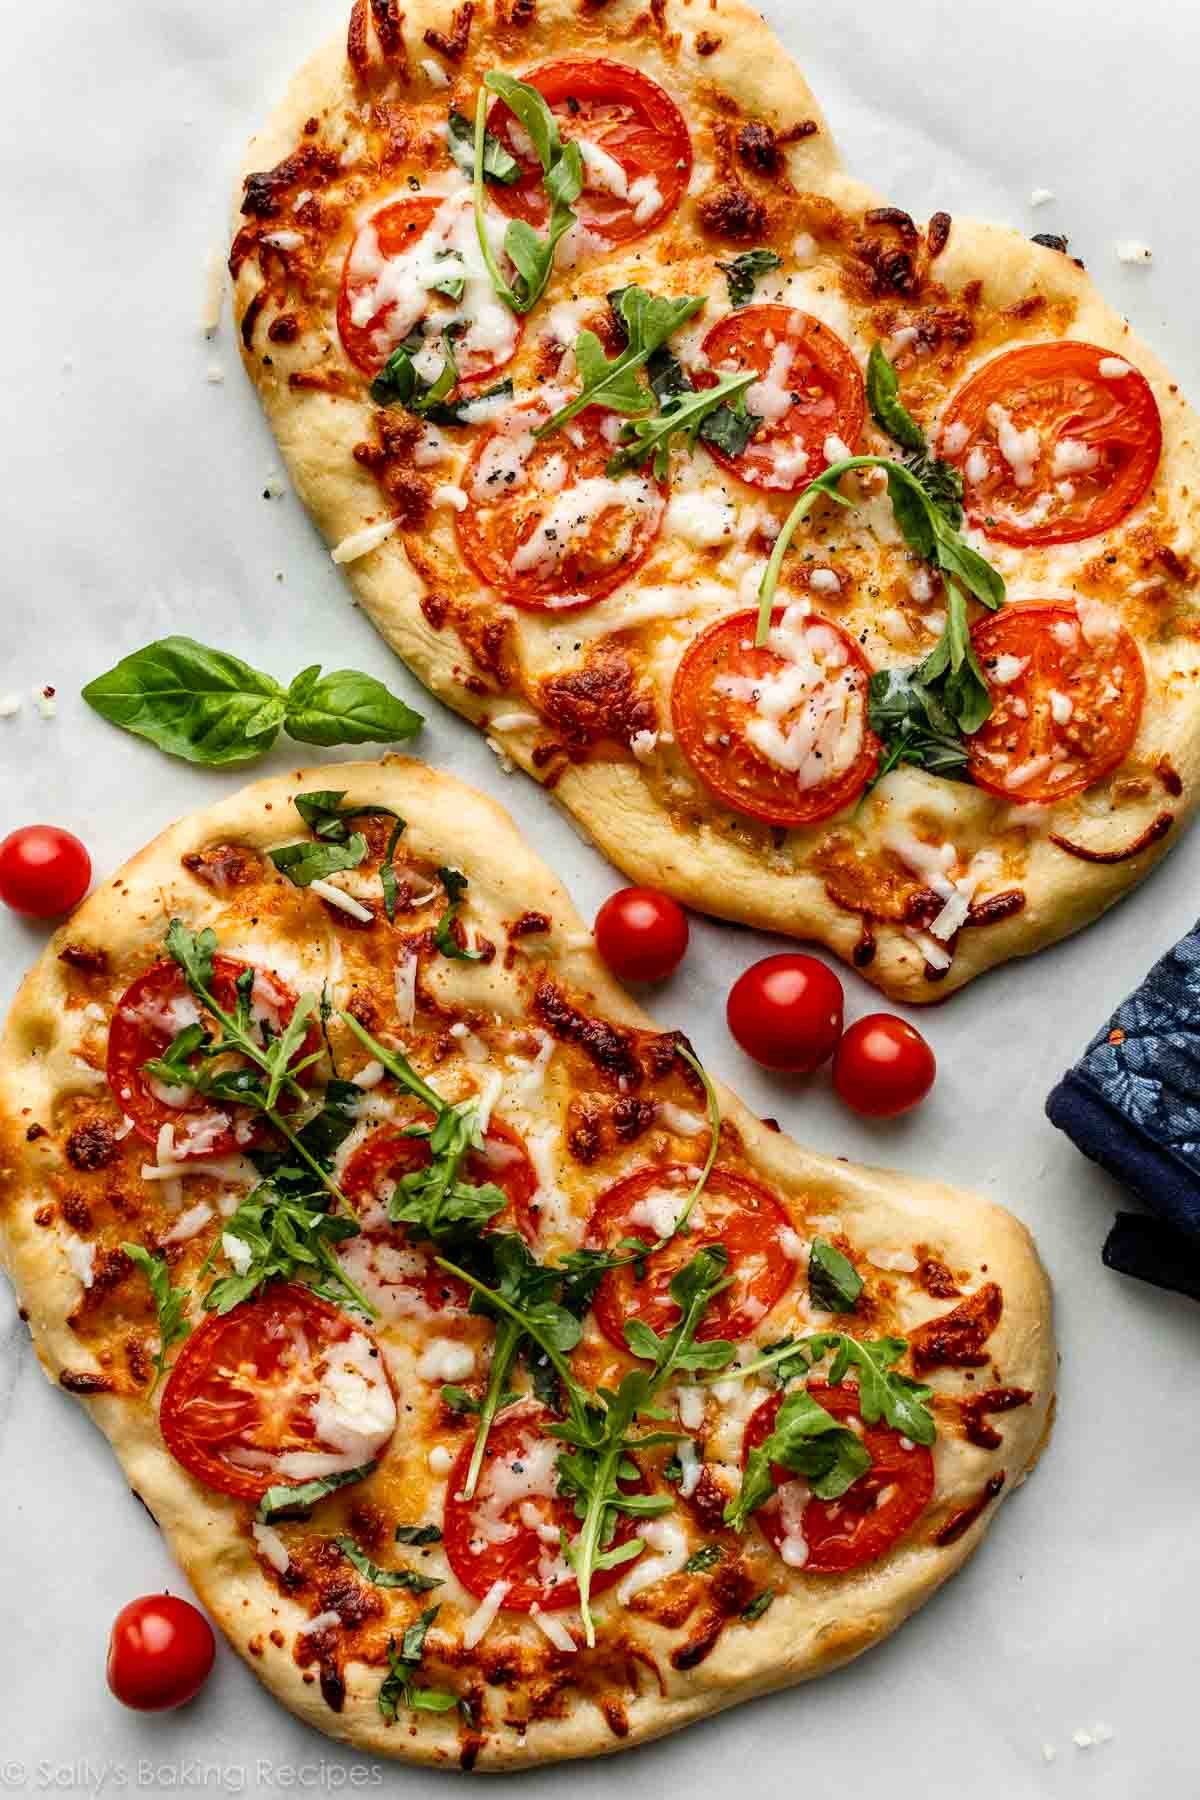
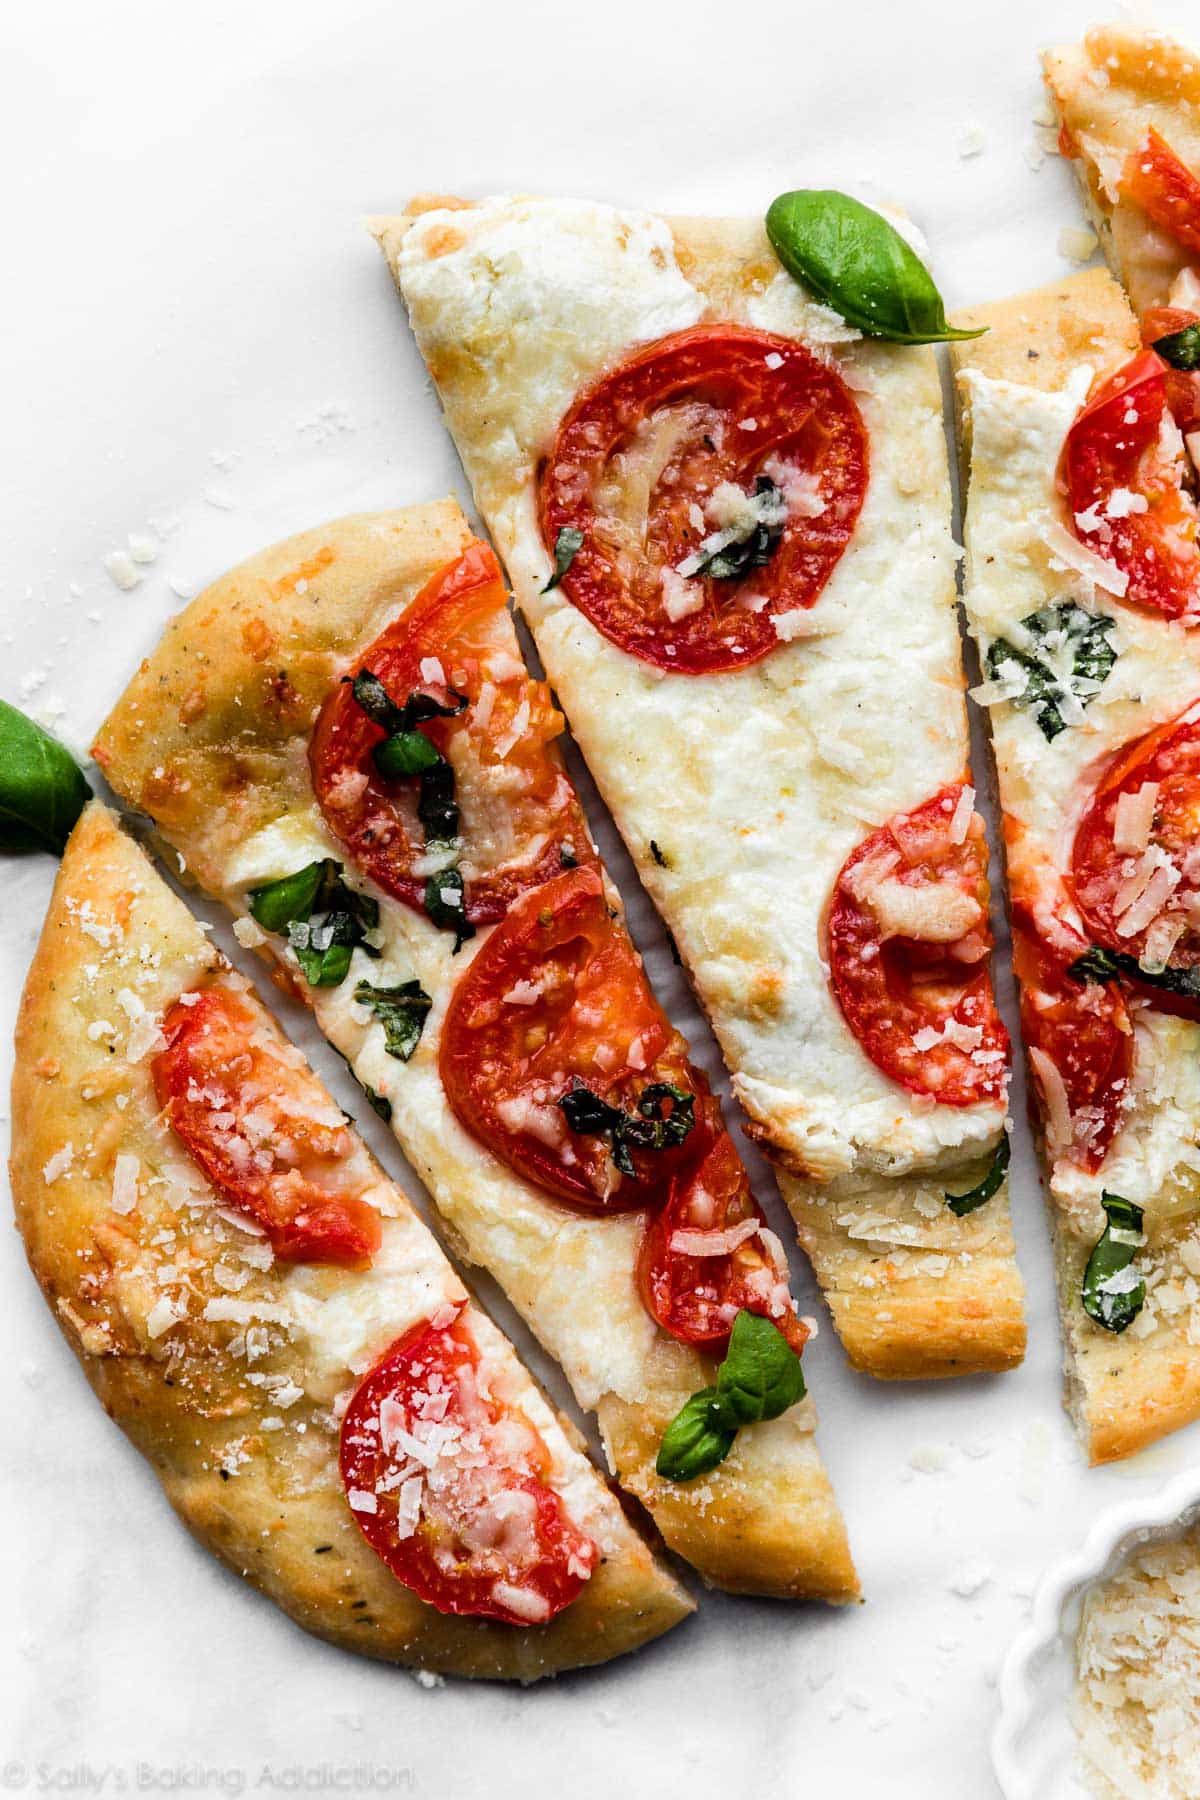
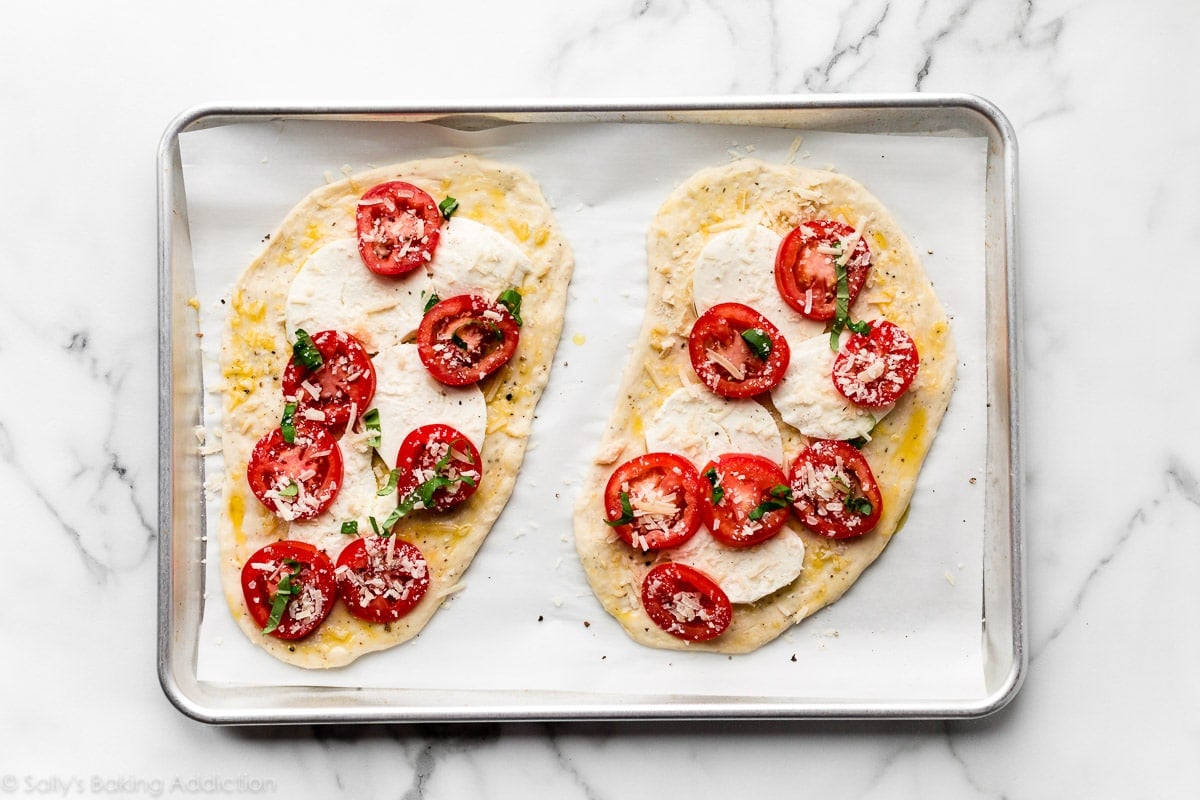
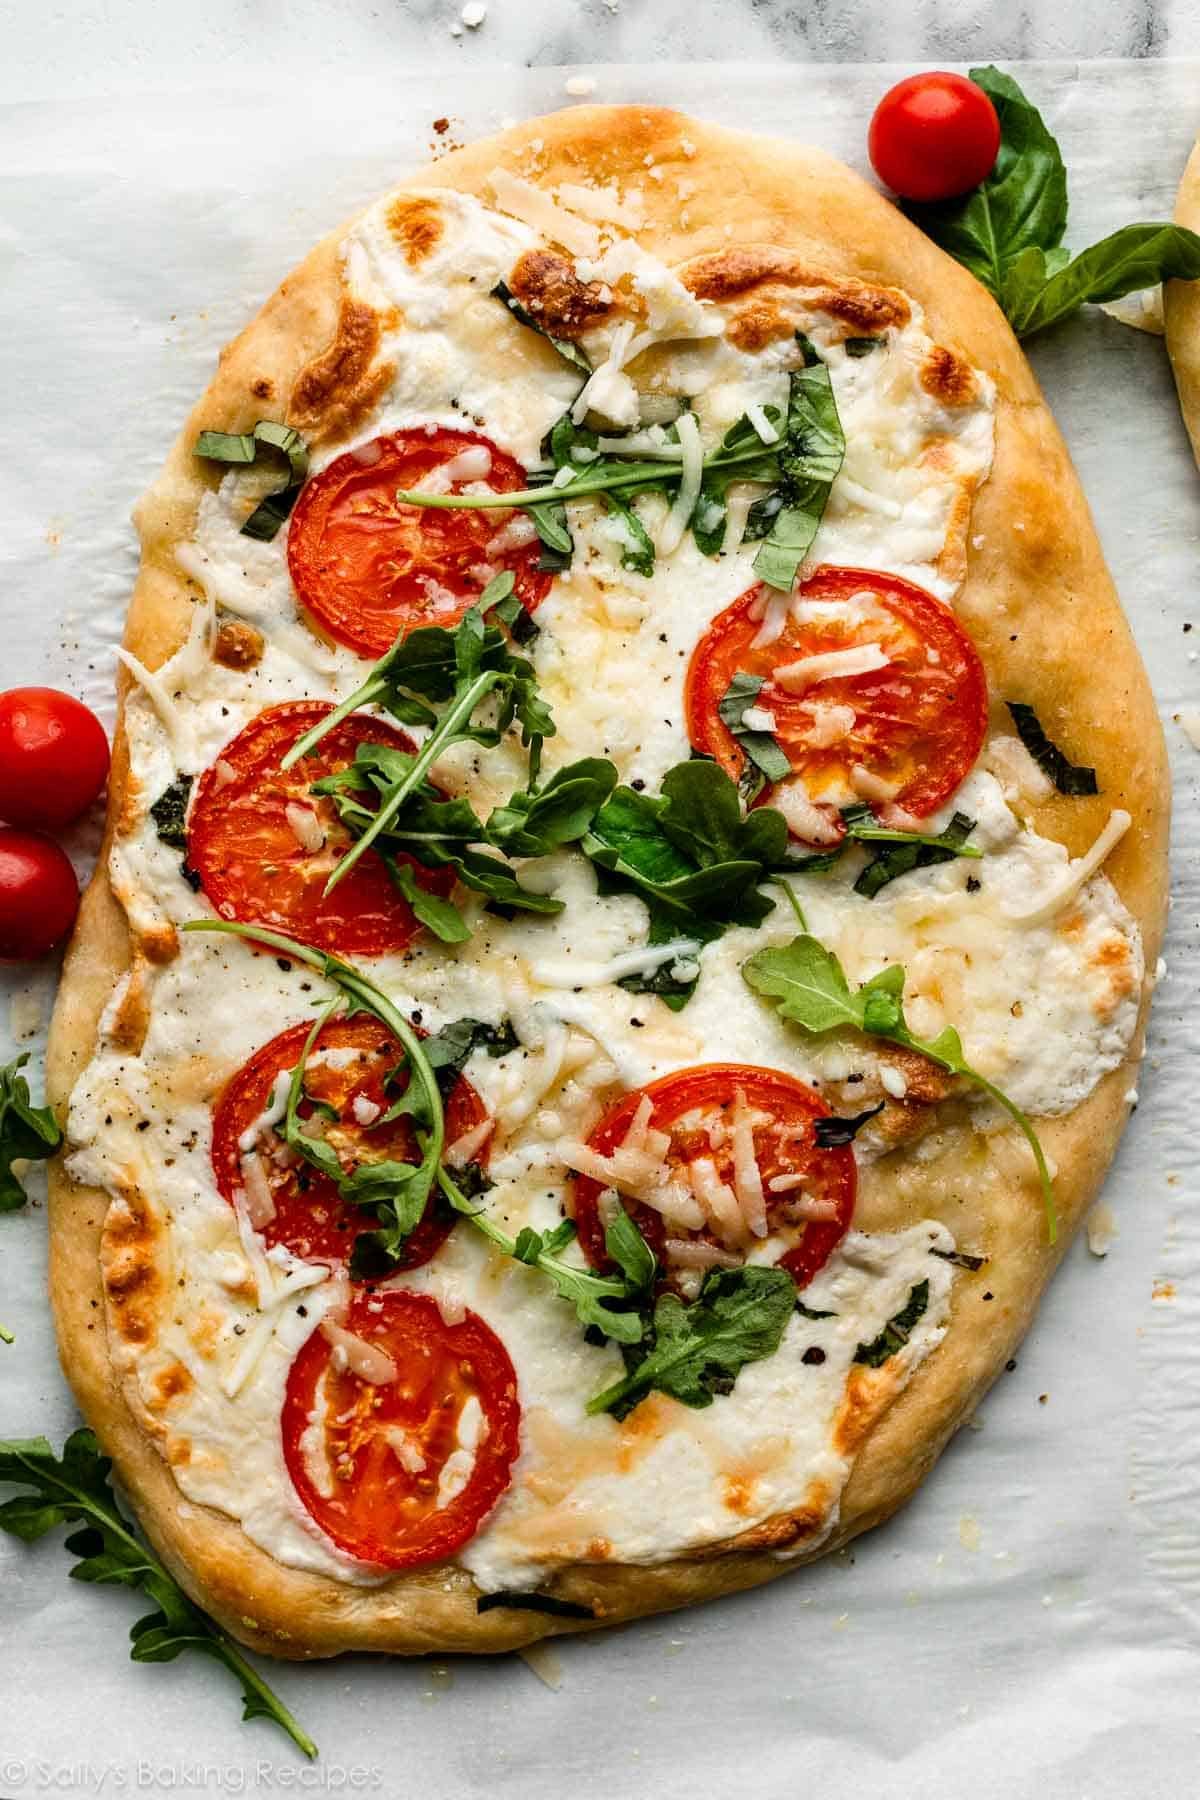
- Tomato, Basil, & Mozzarella Flatbread: I have this version pictured today, and with some fresh arugula on top. See recipe note.
- Zucchini & Herbed Ricotta Flatbread
- Apple & Goat Cheese Flatbread: 1/2 cup goat or blue cheese per flatbread (1 cup total) and 1/2 cup fresh apple or pear slices per flatbread (1 cup total), plus a handful of fresh arugula and/or drizzle of honey after baking
- Sausage & Pesto Flatbread: 1/2 cup prepared pesto and 1/2 cooked sausage crumbles per flatbread (1 cup of each total for 2 flatbreads), 4 ounces mozzarella cheese per flatbread (8 ounces total), and 1/4 cup sliced sun-dried tomatoes packed in oil per flatbread (1/2 cup total)
- Make a cold veggie pizza! (Note the dough is very slightly different in that recipe.)
- BBQ Chicken Pizza toppings*
- Spinach Artichoke White Cheese Pizza toppings*
*If you’re using toppings from my pizza recipes, you’ll need about 2/3 of the amount. My pizza recipe toppings are enough for one 12-inch pizza and are more than plenty for 2 smaller flatbreads (the full recipe below).
Pre-cook: Any meats should be pre-cooked before using as a flatbread topping. If you want to top the flatbread with vegetables, feel free to sauté or gently cook them first. I usually don’t with spinach, peppers, and mushrooms, but with “harder” veggies like broccoli or cauliflower, they’ll taste better if they’ve been slightly cooked before using as topping.
Get creative! I can’t wait to hear about how you top your flatbread pizzas. Feel free to email or share your recipe photos on social media. 🙂
See Your Homemade Flatbread Pizzas:
Print
Homemade Flatbread Pizza Recipe
- Prep Time: 55 minutes
- Cook Time: 15 minutes
- Total Time: 1 hour, 10 minutes
- Yield: serves 2-4
- Category: Dinner
- Method: Baking
- Cuisine: Italian
Description
Follow these basic instructions for thin yeasted flatbread pizza crust. The recipe yields enough dough for two small flatbreads, each perfect for 1 hungry person or 2 people to split (2-4 people total). Freezing instructions listed below. See all of my detailed topping suggestions in the blog post above or recipe notes below.
Ingredients
- 1 teaspoon active dry or instant yeast
- 1 teaspoon granulated sugar
- 3/4 cup (180ml) warm water, (between 100-110°F, 38-43°C)
- 2 cups (250g) all-purpose flour or bread flour (spooned & leveled), plus more for hands and surface
- 1 Tablespoon (15ml) olive oil, plus 2 teaspoons for brushing the dough
- 1 teaspoon salt
- optional: 1 teaspoon garlic powder or 1 clove minced garlic and/or 1 teaspoon Italian seasoning
Instructions
- Prepare the dough: Whisk the yeast, sugar, and warm water together in the bowl of your stand mixer. Loosely cover and allow to sit for 5–10 minutes until foamy and frothy on top. *If you do not own a stand mixer, you can do this in a large mixing bowl and in the next step, mix the dough together with a large wooden spoon/silicone spatula. It will take a bit of arm muscle. A hand mixer works, but the sticky dough repeatedly gets stuck in the beaters. Mixing by hand with a wooden spoon or silicone spatula is a better choice.*
- Add the flour, olive oil, and salt (and garlic/seasoning if using). Mix on low speed with the dough hook attachment until combined, about 2 minutes. The dough should be thick, yet soft and slightly sticky. It should pull away from the sides of the bowl as it mixes. When it does, it is ready to knead. If, however, the dough is too sticky to handle, mix in more flour, 1 Tablespoon at a time. Make sure you do not add too much extra flour; you want a soft, slightly tacky dough.
- Knead the dough: Keep the dough in the mixer (and switch to the dough hook if using the paddle) and beat for an additional 6-8 full minutes, or knead by hand on a lightly floured surface for 6-8 full minutes. (If you’re new to bread-baking, my How to Knead Dough video tutorial can help here.) If the dough becomes too sticky during the kneading process, sprinkle 1 teaspoon of flour at a time on the dough or on the work surface/in the bowl to make a soft, slightly tacky dough. Do not add more flour than you need because you do not want a dry dough. After kneading, the dough should still feel a little soft. Poke it with your finger—if it slowly bounces back, your dough is ready to rise. You can also do a “windowpane test” to see if your dough has been kneaded long enough: tear off a small (roughly golfball-size) piece of dough and gently stretch it out until it’s thin enough for light to pass through it. Hold it up to a window or light. Does light pass through the stretched dough without the dough tearing first? If so, your dough has been kneaded long enough and is ready to rise. If not, keep kneading until it passes the windowpane test.
- Place the dough in a greased bowl (I use nonstick spray to grease) and cover with plastic wrap, aluminum foil, or a clean kitchen towel. Allow to sit and rest for 45 minutes at room temperature. Once it has rested and slightly risen, you can continue with the recipe or place the covered dough in the refrigerator for up to 2 days. More instructions in the make ahead Note below.
- As the dough is resting and rising, prepare your toppings. See blog post and/or recipe note below.
- Preheat oven to 475°F (246°C).
- Shape the dough: Punch the dough down to release any air. Divide the dough in half. On a lightly floured surface with floured hands and working with one dough piece at a time, begin shaping and stretching the dough until it is 1/4 inch thick. You can use a floured rolling pin for this too. Don’t worry about the shape of the dough, just make sure it’s pretty thin. Repeat with the second piece of dough. Carefully transfer both pieces of dough to a parchment paper or silicone-mat lined baking sheet, or use a pizza stone. (You can also shape/roll out the doughs directly on a silicone baking mat or a large sheet of parchment if that is easier for you and then just transfer the whole thing to the baking sheet.)
- Poke your fingers all around the surface of the flatbreads or prick a few holes with a fork. Drizzle or brush each with 1 teaspoon of olive oil. Top each with your favorite toppings.
- Bake for 15–20 minutes or until the crust and toppings are browned to your liking. Remove from the oven. Slice and serve warm.
- Cover and store leftovers in the refrigerator for up to 1 week.

Notes
- Make Ahead & Freezing Instructions: The dough can be prepared through step 4, then after it has risen, cover and place in the refrigerator for up to 2 days. Continue with step 5. To freeze the dough, prepare it through step 4. After it has risen, punch it down to release any air. Divide it in 2, if desired, then wrap in plastic wrap and place in a freezer-friendly container for up to 3 months. When ready to use, thaw the dough overnight in the refrigerator. Then let the dough sit at room temperature for about 1 hour before stretching out/shaping and topping. If the thawed dough keeps shrinking back as you try to shape it, lightly cover it with plastic wrap or a clean kitchen towel and let it rest on the counter or your work surface for 15 minutes. (The gluten just needs a chance to settle.)
- Special Tools (affiliate links): Stand Mixer or Glass Mixing Bowl and Wooden Spoon / Silicone Spatula | Baking Sheet | Silicone Baking Mat or Parchment Paper | Pizza Stone | Pizza Cutter
- Yeast: You can use instant or active-dry yeast with zero changes. If you’re new to working with yeast, I recommend reviewing my Baking with Yeast guide. I used to make flatbread with 1 and 1/2 teaspoons of yeast, but recently reduced it down to 1 teaspoon. This is plenty for a thin flatbread crust. Note that 1 teaspoon is less than 1 standard packet. If you want a no-yeast flatbread, I recommend searching for another recipe that’s modified without its addition. (Don’t simply leave the yeast out of this one!)
- Flour: I haven’t tested this recipe with whole wheat flour, but let me know if you do. You may need a little extra liquid in the dough.
- Pictured Plain Flatbread: Top with 1 teaspoon each of olive oil as directed in step 8. Top each with 1 clove minced garlic. Sprinkle with your desired amount of sea salt and freshly ground black pepper. After baking, sprinkle with fresh parmesan cheese (if desired).
- Pictured Tomato, Basil, & Mozzarella Flatbread: Slice 8 ounces of fresh mozzarella into thin slices, or use 8 ounces shredded mozzarella. Top each flatbread with 4 ounces. Top each with a handful of fresh tomato slices and a sprinkle of chopped fresh basil. If desired, sprinkle with fresh parmesan cheese too. After baking, feel free to top with more chopped fresh basil and/or fresh arugula.
- Double Batch: Dough may easily be doubled by doubling each ingredient. Extend the rise time in step 4 to 1 hour.
- Optional Flavors in Dough: I love adding garlic and Italian seasoning to this dough, as listed in the ingredient list above. If you can’t find a spice labeled “Italian Seasoning” in the spice aisle, use dried oregano, dried basil, and/or dried parsley instead. Honestly, any herb (fresh or dried) that you love works.


Reader Comments and Reviews
Can you partially bake it (e.g. step 9) for about 10 minutes and then freeze? And then when you want to use, add toppings and bake from frozen for ~10 minutes? Just an idea I had for lazy weeknights and wanted to see what you thought!
Hi Sacha, you can absolutely par-bake the crust and then freeze it. Though we haven’t tested it ourselves, we’ve done it with our pizza dough. We recommend baking for 8 minutes. Cool completely, then cover and freeze. Thaw, then top and bake for at least 10 more minutes. Enjoy!
I just made this recipe for the first time, and it’s fantastic. Simple, delicious, low effort beyond some basic timing.
I added Italian seasoning to mine, will do garlic next time. I had a nice bit of uneven crumb in my finished flatbreads, and mine cooked on one large sheet pan in 15 minutes in my small convection oven set at 425F with the fan on. I also preheated my baking tray and rotated it back-front and from a lower to a higher rack partway through.
Love this recipe! Could I possibly make it gluten free, and if so how would I do that?
Hi Lily, I wish we could help, but we don’t have a lot of experience with gluten-free flour. Some readers have commented that they have used a 1:1 gluten-free flour here with success, but we haven’t personally tested it. It may be best to search for a flatbread recipe specially formulated for gluten-free flour instead for best results!
My go to for pizza, my teenagers love it, the wife loves it.
Each one with different toppings always a hit , and they are all picky!
Easy to do and very forgiving as I have put less water on occasion as well as water being a little to warm.
Thank you for the recipe!
Hi Sally,
Your recipes have never failed me so I know there is a user error here somewhere. I followed the recipe exactly, using fresh ingredients and Red Star yeast. While mixing with dough hook in stand mixer (after the initial whisking and foaming period) the ingredients were not coming together. I kept adding a little more flour but after the kneading time was complete it was still very wet/sticky and I had a hard time getting it out of the bowl and into a greased bowl. I’m waiting g to see what happens during rise time. What could have contributed to the dough not coming together as expected? It didn’t even stick to the dough hook.
Hi Susan, was it particularly humid on the day you made this dough? There are a lot of variables that go into the consistency of dough, even down to the weather and humidity in the air. There’s nothing wrong with adding just a little more flour to bring the dough into a less sticky and knead-able consistency. Hope this helps for next time!
Hi there, do you have to pre cook the flatbread for a few minutes before you add the toppings?
Hi Maura, no, you don’t need to pre-bake the flatbread before you add the toppings. Enjoy!
I made homemade flatbreads and they turned out amazing! The dough was so easy to work with! My whole family raved about how good the crust was!! This recipe is a keeper and can’t wait to make them again!
Haven’t tried it yet, but my plan is to make it and bake it without any toppings, then freeze. Then when I want I will pull out a flatbread from the freezer, add topping and quickly heat up in my oven style air fryer to thaw the bread and melt/cook the topping in 8 minutes. Like I do with store bought flatbreads.
I just tried this recipe last night with fresh milled hard white wheat. I chose to make it as is and if adjustments were needed, I would do so in the recipe a second time. It was perfect and so yummy! It’s already been requested again!
Can this recipe be used in a pizza oven? “Gozney”
We haven’t tested it, Louise – let us know if you do!
I intend to make this flatbread recipe as it sounds so easy. Do you think I can throw the ingredients in my bread machine with a 50 minute ‘pizza’ dough setting?
Hi Barb, we haven’t tried this recipe in a bread machine, but let us know if you do — many readers have reported success doing so.
Great recipe. I have doubled with ease. I don’t use a rolling pin as I don’t want to crush the beautiful air pockets in the dough. I push and shape The dough with my fingertips.
After 7 minutes, I turned my pan and had to tent foil over the pizzas and turn the oven down so the cheese didn’t get overdone. They only went another 5 minutes and were cooked absolutely perfect. These were incredibly delicious!
If I adapted these into mini flatbread pizzas which are like 6 inches would i keep the cooking time the same or reduce?
This was such a great recipe and I’ve been using the dough as the base for other flat breads! I would love to freeze these flat for my dad so he can simply add toppings and bake. Is it okay to roll out the shape, poke with a fork, and then wrap and freeze?
Hi Dani, that’s a wonderful idea to make it easy for your dad. We haven’t actually tried freezing the dough that way (see our regular freezing instructions in the Notes section), but I can’t see why it wouldn’t work… if you try it, please report back!
If I make it the day before, after it rises, I put it in the fridge like mentioned in the instructions. But when I take it back out, do I wait an hour for it to get to room temperature and punch it down and continue on with step 7?
Hi Michelle! The dough will rise in the fridge. Just continue with the recipe by punching the dough down and shaping it cold.
All that work and I knew 475⁰ was too high. It burned!
This is. Such a great recipe and will now be a go to!
Can I half bake a flatbread to prep for later in the day and finish the cooking later?
This recipe was easy and delicious! Take out pizza is a thing of the past.
I followed this recipe to the T (adding both garlic powder and Italian seasoning) and it is THE BEST. It’s been a hit with my family and it’s now in my weekly rotation of dinner recipes. Thank you so much!
What are the nutrition facts for this recipe?
Hi Sharon, We don’t usually include nutrition information as it can vary between different brands of the same ingredients. Plus, many recipes have ingredient substitutions or optional ingredients listed. However, there are many handy online calculators where you can plug in and customize your exact ingredients/brands. Readers have found this one especially helpful: https://www.verywellfit.com/recipe-nutrition-analyzer-4157076
Wow, your recipe was on point. I absolutely loved the taste of it and honestly, it was so much better than going out. We just finished the leftovers today and it was just as good.
Thank you for sharing your recipe. I am new to pizzas and this flatbread option was so easy to follow and prepare. The measurements were perfect with Kithchenaid mixer
Could I bake this dough in the oven plain and top it with cold toppings afterwards? I want to make chicken Ceasar salad pizza. Should I adjust the time or do you have any recommendations?
Hi Alexandria, absolutely! You can see how we do that here with the plain flatbread (directions in recipe Notes) or with our cold veggie pizza. Hope you enjoy it!
This was so easy to make and tasted delicious! Love that it’s pantry staple ingredients.
Terrific recipe – especially for those of us who think to make pizza the day we want it. The short rise time and no second rise/proofing let me start in the afternoon for pizza that night. I made one larger pizza rather than two – rolled out the dough onto a silicone pad as suggested and lifted it onto a baking sheet. My pizza was done in 12 minutes. I’ll make again.
I made this for the first time and it turned out beautifully! I mixed and kneaded the dough by hand which made for an easy clean up afterward. The only thing I would do differently is add more garlic powder to the dough. Otherwise it was perfect!
Made this in my food processor and it came out great. The dough works great on the grill. Thank you for an easy and delicious recipe!
You just answered both of my questions! Thanks!