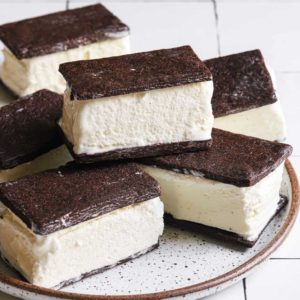
Old-Fashioned Ice Cream Sandwiches
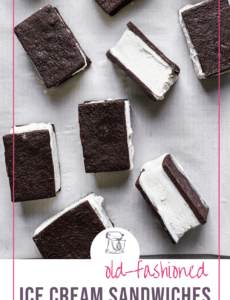
Chewy chocolaty cookies sandwich fresh homemade ice cream in this old-fashioned ice cream sandwich recipe. These decadent treats are better than any store-bought option and perfect for keeping you cool all summer long!

Old-fashioned ice cream sandwiches. The uniform pattern of holes. The chocolate cookie remnants stuck to your fingers. Ice cream oozing out between the cookies. The plain paper wrapper. They’re as iconic as the milk man. (Incidentally, we actually did have a milk man when I was young. There was a metal bin outside the door and everything!)
The classic ice cream sandwich wasn’t always the first thing on my wish list when the ice cream truck came jingling and jangling down the street – there were so many other flashy options, like the push-up, the drumstick, and the firecracker popsicle! Now that I’m older, two amazingly rich and chocolatey cookies sandwiching vanilla ice cream sounds about as good as it gets.
You know what’s even better? Homemade chocolate cookies and freshly churned vanilla bean ice cream. These are 100% homemade, and a perfect imitation of the classic ice cream sandwich, only a million times better.
Why We LOVE these Ice Cream Sandwiches
- Better than store-bought.
- Rich chocolaty flavor. With the Dutch-processed cocoa and the espresso powder, you get a deep chocolaty flavor.
- Versatile. Swap the ice cream filling for any flavor combination you want!
- Perfect to stash in the freezer all summer long (or use them to make our favorite ice cream sandwich cake!).

The Ingredients
These ice cream sandwiches are made of two components: the chocolate cookies and the ice cream filling.
Chocolate Cookies – The Key Ingredients
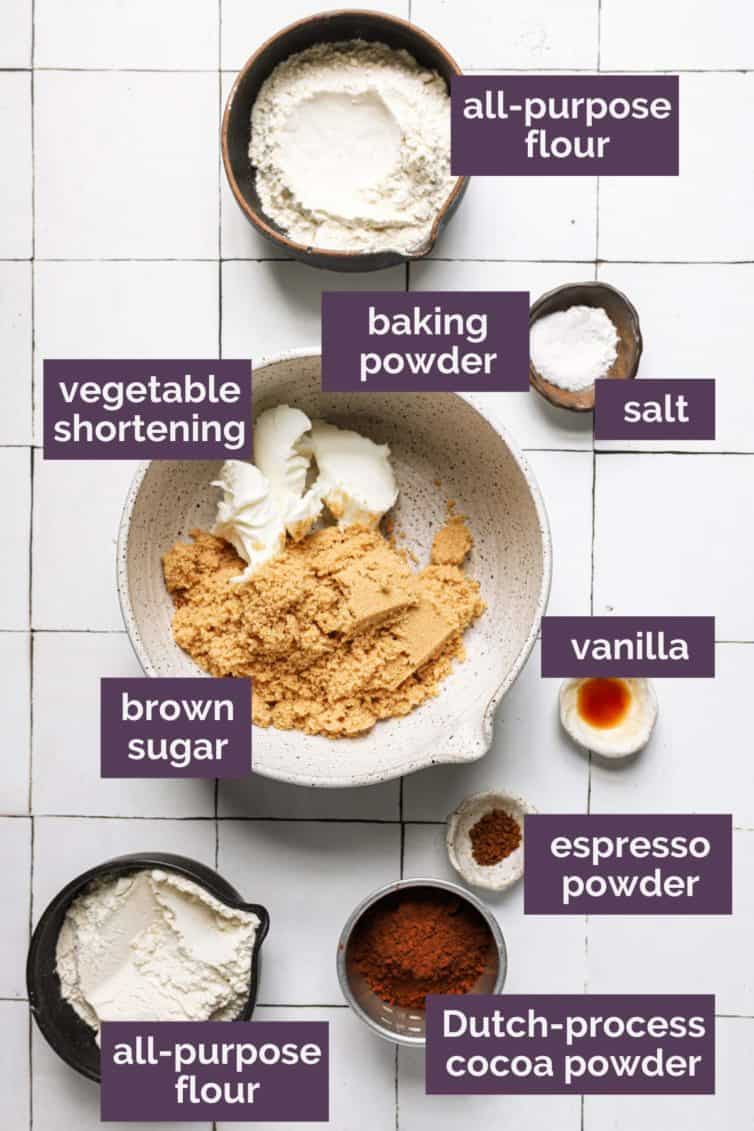
- Vegetable Shortening: Makes the chocolate cookie softer and a little flaky.
- Brown sugar: Sweetens the cookies but also keeps them extra soft.
- Cocoa Powder: I highly suggest using Dutch-processed cocoa powder for an intensely chocolate flavor.
- Espresso Powder: Helps bring out the flavor of the chocolate.
Other Ice Cream Choices
While many people argue the best flavor for an ice cream sandwich is classic vanilla, the truth is you really can’t go wrong with any flavor. I would suggest picking a flavor that pairs well with chocolate since that’s the flavor of the cookies. Some of my favorites to try are:
- Jeni’s Milkiest Chocolate Ice Cream
- Rocky Road Ice Cream
- Peanut Butter Ice Cream
- Cookie Butter Ice Cream
- Your favorite store-bought flavor!
How to Make Them
These ice cream sandwiches are not at all difficult to make but do require a little planning ahead. It’s important that everything be as cold as possible before you begin assembling them and that you work quickly.
Prepare the Ice Cream
This step needs to be done the day before you plan to assemble the ice cream sandwiches.
- Prep the pan: Line a 9×13-inch baking dish with foil, allowing the excess to hang over the edges.
- Freeze ice cream: Spread ice cream onto the prepared pan. If using store-bought ice cream soften it slightly before spreading. Freeze overnight.
Directions for Homemade Chocolate Cookies
- Preheat the oven to 350°F.
- Beat shortening and sugar: In a large mixing bowl, beat together the shortening and the brown sugar with an electric mixer for 2 to 3 minutes.
- Add dry ingredients: Beat in the baking powder, salt, cocoa powder, espresso powder, and vanilla. Mix until incorporated.
- Add flour and water: Mix in 1 cup of the flour followed by 2 tablespoons of water, mixing well until no dry ingredients remain.
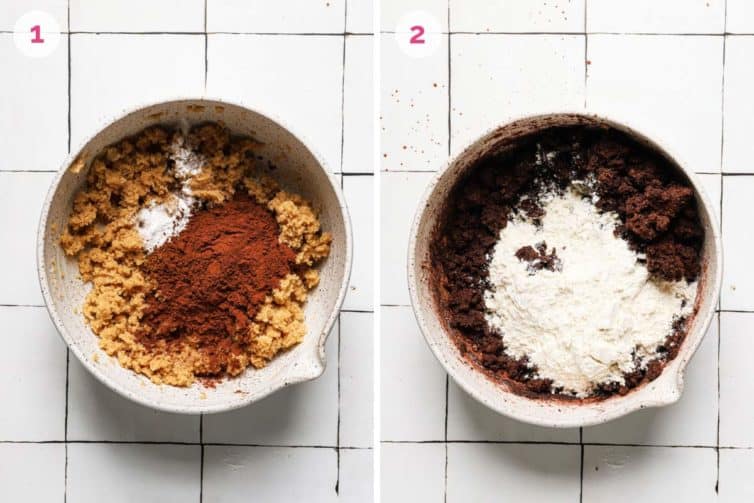
- Tip: Give it some time, up to 5 minutes of mixing. The dough should be soft and pliable but not sticky; if necessary, add more water, a teaspoon at a time, until the dough comes together.
- Roll out the dough: Turn out half the dough onto a lightly floured surface and roll into an even 1/8-inch to 1/4-inch thickness.
- Cut the dough into 2×4-inch rectangles. You could also cut into squares or use a cookie cutter to make circles.
- Transfer the cookies to a baking sheet lined with parchment paper.
- Poke the cookies: Using a skewer or the tip of a thermometer, poke a pattern of holes on each cookie’s surface.
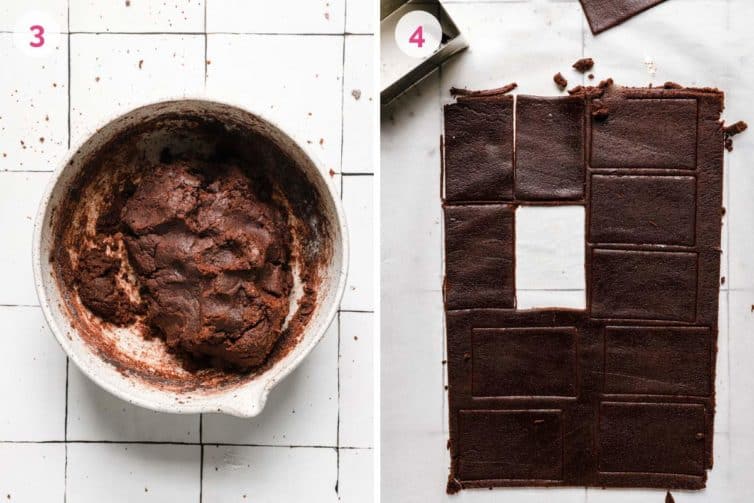
- Repeat: Roll out, cut, and poke the remaining dough, re-rolling the scraps as you work.
- Freeze the cookie dough: Place the sheets of cookies in the freezer for 10 minutes before baking.
- Bake 7 to 8 minutes, or until the cookies are just set. Do not overbake.
- Cool completely: Remove from the oven and let the cookies cool for 2 to 3 minutes on a baking sheet. Transfer to cooling racks and cool to room temperature.
- Freeze the cookies for at least 1 hour before assembling the sandwiches.
Assemble Your Sandwiches
- Pair cookies: Match up cookies of the same size and have them laid out and ready for ice cream.
- Remove ice cream: Use the edges of the foil to lift the block of firm ice cream from the baking pan and place it on a cutting board.
- Cut ice cream: Working quickly, cut the ice cream into 2×4-inch rectangles (or whatever shape you cut the cookies into).

- Stick cookies together: Using a narrow stainless steel spatula, place a rectangle between two chilled cookies and press the cookies lightly to adhere.
- Freeze to set: Return sandwiches to the freezer for at least 30 minutes.
- Tip: I found it easiest to cut one or two ice cream fillings at a time and assemble the sandwiches, then transfer them to a tray and repeat until all finished.

Dip and Decorate
Serve the ice cream sandwiches as is or dress them up for something a little more fun! Here are some ways to dip or decorate these homemade ice cream sandwiches:
- Chocolate dip. Dunk half of the ice cream sandwich in melted chocolate and freeze to set.
- Peanut butter dip. Dunk half of the ice cream sandwich in melted peanut butter and freeze to set.
Edge Coatings
To coat the edges with toppings, pour the topping on a medium plate and hold the ice cream sandwich in the middle. Place the ice cream exposed edge in the toppings and dip to coat. Rotate and dip each edge in the toppings until they are all coated. Some great edge coatings include:
- Rainbow sprinkles
- Chocolate sprinkles
- Crushed oreo cookies
- Mini chocolate chips
- Chopped peanuts or other nuts like pistachios, pecans, or walnuts
- Cocoa Krispies Cereal
Storing and Freezing Tips
- Store: Wrap the ice cream sandwiches individually in plastic wrap and store them in a freezer-safe, airtight container or zip-top plastic bag in the freezer.
- Shelf-Life: Stores well for up to 3 months.
Ice Cream Sandwich FAQs
Poking holes in the top of the cookies allows the cookies to bake evenly as well as gives a space for steam to escape during the baking process.
While each individual part is already frozen, it’s important to give the sandwich time to freeze together. The moisture from the ice cream helps to soften the cookies so each bite is chewy and melts in your mouth.
Frozen Treats to Try Next
- Homemade Dairy Queen Ice Cream Cake
- Spumoni Ice Cream Terrine
- Banana Split Ice Cream Cake
- Ice Cream Sandwich Cake
- Cookies and Cream Ice Cream Cake

Homemade ice cream sandwiches are a nostalgic summer dessert perfect for cooling off. Made with soft chocolate cookies and homemade vanilla ice cream, these are a classic summer treat perfect for everyone!
Watch the Recipe Video Below:
If you make this recipe and love it, remember to stop back and give it a 5-star rating – it helps others find the recipe! ❤️️
Old-Fashioned Ice Cream Sandwiches
Ingredients
For the Filling:
- 1 quart vanilla ice cream, homemade or store-bought
For the Cookies:
- ½ cup (102.5 g) vegetable shortening
- 1¼ cups (275 g) light brown sugar
- ½ teaspoon (0.5 teaspoon) baking powder
- ¾ teaspoon (0.75 teaspoon) salt
- ½ cup (43 g) Dutch-process cocoa powder
- ½ teaspoon (0.5 teaspoon) instant espresso powder
- ½ teaspoon (0.5 teaspoon) vanilla extract
- 2 cups (250 g) all-purpose flour, divided
Instructions
- Line a 9×13-inch baking dish with foil, allowing excess to hang over the edges.
- If you’re using homemade ice cream, immediately after churning, spread the ice cream into the prepared pan. If using store-bought ice cream, soften it slightly and then spread it into the prepared pan. Freeze overnight.
- Preheat oven to 350 degrees F.
- In a large mixing bowl, beat together the shortening and the brown sugar with an electric mixer for 2 to 3 minutes. Add the baking powder, salt, cocoa powder, espresso powder and vanilla. Mix until incorporated. Mix in 1 cup of the flour, followed by 2 tablespoons of water, and then add the remaining 1 cup flour and another 2 tablespoons of water, mixing well until no dry ingredients remain (give it some time, up to 5 minutes of mixing). The dough should be soft and pliable but not sticky; if necessary, add more water, a teaspoon at a time, until the dough comes together.
- Turn out half the dough onto a lightly floured surface and roll to an even 1/8-inch to ¼-inch thickness. Cut the dough into 2×4-inch rectangles (you could also cut into squares, or use a cookie cutter to make circles).
- Transfer the cookies to a baking sheet lined with parchment paper. Using a skewer (or the tip of a thermometer – works awesome!), poke a pattern of holes on each cookie’s surface. Roll out, cut, and poke remaining dough, rerolling the scraps as you work. Place the sheets of cookies in the freezer for 10 minutes before baking.
- Bake 7 to 8 minutes, or until the cookies are just set. Do not overbake.
- Remove from the oven and let the cookies cool 2 to 3 minutes on a baking sheet. Transfer to cooling racks and cool to room temperature. Freeze cookies for at least 1 hour before assembling the sandwiches.
- To assemble the sandwiches, have everything ready and work quickly! Match up cookies of the same size and have them laid out and ready for the ice cream. Use the edges of the foil to lift the block of firm ice cream from the baking pan and place it on a cutting board. Working quickly, cut the ice cream into 2×4-inch rectangles (you’ll have a little ice cream left over). Using a narrow stainless steel spatula, place a rectangle between two chilled cookies and press the cookies lightly to adhere. (I found it easiest to do this one at a time. Cut one or two rectangles, assemble those cookies and place on a tray, then do one or two more, etc. until you’re finished.) Return the sandwiches to the freezer for at least 30 minutes. Wrap individually in plastic wrap and store in an airtight container or zip-top plastic bag in the freezer.
Notes
- Cocoa Powder: I highly suggest using Dutch-processed cocoa powder for an intensely chocolate flavor.
- Espresso Powder: Brings out the flavor of the chocolate. Buy at the grocery store in the Italian or coffee section, or purchase on Amazon.
- Ice Cream: Use fresh homemade ice cream or your favorite store-bought flavor.
- Storage: These will keep in the freezer for up to 3 months.
- Cookie recipe adapted from The Cookie Dough Lover’s Cookbook
Did you make this recipe?
Leave a review below, then snap a picture and tag @thebrowneyedbaker on Instagram so I can see it!


these came out soooo good and were not difficult to make. Thank you for sharing and helping to provide a good memory for both my kids and I.
I had to add almost 4 times the water. I don’t understand how 1/2 cup of shortening is supposed to be enough for all those dry ingredients (plus 1/4 cup of water)
They look very classic, my question is, would regular pork shortening work?
Classic delish. Someone named sissy needs to make these for me😁
I think that the recipe is very scrumptious. But I have to differ on the use of parchment paper in the oven. When I opened it up, to an unpleasant discovery I just simply couldn’t remove the sandwich cookies. I believe that you should rewrite the recipe so that no one else shall have to face this trauma.
Hi Gladys, I’m glad you like the ice cream sandwiches. Hmmm so weird about the parchment because I’ve never had anything at all stick to parchment, that’s the beauty of it!
These look delicious! I got one of those Kitchaid Ice cream makers for Christmas and I can not wait to use it! Strange about the review with the parchment paper not working…. I bake almost everything on parchment paper, especially cookies and I’ve never had anything stick to it either.
These were awesome! Waiting a day (if you can!) After you make them, they taste better than the day you make them. I will make them again and won’t eat a store bought ice cream sandwich again
Hello
Another winner.
We are all dieting but birthdays are not birthdays without a “cake”. This year I will make these and that way we will be limited in how much we can eat. I will make a chocolate chip ice cream with home made chunks that are softer than store-bought chips.
My question, can I make the cookies, then assemble the sandwiches the next day? I assume I should freeze the cookies until ready to fill. If so how should I wrap them for freezing and to make sure they don’t crack or stick to whatever I am storing them in?
Thank you
Hi Maureen, Yes, you could make them ahead of time. I would separate them with parchment paper and place in a ziploc freezer bag.
I have made these are few times and they turned out great! I have even made them gluten free for my friend. Thank you for sharing ,
Thanks for this – been looking high and low for a ice cream sandwich cookie recipe that has flexibility once frozen. This is it! I needed to add an egg to get my batter to stick together, but it worked perfectly: easy to roll into a square, cut with a pizza cutter, dock, and then transfer on the parchment I cut these on right to the cookie sheet. I used nutriva, allegedly a “superfood” organic shortening made from coconut oil and red palm oil so I don’t feel too bad about from a nutrition standpoint. The shortening definitely made the dough much easier to handle without sticking to the roller. Perfect end result – just like the real thing (but with my homemade chunky monkey gelato on the inside).
These look awesome! Was wondering if instead of shortening, would coconut oil work? I have a kid who’s allergic to many things, including soy and corn, and thus can’t use vegetable shortening.
Hi Wendy, Yes, I haven’t tried coconut oil, I’m not sure it has the same properties as the shortening (keeps the cookies soft, even in the freezer). If you try it, let me know how it works!
Try Nutiva – organic shortening made from coconut oil and red palm oil (only) – worked great for me with the addition of 1 egg. Got it at Whole Foods.
I may try this recipe,
I have been using different cake recipes and found a few that work pretty well.
One thing ~ if you and your followers want to do this a LOT more easily,
bake your cake in a cake pan, then pop it out, split so it is about 3/8 inch or so,
line that cake pan with saran wrap and put one layer of cake in the bottom.
when the ice cream comes out of the batch freezer, pour it into the pan then top with the next layer of cake.
freeze it, turn it out onto the work table and cut the sizes that you want.
I made mine with the cake tops from some 9 inch round cakes that i had the staff bake for me, I am using the cakes for ice cream cakes and regular cakes, but the tops have a bit of skin that makes it nicer to hold.
It makes wedge shaped ice cream sandwiches, but that makes us unique.
one could of course use rectangular cake pans or sheet pans.
Using a full sheet pan would require sheet pan extenders to mold the sandwiches, but that would make lots of rectangles the most efficiently.
I did try this, it is by far the best recipe for ice cream sandwich that I have found.
Butter does not make it spread either (I don’t use any hydrogenated fats so I wasn’t going to use shortening).
Now if only I had a sheeter !
Oh Michelle! I dont quite understand why but every I go to your site, I swear, I can feel my pants getting tighter. Krazy huh???
Any way, I just wanted to let you know that i made your ice cream sandwiches and as expected (you never fail) they were so good that there is no word in the english language to describe them. The only thing I can say is MMMMMM……
I wanted to also tell you that I made them but I simplified then directions. So quick and so much easier. The first thing you want to do is prep 3—- 9×13 baking dishes with tin foil. Place the ice cream into the bottom of one of the pans. Keep it as smooth and even as you can. Cover with plastic wrap and put in the freezer till completely frozen. It usually takes about 3-4 hours. Once the dough is made, divide it 1/2 and put 1half in one pan and put the second 1/2 into the other pan. Press firmly into the bottom and bake at 350 degrees for 8 min. When the are done, put the pans on a cooling rack for 10 minutes, remove them from their pans lifting by the foil and return them to the cooling racks till totally cool. When ready to make the sandwiches, place one of the chocolate “breads” in a large piece of plastic wrap. Next take the ice cream pan from the fridge and lay ice cream layer directly and peel the foil off. Remove the foil for the second layer “bread” and lay on top of the ice cream layer. Wrap the whole thing in plastic wrap, then in foil wrap and put in freezer for about 4 hours until ice cream is frozen. Cut in desired sizes. EAT N ENJOY.
Hi Liz, Thanks so much for sharing your feedback! I’m thrilled that you enjoyed these!
I bought Cup4Cup flour which is a gluten free flour blend that supposedly you can substitute for regular AP flour. It’s expensive and I’ve never used it before so I was wondering if you thought it would work well in this recipe.
Hi Amber, I am not at all familiar with gluten-free flour substitutes, so I unfortunately can’t give you a guarantee on how it would work in this recipe.
It’s a pity, we can’t to buy like those ice cream sandwiches in our country ;/ (I live in Lithuania). Thank you for a recipe, I will definitely try these. :)) By the way, are there any cafes in your country, where you can eat just this kind of ice cream and nothing else? :)
Great photos! Need to try these ASAP.
I made these today, have yet to try them as i am letting them freeze. They were quite a lot of work, (I dont bake much) I tried some of the cookie before i froze them and it tastes really good. I only baked them for 5 mins. They turned out really good, they actually look almost as good as yours. I cant wait to taste them.,
As usual, AWESOME! Anyway, I just saw the queries about butter. Good point about the shortening. What do you think about 7T of butter with 1T of vegetable oil? You think that might a worthy sub? I’m just too lazy to go out shopping again for some shortening. Thanks again!
Hi Ruth, You can do that, but just know that the texture of the cookies will change, and they may spread more than they should by using the butter. Also, they will be more crispy then soft.
I went ahead and made them. The cookies surprisingly did not spread. I had already expected this, from my previous experience with cookies. I had some gluten-free flour mix on hand and decided to use that with the xanthum gum (Don;t really know how they changed the texture). They were not exactly crispy, kind of soft… but I need to make your original recipe to see the true difference.
Have you travelled with these in a cooler? I am wondering how long they would last if they had to stay (prefrozen of course) in a cooler for a few hours?
Hi Tracy, The farthest I have traveled with these (in a thermal cooler bag with a few ice packs) is about a half hour. They were just fine. I’m not sure about a few hours; if you were able to get it ice cold and fill it with ice packs, it could work.
This looks so yummy!
Gotta do it.
Actually we had a milkman too along with a breadman. That was until dad got the idea one of them was stalikng mom.
Yummy!!! I will be trying these!!! thanks for sharing!!!!!
These look fabulous!! I have wanted to try my own ice cream sandwiches for a while, but I was never quite sure how to go about getting the ice cream layer to be the right size for the cookies. I’ll have to play around with different flavors of homemade ice cream and give this a try!
just a question, can i use normal unsweetened cocoa? what’s the difference between the dutch processed one?
Hi Moi, In a pinch, you can use the unsweetened cocoa, but I would definitely recommend getting some Dutch-process to keep on hand if you make a lot of chocolate-based recipes. The Dutch-processed cocoa lends a much smoother, richer flavor to chocolate baked goods than the regular natural unsweetened.
Oh my goodness, these sound diving!
This sounds perfect for the grandkids!
Every time the ice cream truck played it’s magical song, this was the treat I was running out of the house for. 50 cents were never better spent! I can’t wait to try this recipe. Thanks for posting!
These ice cream sandwiches remind me of how long it’s been since I’ve had any! I think it’s about time to change that. :) Plus, your recipe and pix look great!
I fully support your summer mission of recreating these delicious frozen treats, hehe! Love these!!
These looks soo perfect, what a nostalgic treat! Perfect for a summertime party. You’re right – once you make a homemade version of something, you’ll never want to go back to the “box”… pasta, yogurt, ice cream sandwiches. Homemade always tastes a million time better. Thanks for this recipe!
omg, i had an ice cream sandwhich craving just today, i check your blog like i usually do and voi la, you have a home made recipe. michelle, i swear i love you, you always make my kitchen so interesting and tasty, never blah!
hello, your blog is amazing! I love ice cream sandwiches but unfortunately they are not sold in my country so I am always looking for a good recipe. I was wondering, when they are done, are the cookies soft, like the ones sold in the usa are they crunchy? Thanks
Hi Mariana, The cookies are soft. That was one of the reasons I loved this recipe so much – the cookies stayed nice and soft, even when frozen!
I tried them today and unfortunately they didn’t turn out soft, don’t know what I did wrong…the only thing I change was I used regular cocoa powder instead of dutch… :-(
Hi Mariana, I’m sorry your cookies didn’t turn out soft. The two keys to ensuring they are soft cookies is that you don’t roll the dough too thin – make sure to measure when you roll. They will look thick, but they end up perfect. The second key is to absolutely not overbake them. Avoid this by making sure you check them on low side of the baking time, and to ensure that your oven isn’t running hot by using an oven thermometer.
Definitely bookmarking this one. I love ice cream sandwiches and I would love to make my own since I’m trying to cut out as much processed food as I can.
I might have to try these.
Another amazing post for me to drool over… I’m featuring it in this week’s Food Fetish Friday series (with a link-back and attribution). I hope you have no objections and as always I love following your creations… Thanks so much for sharing.
These look perfect, Michelle! And loads of love to all the Pittsburgh Grandma’s who always had ice cream sandwiches and Klondikes in the freezer “for the grandkids” (even though I know my Grandpap loved them too!)
amazing, I love the pictures. i can just imagine biting down onto one of these!
when i start seeing ice cream sandwiches on food blogs, i know that summmer is just around the corner!
i wonder if this recipe will work if i just spread cookie dough on a baking sheet and bake it as one whole sheet then spread ice cream on top of that. what i mean is, will it work if don’t cut the ice cream into rectangles first before using?
Hi Connie, Hmm, I suppose you could try it that way. You’d need to bake two sheets of cookies, though (one for the top and one for the bottom). I’m unsure of baking time since it would be increased for an entire sheet vs. individual cookies, and I think you would need more dough if you were to essentially bake two 9×13-inch sheets of cookies.
Glad to see someone else wanting to do that. I want to just do the single sheet as well. Guess it is time to play in the kitchen after work! Thank you for sharing this recipe. It looks wonderful. Definaltey will use shortening. I make cookies and freeze them all the time, and yes they get rock hard when frozen.
i don’t ever want to buy ice cream sandwiches again!
Oh my, these are things of beauty! Who doesn’t love an ice cream sandwich?
Ooohh!! We’re on the same wave length and working on an ice cream sandwich for next week’s blog. This is so beautiful and elegant! Love the presentation. Congrats on top 9!
I wonder if I can make these without shortening? Maybe butter instead? I love the way they look, and it sounds amazing!
Hi Aly, I thought long and hard about that, but I felt that the butter would create too crisp of a cookie, that would get way, way too hard in the freezer. The shortening helps to keep the cookie soft and tender, even when frozen.
I love ice cream sandwiches, and yours look so good. I have to try these- thank you!
Old-Fashioned indeed! I absolutely loved these sandwiches growing up and making them would be so much better!
These look great! I can’t wait to adapt them to gluten free!
Love these! I bet they taste so much better homemade!
I love making ice cream sandwiches, but mine are never as pretty as these! They’re perfect! :)
I will try it – looks yummy!
xxxFiC.
http://www.fashionicook.blogspot.com
I want one of these right now, perfect for my post workout snack, don’t you think? These look so good. I love ice cream sandwiches. Saved this in my recipe file!
http://www.lifeofamodernhousewife.com
I agree! Ice cream sandwiches aren’t really what I usually think of first but they are so underrated!
I love ice cream sandwiches. They were always a staple in our house too when we were growing up. I love the idea of making them homemade, which is usually so much better.
Ooooooh! Loving these :)
These are so nostalgic to me, Michelle. Could not love this post more!
Fantstatic recipe! Looks yummy! I love ice cream bars! My favorite childhood ice cream treat were the pop ups! I love the pschedeilic (sorry for spelling) look of them with the pink, blue and green circles!
I love that you made your own ice-cream sandwiches. I used to eat these often as a treat when I was younger…never home-made though. They look perfect and I’m sure will knock the store bought ones right out of the park.
These look delicious! I wish I had some in my freezer right now.
My favorite frozen treat was (and is) the Snickers ice cream bars….ohmygod. If my mom ever bought a box when I was a kid…gone. In minutes. So good!
I’m from the bay area, so It’s-It ice cream treats are IT!!!
There is nothing better than an old fashion ice cream sandwich during these hot days! Your look perfect!
Wow! These look great. I’ll bet they’ll be good with Breyers French Vanilla or Breyers Oreo Cookies and Cream. I’ll have to try them.
I used to not like ice cream sandwiches, then I realized that was dumb, and now I love them. These look so tasty! Great pics!
Oh yum, this really takes me back to my childhood! It’s been years since I’ve had a good old-fashioned ice cream sandwich. Delicious!
Check out my blog, I’m blogging every day in June!
just-another-day2.blogspot.ca
I would love to surprise my family with these for July 4th. They look so yummy!
I looove the sound of these! Ice cream sandwiches are unbeatable!
These look beyond amazing, and better than anything you could buy in the store. Great photos too!
We call the icebergers here in Ireland,had one the other day but never dreamed of making my own! I love to make homemade ice-cream so these are a must!
shirley x
I saw those in Lindsay’s book (and the cover) and I have been pining away ever since! YUM!
Can you leave out or substitute the instant espresso powder. Not sure but it sounds like coffee and no one in my family will touch coffee. So hate to buy this powder and use such little amount.
By the way I love your blogs.
Karen
Hi Karen, Espresso powder is actually used in many chocolate recipe like cake, brownies, and sometimes cookies. It typically does not cause the resulting baked good to taste like coffee, but rather makes the chocolate flavor even deeper. However, you could definitely omit it if you’d like, you wouldn’t need to substitute anything for it.
These pictures are amazing! So cool that you tackled homemade ice cream sandwiches. p.s. I loved those firecracker popsicles when I was little :)
I ate these soo much growing up! Can’t wait to make them myself!
And me with a broken ice cream maker…. oh amazon when will you deliver? I love that you are making all my favorite foods available sans ingredients I can’t pronounce.
Wow, these are beyond perfect!! I can’t tell you how many times I’ve been tempted to pick up a box of ice cream sandwiches recently. I definitely think I need to make these instead, I know they’ll blow the store-bought out of the water!
Wow, these looks so delicious!!
You think it would be possible to substitute the vegetable shortening with butter?
Love your blog by the way :)
Hi Andrea, Thank you! In many recipes, you can easily substitute butter for shortening, but I would caution against doing so in this recipe. The shortening is the key to keeping the cookies soft, even when frozen.
Hi Michelle, I really want to try these! I am just not a fan of processed shortening, hence the reason I make things homemade. :-)
Is there anything else one could use? I believe even coconut oil hardens once frozen. :-(
What about lard? I might try that because that is what I have in the pantry right now.
I tried making the ice cream sandwiches. The taste is great however the appearance turned out awful. How did you get yours to look so perfect? Is there a video showing how you made them?
Hi Joann, I’m sorry to hear that! I don’t have a video, but the key is definitely to work quickly with the ice cream, and have the cookies frozen.