
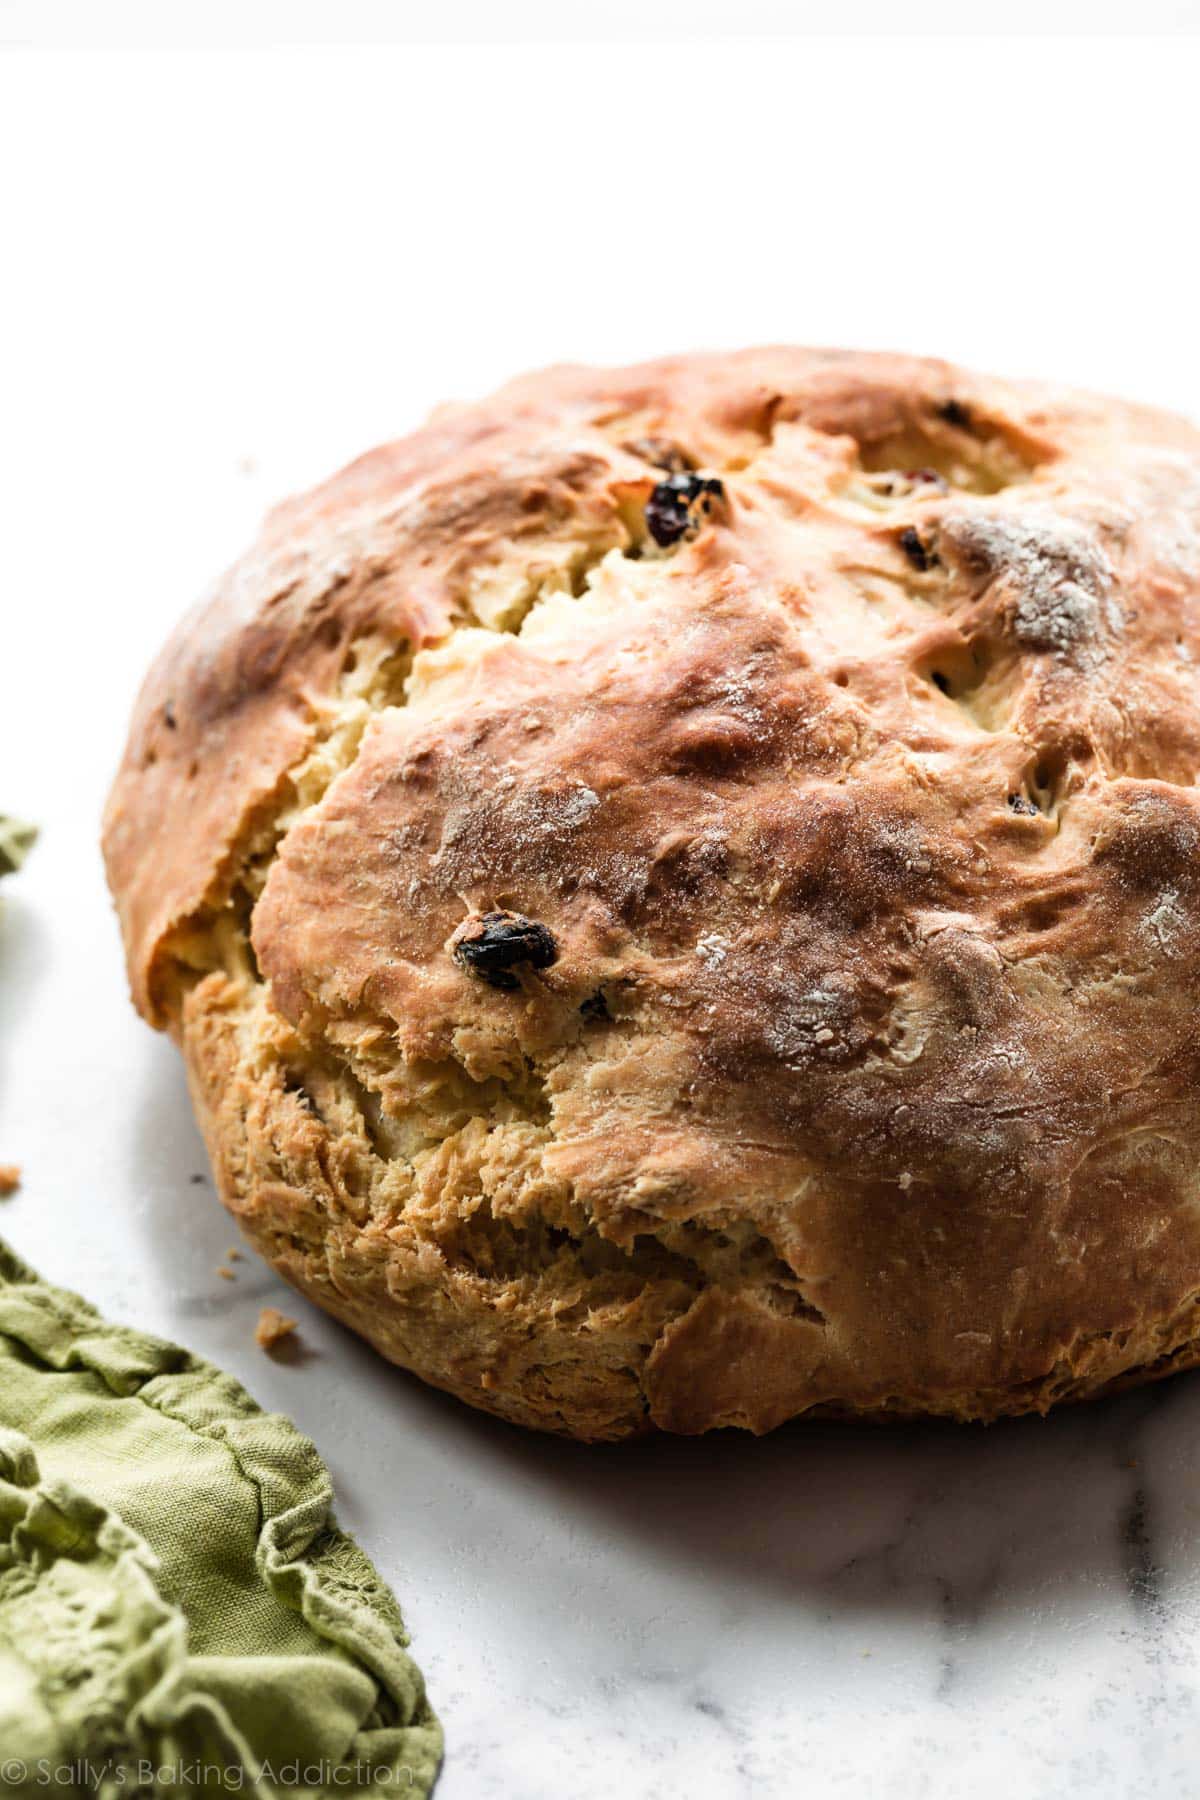
Irish Soda Bread is a quick bread that does not require any yeast. Instead, all of its leavening comes from baking soda and buttermilk. This Irish soda bread recipe is my grandmother’s and has been cherished in my family for years. It’s dense, yet soft and has the most incredible crusty exterior. Buttermilk and cold butter are the secret to its delicious success!
Welcome to my favorite Irish Soda Bread recipe. I shared this no yeast bread recipe on my blog a few years ago and decided to revisit with fresh new pictures and a video tutorial. This recipe is my grandmother’s. She passed away in 2011, 2 weeks before I started this food blog. I dedicated my 1st cookbook to her. Full of energy and the creator of the best homemade pie crust on earth, she would be in her 90s today. St. Patrick’s Day is her birthday.

Irish Soda Bread is a Quick Bread
Does the thought of homemade bread send you running for the hills? Sometimes homemade bread feels daunting, but you’re in luck today. Irish soda bread is a quick bread made with baking soda, not yeast. Like my easy no yeast bread, this is a shortcut bread that doesn’t skimp on flavor. (If you want a yeast bread, I recommend my sandwich bread recipe!)
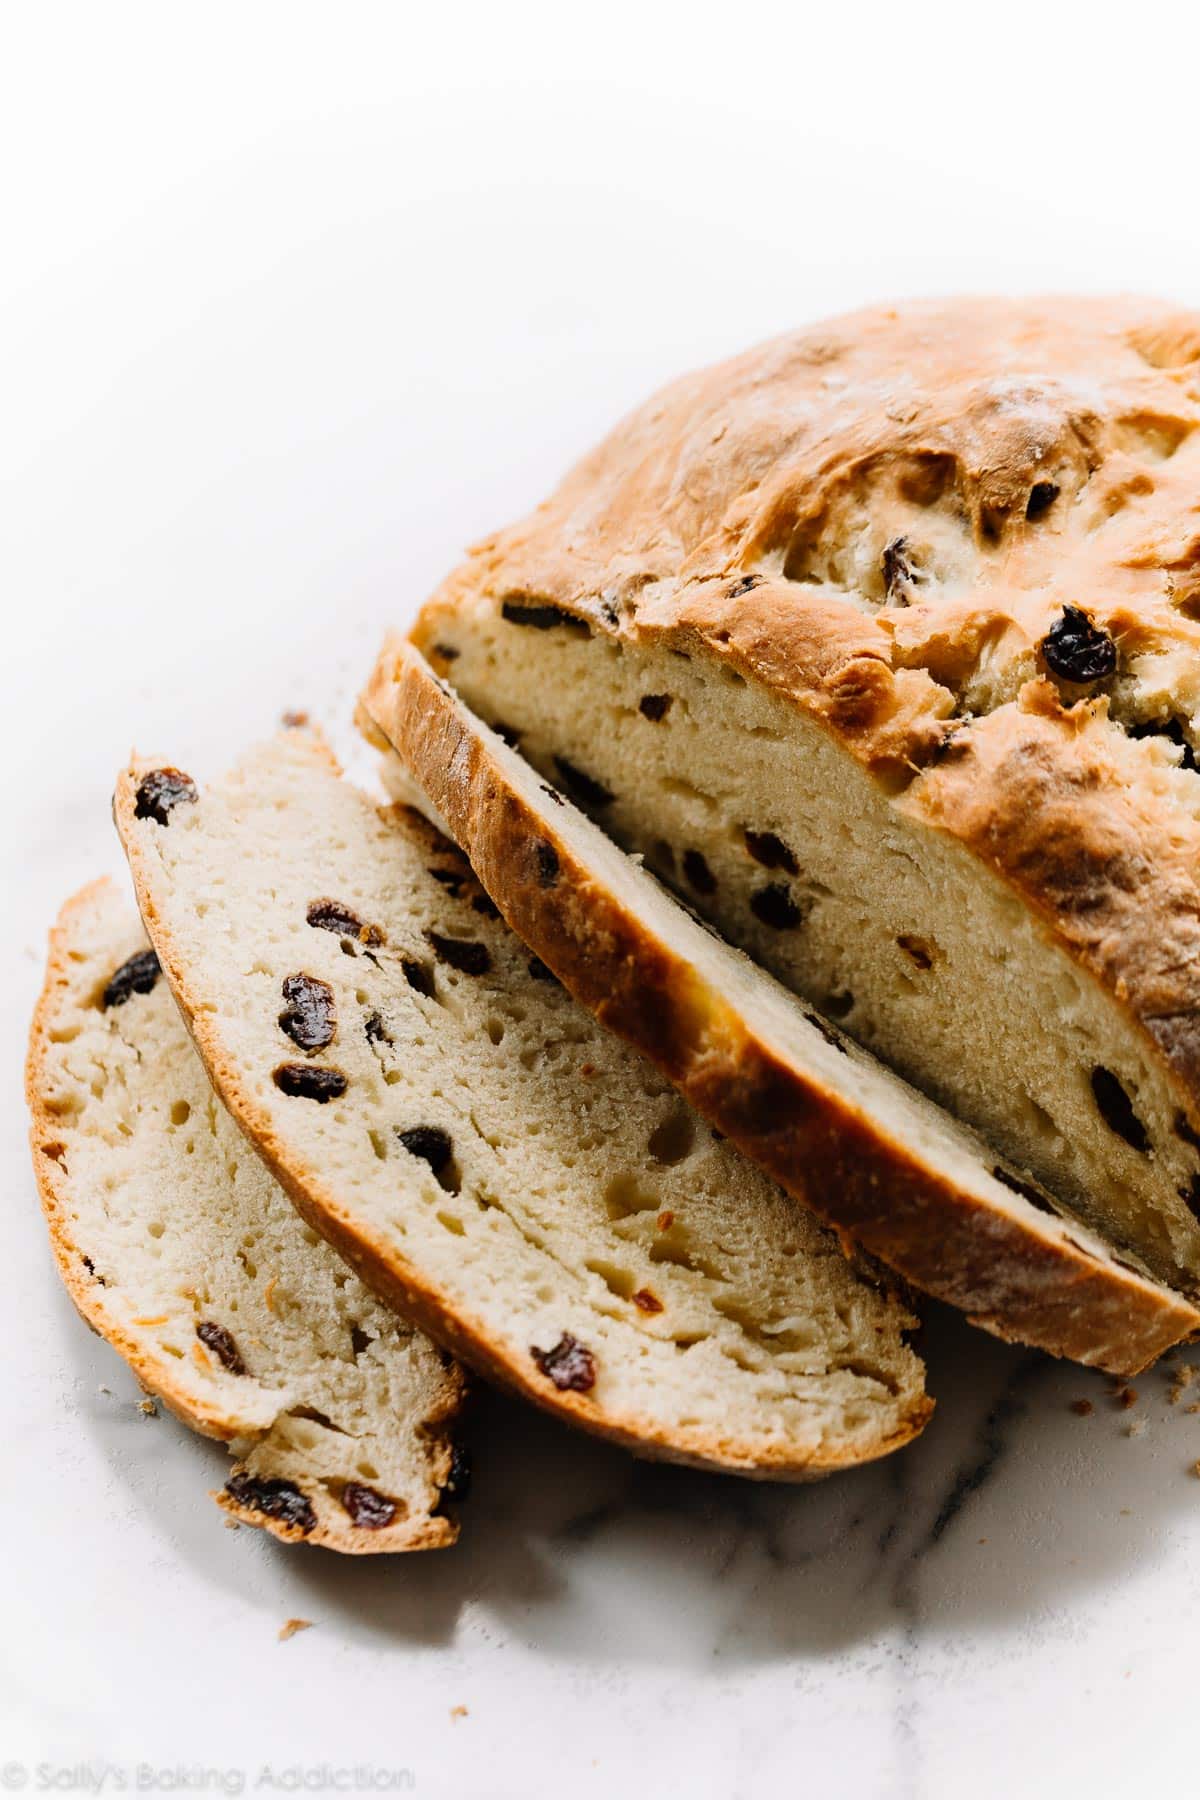
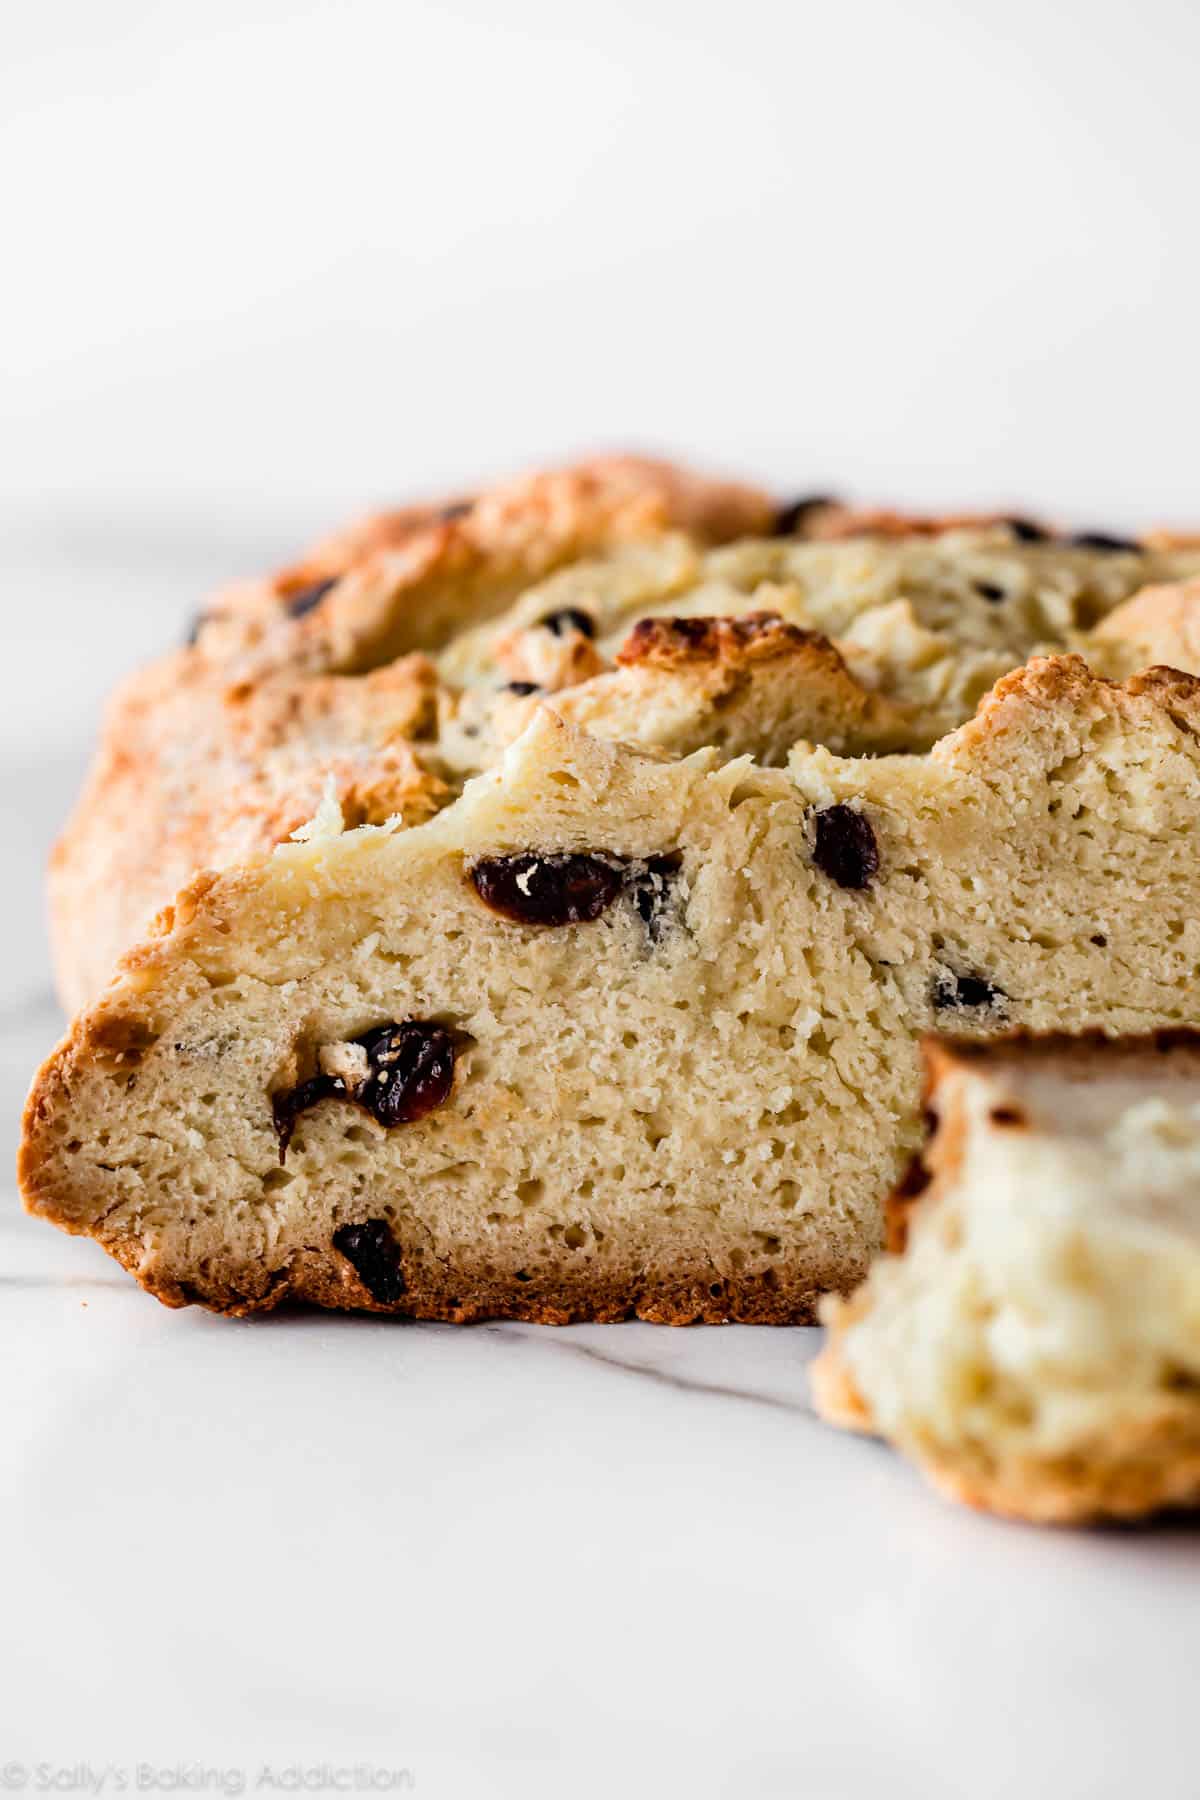
- What’s the texture like? The best Irish soda bread, like this recipe, has a golden brown crust with a dense, tight crumb. The bread isn’t heavy, it’s actually quite tender and soft inside. The crust is nice and crisp when it comes out of the oven and becomes a little chewy on day 2 and 3. It’s so good.
My grandmother’s Irish soda bread contains some sugar, but it’s not overly sweet. It’s a wonderful companion for savory dinners like hearty stew or you can serve it with butter, honey butter, jam, and/or cheese. The raisins are optional, but Grandma would never let you skip them.
Video Tutorial: Homemade Irish Soda Bread
Overview: How to Make Irish Soda Bread
The full printable recipe is below. Irish soda bread dough comes together in about 10 minutes. You need buttermilk, egg, flour, sugar, baking soda, salt, and butter.
- Whisk buttermilk and 1 egg together. Whisk the flour, sugar, baking soda, and salt together in another bowl.
- Cut cold butter into the flour mixture. Like scones and pie crust, cutting cold butter into the flour is a key step. Coating the flour in cold butter guarantees a lovely flaky texture. You can use a fork, your hands, or a pastry cutter. Add the wet ingredients.
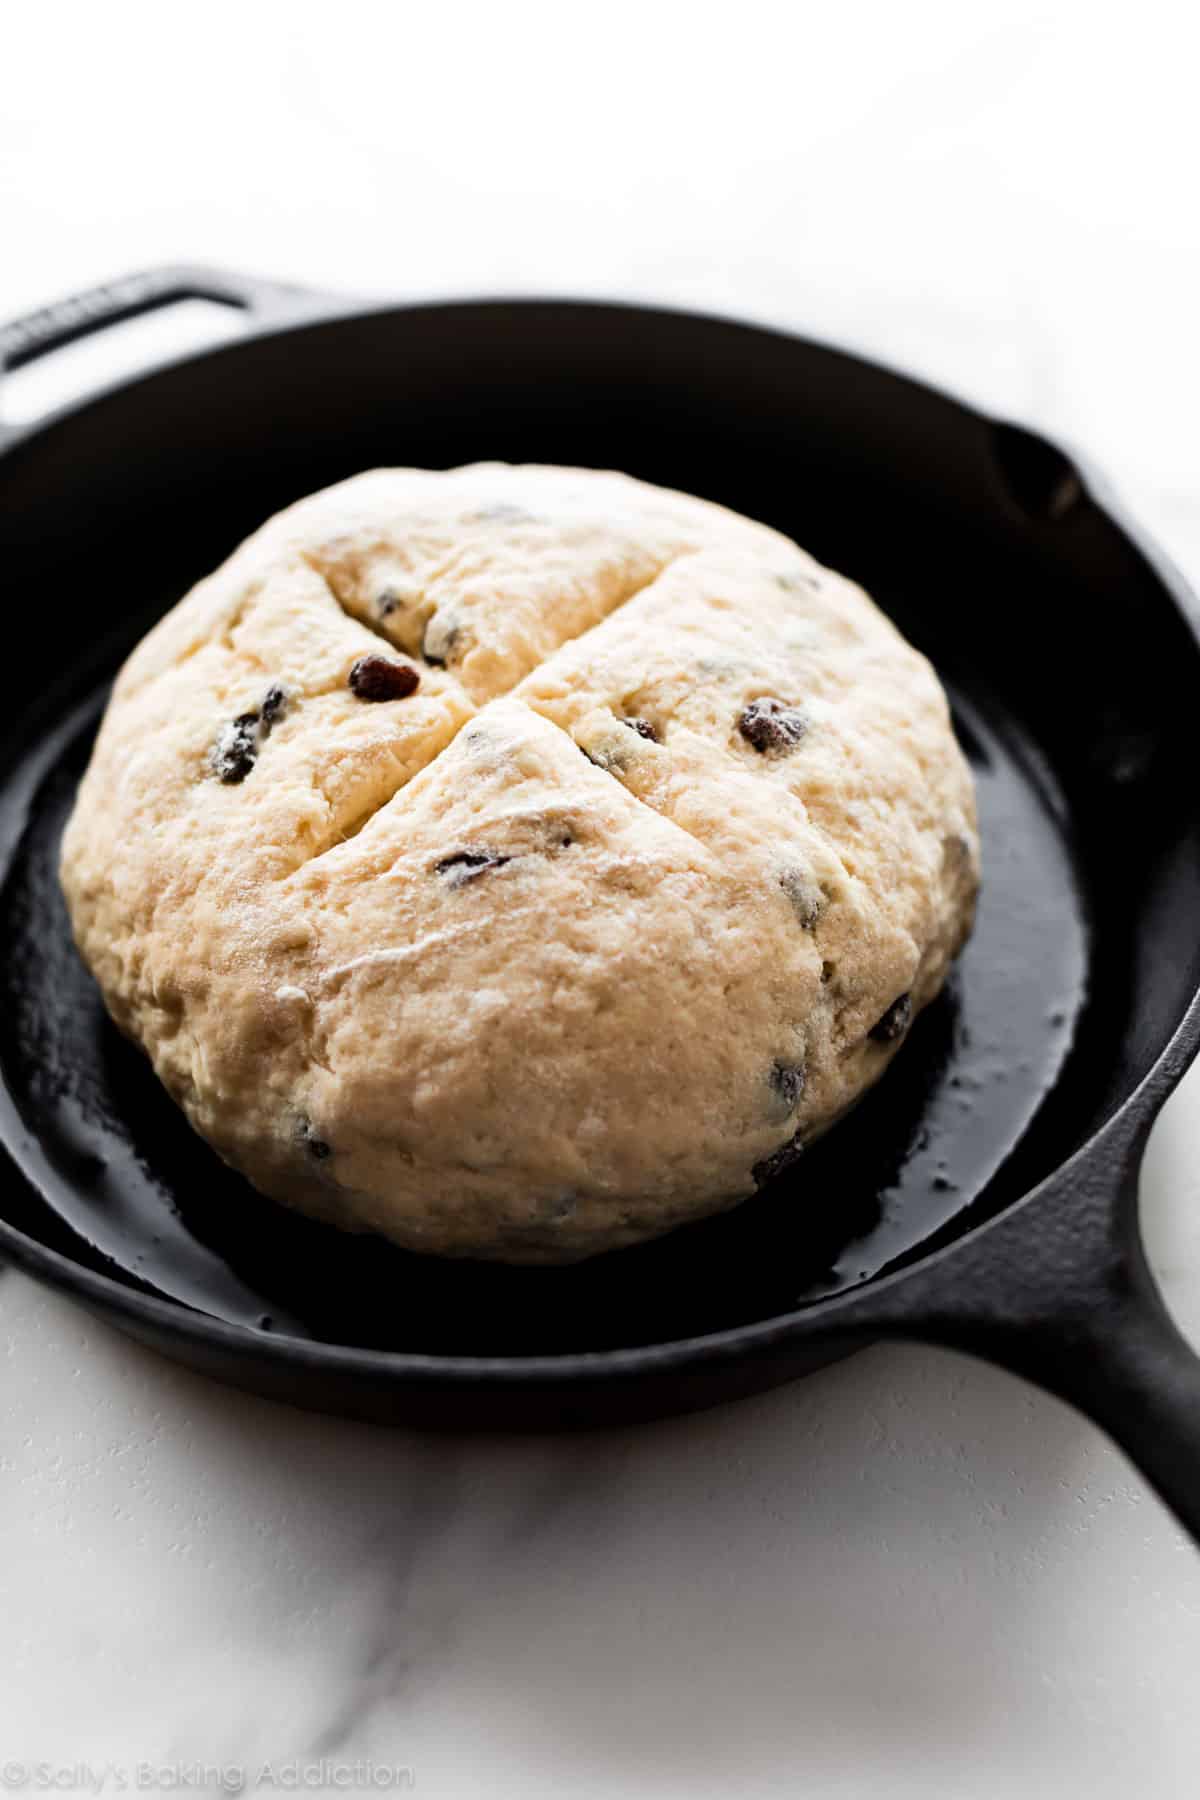
- Bring the dough together with your hands. Using a very sharp knife, score the dough. This allows the center to bake.
- Bake until golden brown.
Buttermilk is the Secret
Irish soda bread only requires a few ingredients, including buttermilk. Buttermilk reacts with the baking soda to provide the bread’s leavening. It also adds wonderful flavor! We use buttermilk for the same reasons in my regular no yeast bread, too. If you’re interested, I have plenty more on this topic in my Baking with Buttermilk post (including a DIY buttermilk substitute recipe).
Feel free to Skip the Egg
Irish soda bread can be made with or without an egg. 1 egg adds richness and density. Feel free to skip it to make a slightly lighter loaf. No other changes necessary, simply leave out the egg.
3 Success Tips
- Don’t over-work the dough. It’s supposed to look a little shaggy.
- Score the top of the dough with an “X” before baking. This helps the center bake through.
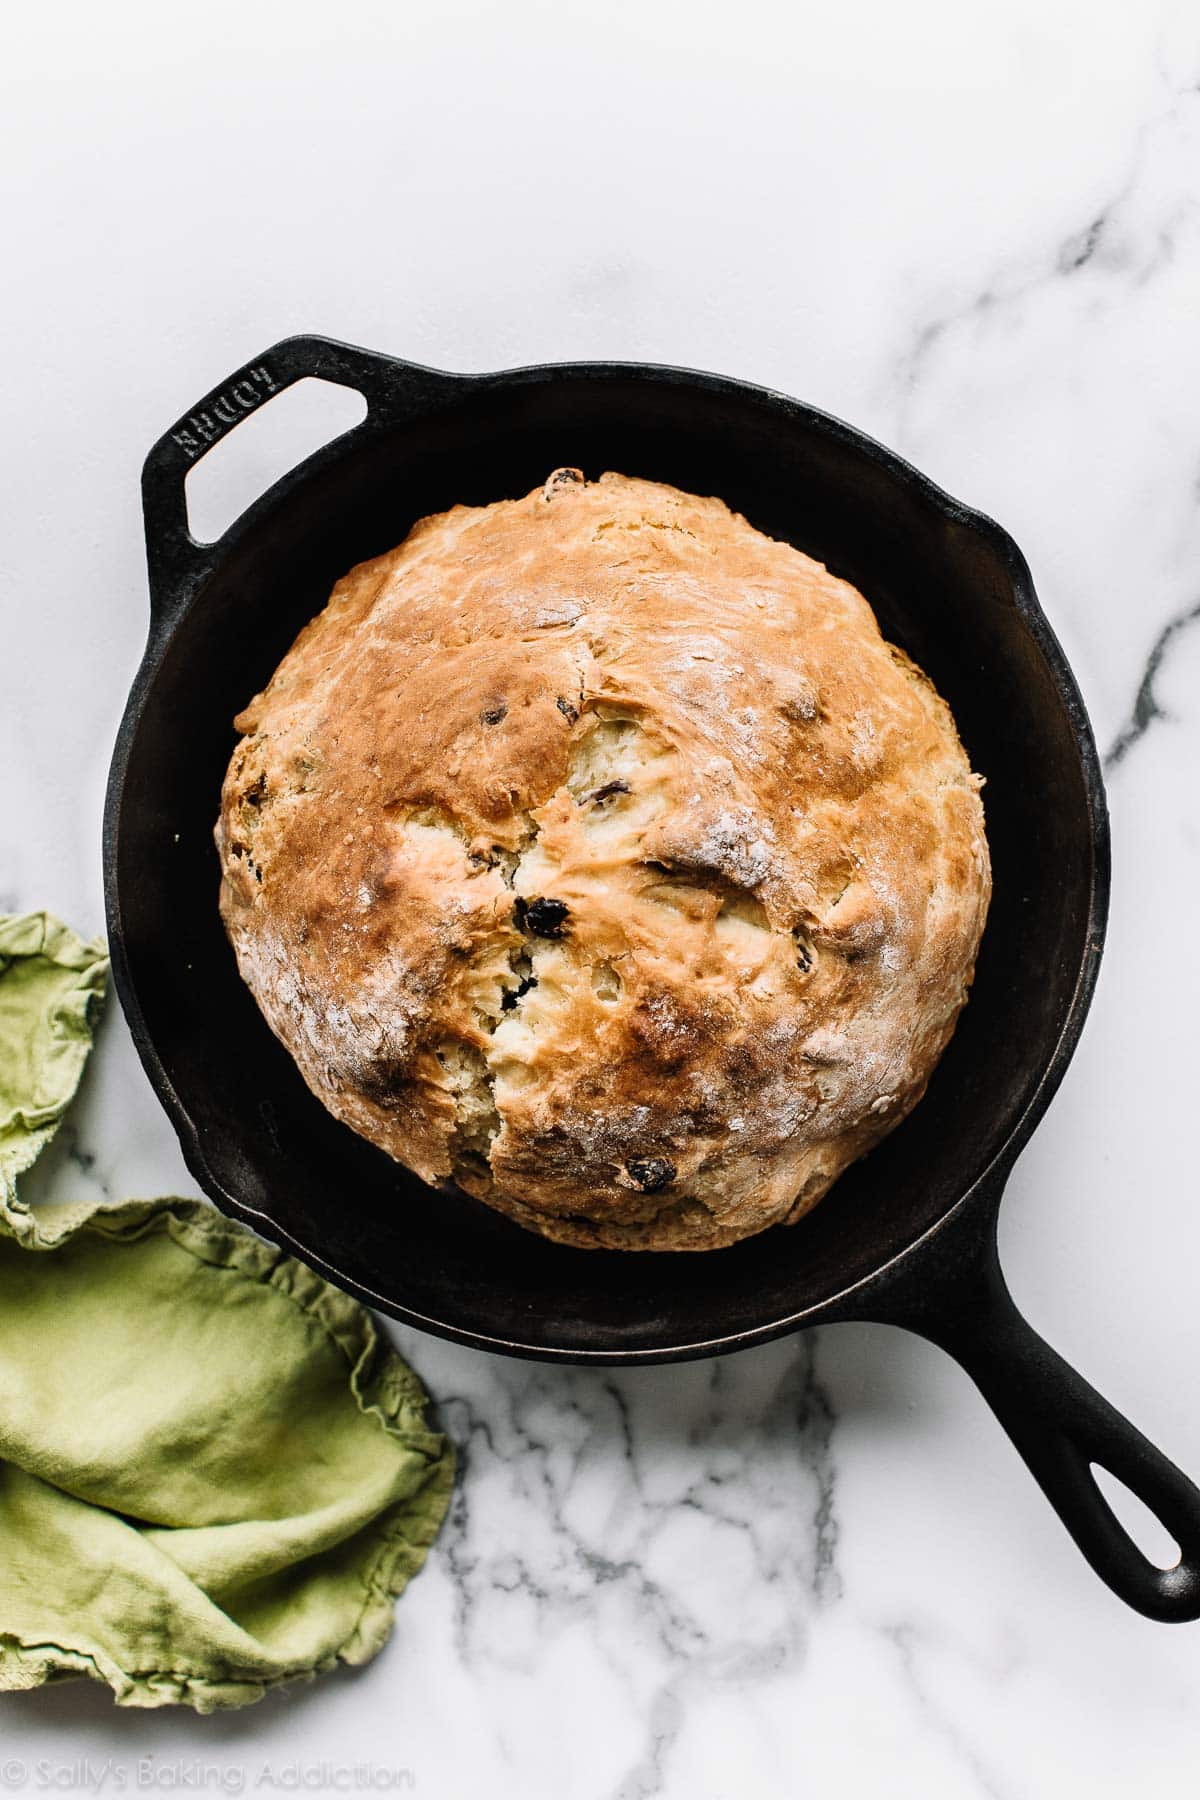
- You can bake Irish soda bread on a baking sheet, in a baking pan, or in a cast iron skillet. I recommend a cast iron skillet because it helps guarantee a super crispy crust. Here’s how to keep your cast iron cookware seasoned.
If you’re baking for St. Patrick’s Day, you’ll love my Guinness Brownies, Baileys and Coffee Cupcakes, Guinness Chocolate Cake, Guinness Chocolate Cupcakes, Lucky Charms Treats, and shamrock St. Patrick’s Day Cookies, too.
Print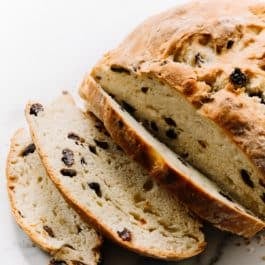
Grandma’s Irish Soda Bread
- Prep Time: 10 minutes
- Cook Time: 45 minutes
- Total Time: 55 minutes
- Yield: 1 loaf
- Category: Bread
- Method: Baking
- Cuisine: Irish
Description
Irish Soda Bread is a quick bread that does not require any yeast. Instead, all of its leavening comes from baking soda and buttermilk. This Irish Soda Bread recipe is my grandmother’s and has been cherished in my family for years. It’s dense, yet soft and has the most incredible crusty exterior.
Ingredients
- 1 and 3/4 cups (420ml) buttermilk*
- 1 large egg (optional, see note)
- 4 and 1/4 cups (531g) all-purpose flour (spooned & leveled), plus more for your hands and counter
- 3 Tablespoons (38g) granulated sugar
- 1 teaspoon baking soda
- 1 teaspoon salt
- 5 Tablespoons (71g) unsalted butter, cold and cubed*
- optional: 1 cup (150g) raisins
Instructions
- Preheat oven & pan options: Preheat oven to 400°F (204°C). There are options for the baking pan. Use a regular baking sheet and line with parchment paper or a silicone baking mat (bread spreads a bit more on a baking sheet), or use a seasoned 10-12 inch cast iron skillet (no need to preheat the cast iron unless you want to), or grease a 9-10 inch cake pan or pie dish. You can also use a 5 quart (or higher) dutch oven. Grease or line with parchment paper. If using a dutch oven, bake the bread with the lid off.
- Whisk the buttermilk and egg together. Set aside. Whisk the flour, granulated sugar, baking soda, and salt together in a large bowl. Cut in the butter using a pastry cutter, a fork, or your fingers. Mixture is very heavy on the flour, but do your best to cut in the butter until the butter is pea-sized crumbs. Stir in the raisins. Pour in the buttermilk/egg mixture. Gently fold the dough together until dough it is too stiff to stir. Pour crumbly dough onto a lightly floured work surface. With floured hands, work the dough into a ball as best you can, then knead for about 30 seconds or until all the flour is moistened. If the dough is too sticky, add a little more flour.
- Transfer the dough to the prepared skillet/pan. Using a very sharp knife or bread lame, score the dough with a slash or X about 1/2 inch deep. (“Score” = shallow cut.)
- Bake until the bread is golden brown and center appears cooked through, about 45-55 minutes. Loosely tent the bread with aluminum foil if you notice heavy browning on top. For a more accurate test, the bread is done when an instant-read thermometer reads the center of the loaf as 195°F (90°C).
- Remove from the oven and allow bread to cool for 10 minutes, and then transfer to a wire rack. Serve warm, at room temperature, or toasted with desired toppings/spreads.
- Cover and store leftover bread at room temperature for up to 2 days or in the refrigerator for up to 1 week. We usually wrap it tightly in aluminum foil for storing.
Notes
- Freezing Instructions: Baked and cooled bread freezes well up to 3 months. Freeze the whole loaf or individual slices. Thaw in the refrigerator or at room temperature, then reheat as desired.
- Special Tools (affiliate links): Cast Iron Skillet, 9-inch Round Cake Pan, 9-inch Pie Dish, Dutch Oven, or Baking Sheet with Silicone Baking Mat or Parchment Paper | Glass Mixing Bowl | Whisk | Pastry Cutter | Bread Lame | Instant-Read Thermometer
- Baking Pan: There are options for the baking pan (see Special Tools Note above). You can use a lined large baking sheet (with or without a rim), a seasoned 10-12 inch cast iron skillet, or a greased or lined 9-10 inch cake pan or pie dish. I don’t recommend a loaf pan because the loaf may not bake evenly inside. This dough is best as a flatter loaf.
- Buttermilk: Using cold buttermilk is best. Buttermilk is key to the bread’s flavor, texture, and rise. The bread will not rise without it. If you don’t have any buttermilk on hand, you can make a homemade buttermilk substitute. Whole milk or 2% milk is best, though lower fat or nondairy milks work in a pinch. Add 1 Tablespoon of lemon juice or white vinegar to a liquid measuring cup. Add enough cold milk to make 1 and 3/4 cups. Whisk together, then let sit for 5 minutes before using in the recipe.
- Egg: 1 egg adds richness and density. Feel free to skip it to make a slightly lighter loaf. No other changes necessary, simply leave out the egg.
- Cold Butter: The colder the butter, the less sticky the dough will be. Make sure it’s very cold, even frozen cubed butter is great.
- Smaller Loaves: You can divide this dough up to make smaller loaves. The bake time will be shorter, depending how large the loaves are. An instant read thermometer will be especially helpful. Bake the loaves until an instant-read thermometer reads the center of the loaf as 195°F (90°C).


Reader Comments and Reviews
Hi, I’m out in Colorado at about 5,000 ft altitude, there weren’t any adjustments that I could find for that. It was so dry I added a teensy bit of water just to try to get it to stay together, added more flour was able to form a pretty rough ball to put in my cast iron did the x but it’s all coming apart like in pieces, I’ll try to attach a picture but could it be that I needed an adjustment for altitude? Pls let me know. It smells great ! And my hubs will prob love the flavor .
Hi Cin, I wish we could help, but have no experience baking at high altitude. Some readers have found this chart helpful: https://www.kingarthurflour.com/learn/high-altitude-baking.html
Have made this several times because it’s now by favorite bread recipe. Add grated cheese and sun dried tomatoes for added kick.
loved the taste and texture of the Irish soda bead. so glad I found this site
Easy and quick to put together, but I agree with another comment that said this bread was too dry. (Everything was weighed and the internal temp was taken.) It was just way too dry and hard crust. Wouldn’t make it again unfortunately.
My grandson made this from scratch with only a few tips from me he is only 10
Absolutely perfect, it was the star at dinner, everyone loved it.
I followed all the steps to the letter, including chopping up butter into small dice and putting it into the freezer for 20 mins.
Thank you for this fantastic recipe.
I have a question that will seem dumb and sorry for this. But I LOVE this Irish soda bread recipe, it’s growing on me daily as it disappears. I want to make it again. But I struggled SO MUCH with it. I see people say it’s easy and I’d like to understand how. I formed it on the countertop. I put a lot of flour on the counter first, not a little. I could not make a ball because I had a sticky gooey mess that was stuck to the counter. I kept adding more and more flour to attempt to turn goo into a formable mass. But getting it off the countertop required a lot of flour underneath. Can you please tell me what surface I should be working on so that I don’t struggle so much to get it off and onto the parchment lined pan next time? Thank you!
Hi Elizabeth, we’re happy to help troubleshoot. This is a sticky dough, but there are a lot of variables that go into the consistency – there’s nothing wrong with adding just a little more flour to bring the dough into a less sticky and knead-able consistency. In addition to flouring the surface as you’ve mentioned, you can add additional flour to the dough in the mixing bowl. Start small—one Tablespoon at a time—until the dough becomes stiff to stir. Make sure you are also working with very cold butter, too—if the butter is too warm, that will make the dough stickier. A bench scraper can also be helpful for lifting the dough off your countertop surface. Hope this helps for your next loaf!