
With crisp edges, thick centers, and room for lots of decorating icing, I know you’ll love these soft cut out sugar cookies. Use your favorite cookie cutters and try my classic royal icing.

These are my favorite sugar cookies with icing. I shared the recipe on Sally’s Baking Addiction several years ago and published them in my cookbook as well. I’ve made them at least 38577 times (imagine all the butter), so I figured it’s time to share new recipe tips, a video tutorial, and more helpful information.
Why You’ll Love These Sugar Cookies
- Soft, thick centers with slightly crisp edges
- Irresistible buttery vanilla flavor
- Leave plain or flavor with extras like maple, cinnamon, and more
- Hold their shape
- Flat surface for decorating
- Stay soft for days
- Freeze beautifully
Sugar Cookies Video Tutorial


Overview: How to Make Sugar Cookies with Icing
- Make cookie dough. You only need 7-8 ingredients. With so little ingredients, it’s important that you follow the recipe closely. Creamed butter and sugar provide the base of the cookie dough. Egg is the cookie’s structure and vanilla extract adds flavor. I almost always add a touch of almond extract for additional flavor and highly recommend that you try it too! Flour is an obvious addition, baking powder adds lift, and salt balances the sweet. So many *little ingredients* doing *big jobs* to create a perfect cookie. By the way, I also make chocolate sugar cookies too!
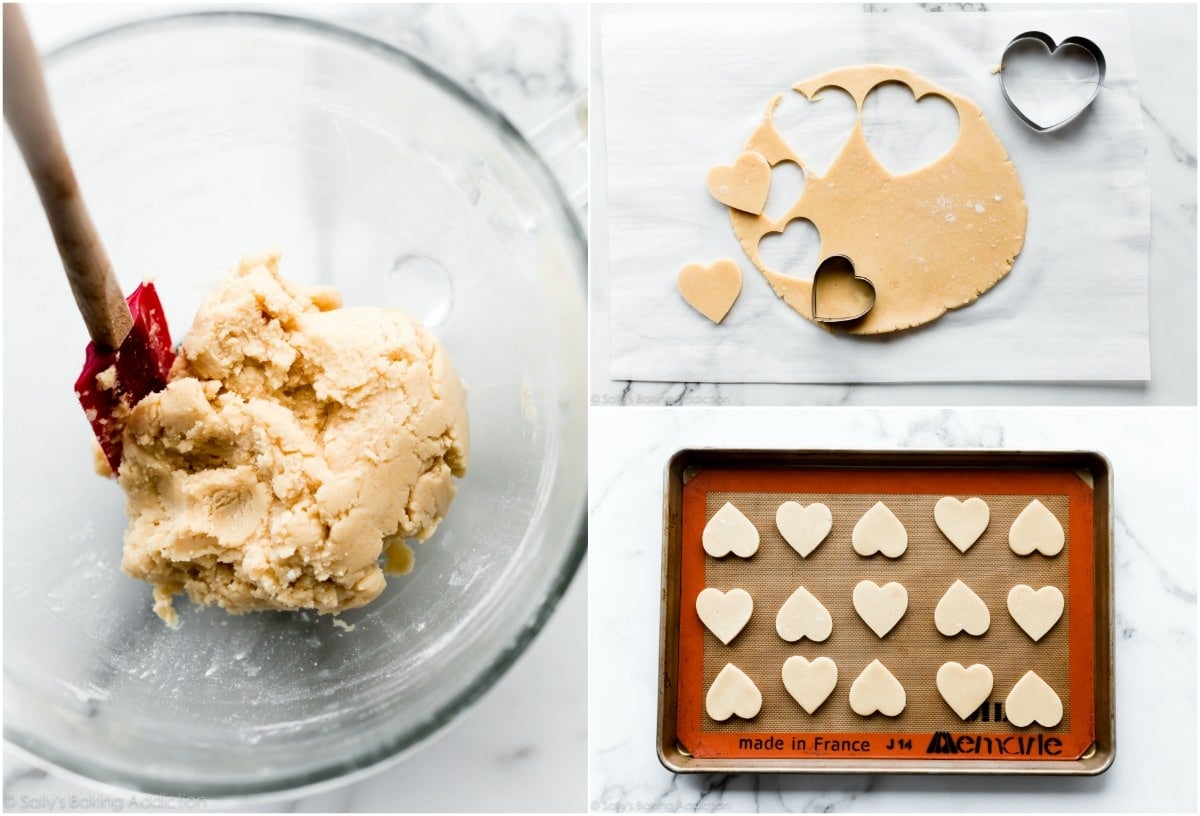
- Divide in two pieces. Smaller sections of dough are easier to roll out.
- Roll out cookie dough. Roll it out to 1/4 inch thick or just under 1/4 inch thick. If you have difficulty evenly rolling out dough, try this adjustable rolling pin. Speaking from experience—it’s incredibly handy!
- Chill rolled out cookie dough. Without chilling, these cookie cutter sugar cookies won’t hold their shape. Chill the rolled out cookie dough for at least 1-2 hours and up to 2 days.
- Cut into shapes. If you need suggestions for cookie cutters, I love Ann Clark brand. (Not sponsored, just a genuine fan!) Some of my favorites include this heart set, dog bone, snowflake, snowman, leaf, and a pumpkin. I also use and recommend these heart cookie cutters.
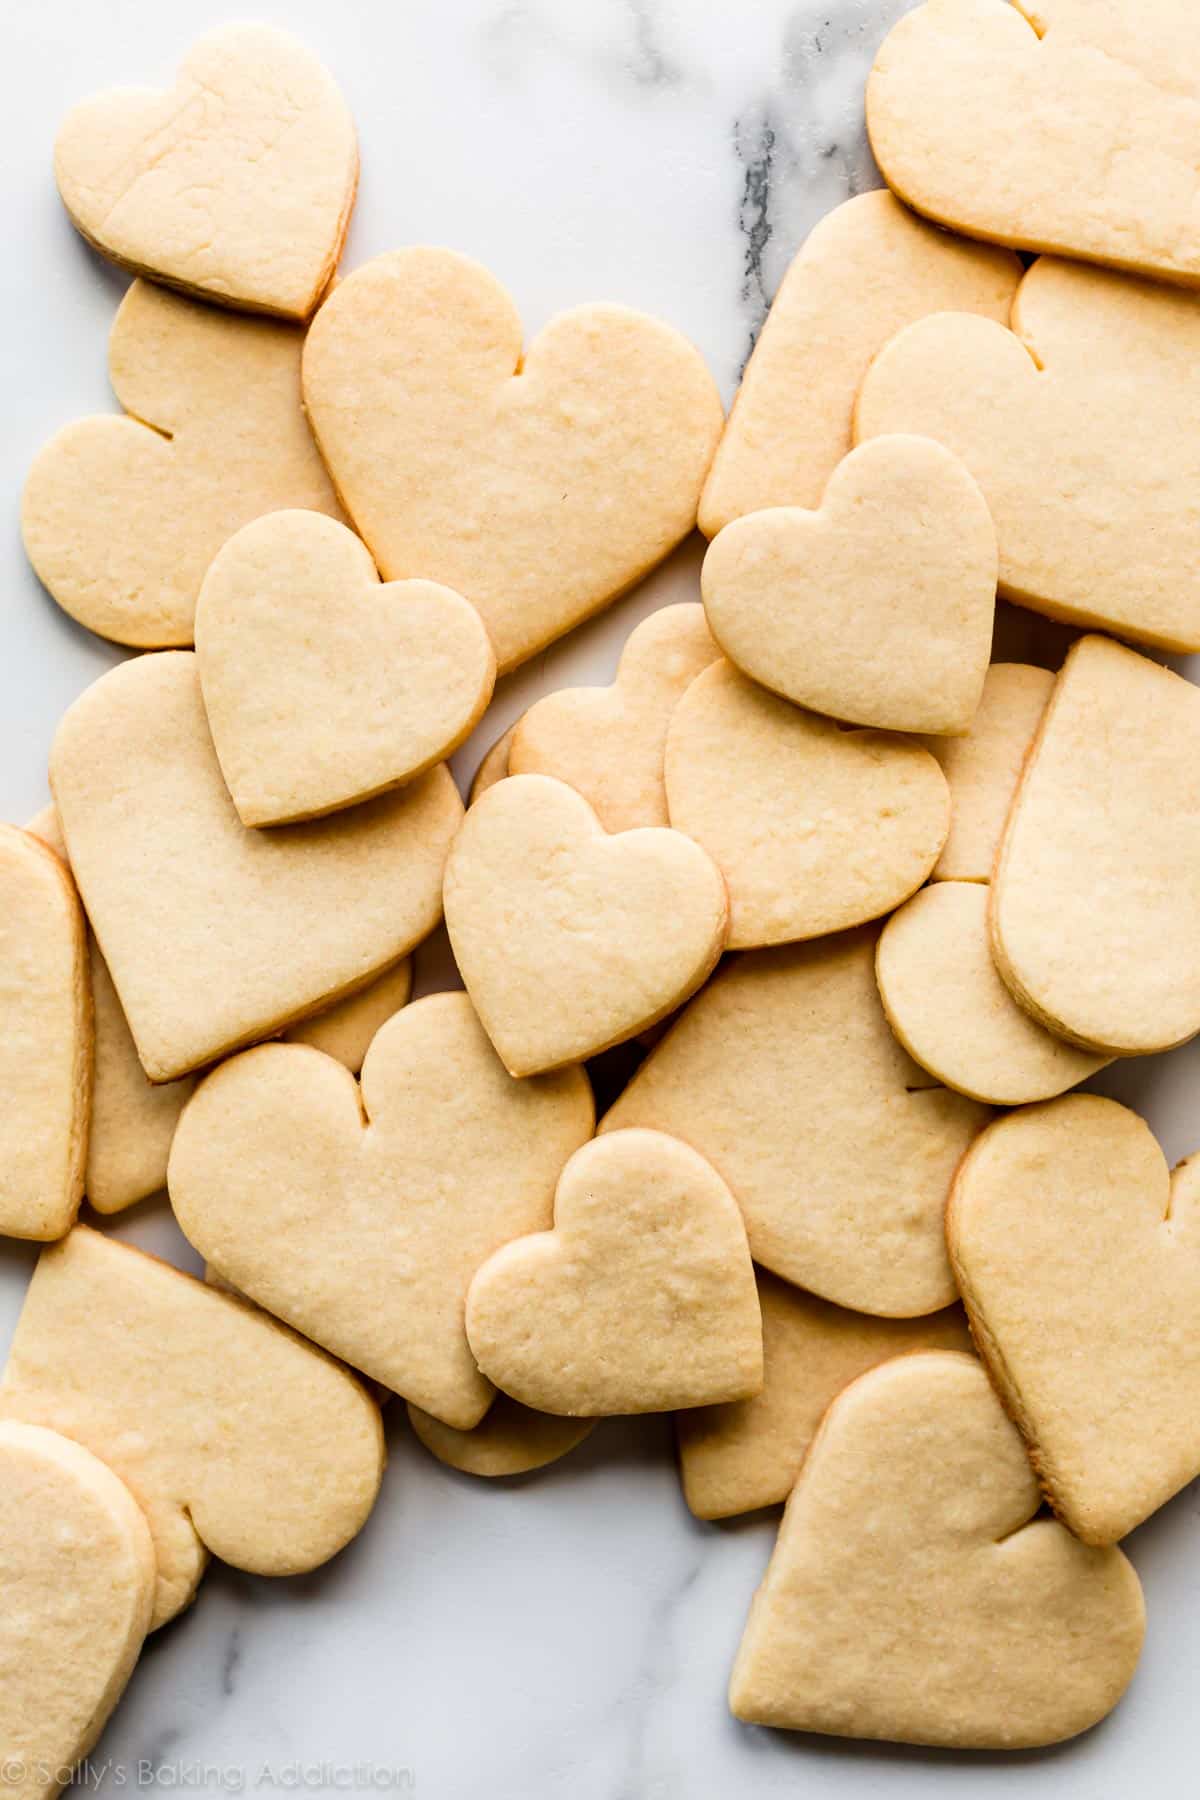
- Bake & cool. Depending on size, the cookies take about 12 minutes.
- Decorate. See my suggested icings below and my how to decorate sugar cookies tutorial for even more helpful decorating tips.
Have a little flour nearby when you’re rolling out the cookie dough. Keep your work surface, hands, and rolling pin lightly floured. This is a relatively soft dough.
The Trick Is the Order of Steps
Notice how I roll out the dough BEFORE chilling it in the refrigerator? That’s my trick and you can see me doing it in the video tutorial above.
Let me explain why I do this. Just like when you’re making chocolate chip cookies, to prevent the cookies from over-spreading, the cookie dough must chill in the refrigerator. Roll out the dough right after you prepare it, then chill the rolled-out dough. (At this point the dough is too soft to cut into shapes.) Don’t chill the cookie dough and then try to roll it out because it will be too cold and difficult to work with. I divide the dough in half before rolling it out and highly recommend you do the same. Smaller sections of dough are simply more manageable.
Another trick! Roll out the cookie dough directly on a silicone baking mat or parchment paper so you can easily transfer it to the refrigerator. Pick it up, put it on a baking sheet, and place it in the refrigerator. If you don’t have enough room for two baking sheets in your refrigerator, stack the pieces of rolled out dough on top of each other.
How Thick Do I Roll Sugar Cookies?
These sugar cookies remain soft because they’re rolled out pretty thick. Roll out the cookie dough to about 1/4 inch thick or just under 1/4 inch thick. Yes, this is on the thicker side and yes, this produces extra thick and soft cookies. If rolling out cookie dough doesn’t sound appealing, try my drop sugar cookies instead.
Sugar Cookie Icing
I have THREE sugar cookie icing recipes and you can choose whichever works best for you.
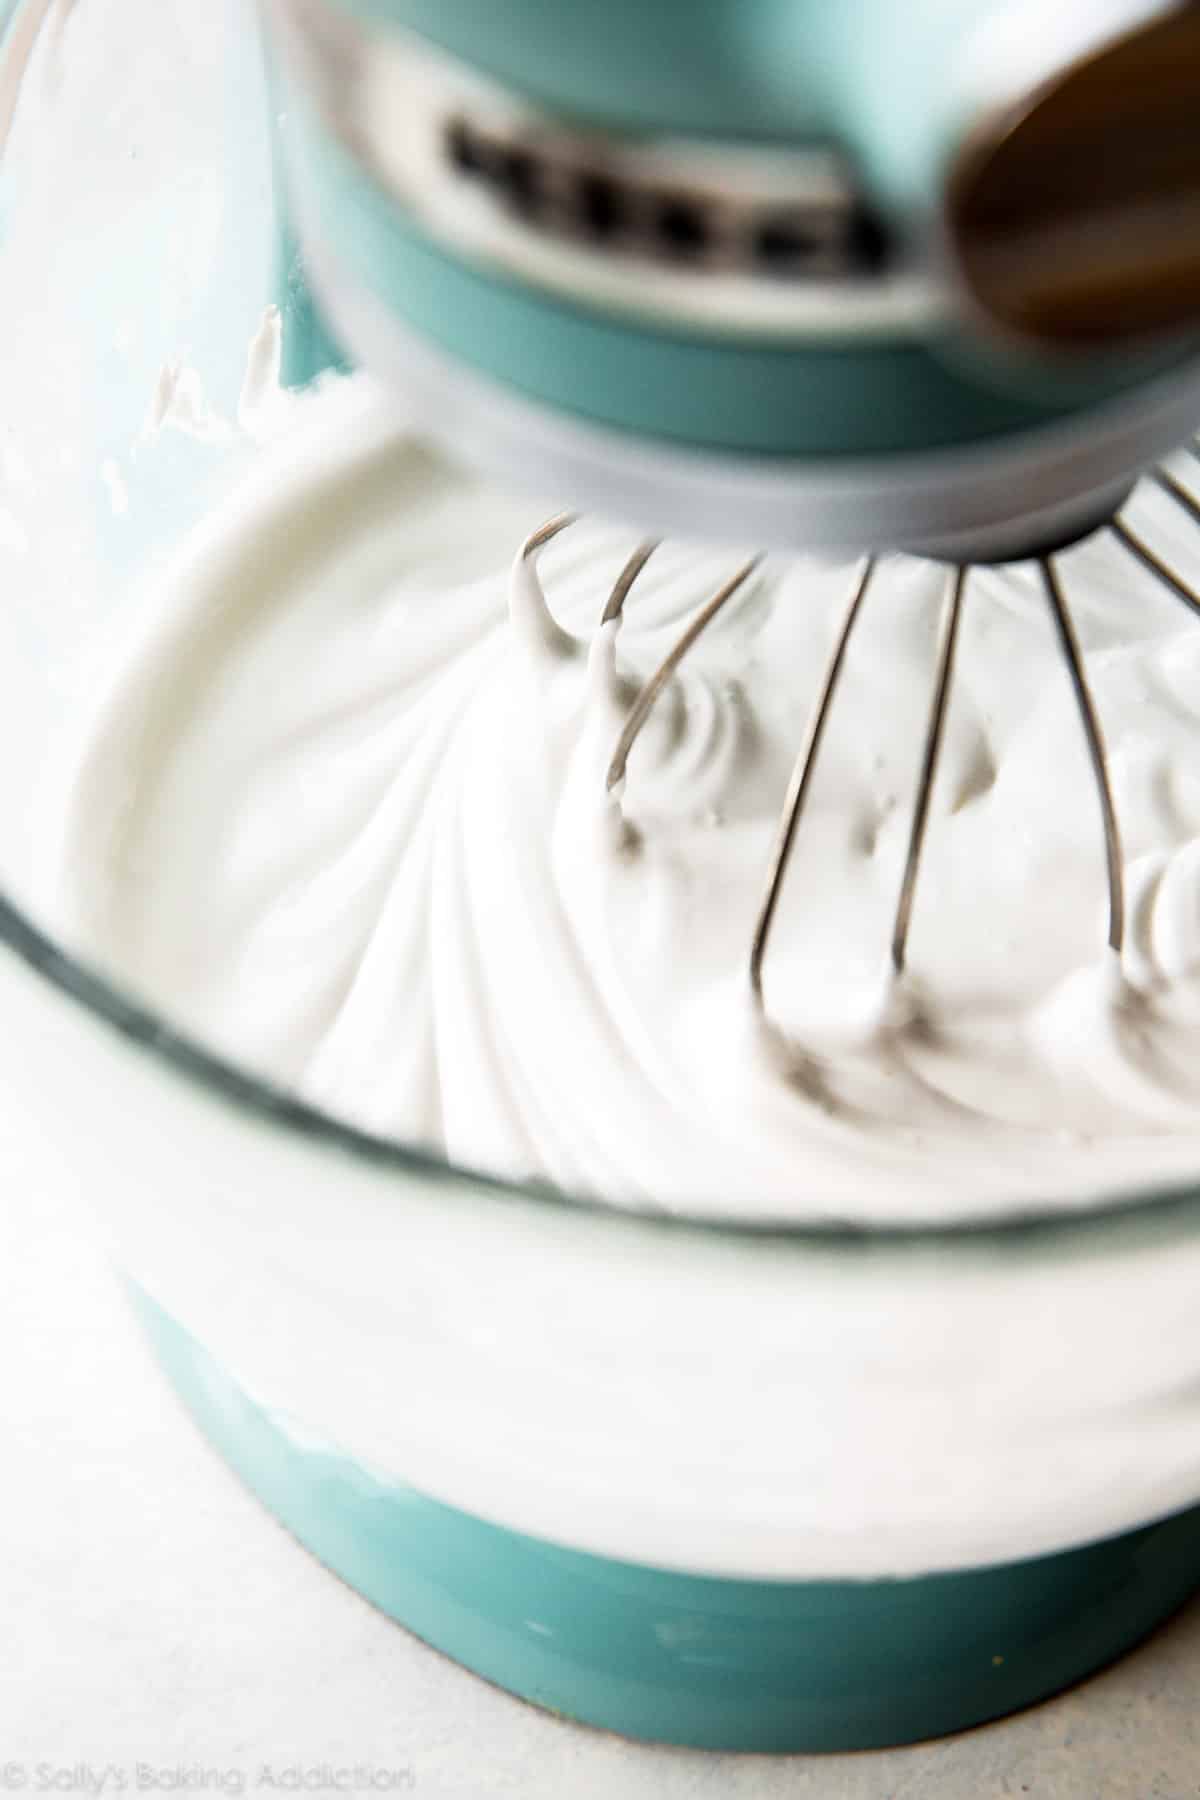
- Favorite Royal Icing: This royal icing is my preferred sugar cookie icing because it’s easy to use, dries within 1-2 hours, and doesn’t taste like hardened cement. (It’s on the softer side!) I make it with meringue powder. Meringue powder takes the place of raw egg whites, which is found in traditional royal icing recipes. It eliminates the need for fresh eggs, but still provides the same consistency. You can find meringue powder in some baking aisles, most craft stores with a baking section, and online. The 8 ounce tub always lasts me awhile. The trickiest part is landing on the perfect royal icing consistency, but I provide a video in the royal icing recipe to help you.
- Easy Cookie Icing: This easy cookie icing is ideal for beginners. It’s easier to make than royal icing because you don’t need an electric mixer and the consistency won’t really make or break the outcome. However, it doesn’t provide the same sharp detail that royal icing decorations do. It also takes a good 24 hours to dry.
- Buttercream: This cookie decorating buttercream is also excellent for beginners. You can tint it any color you like, flavor it, and spread it on with a knife or use piping tips. It soft-sets after a few hours, meaning you can carefully stack the cookies.
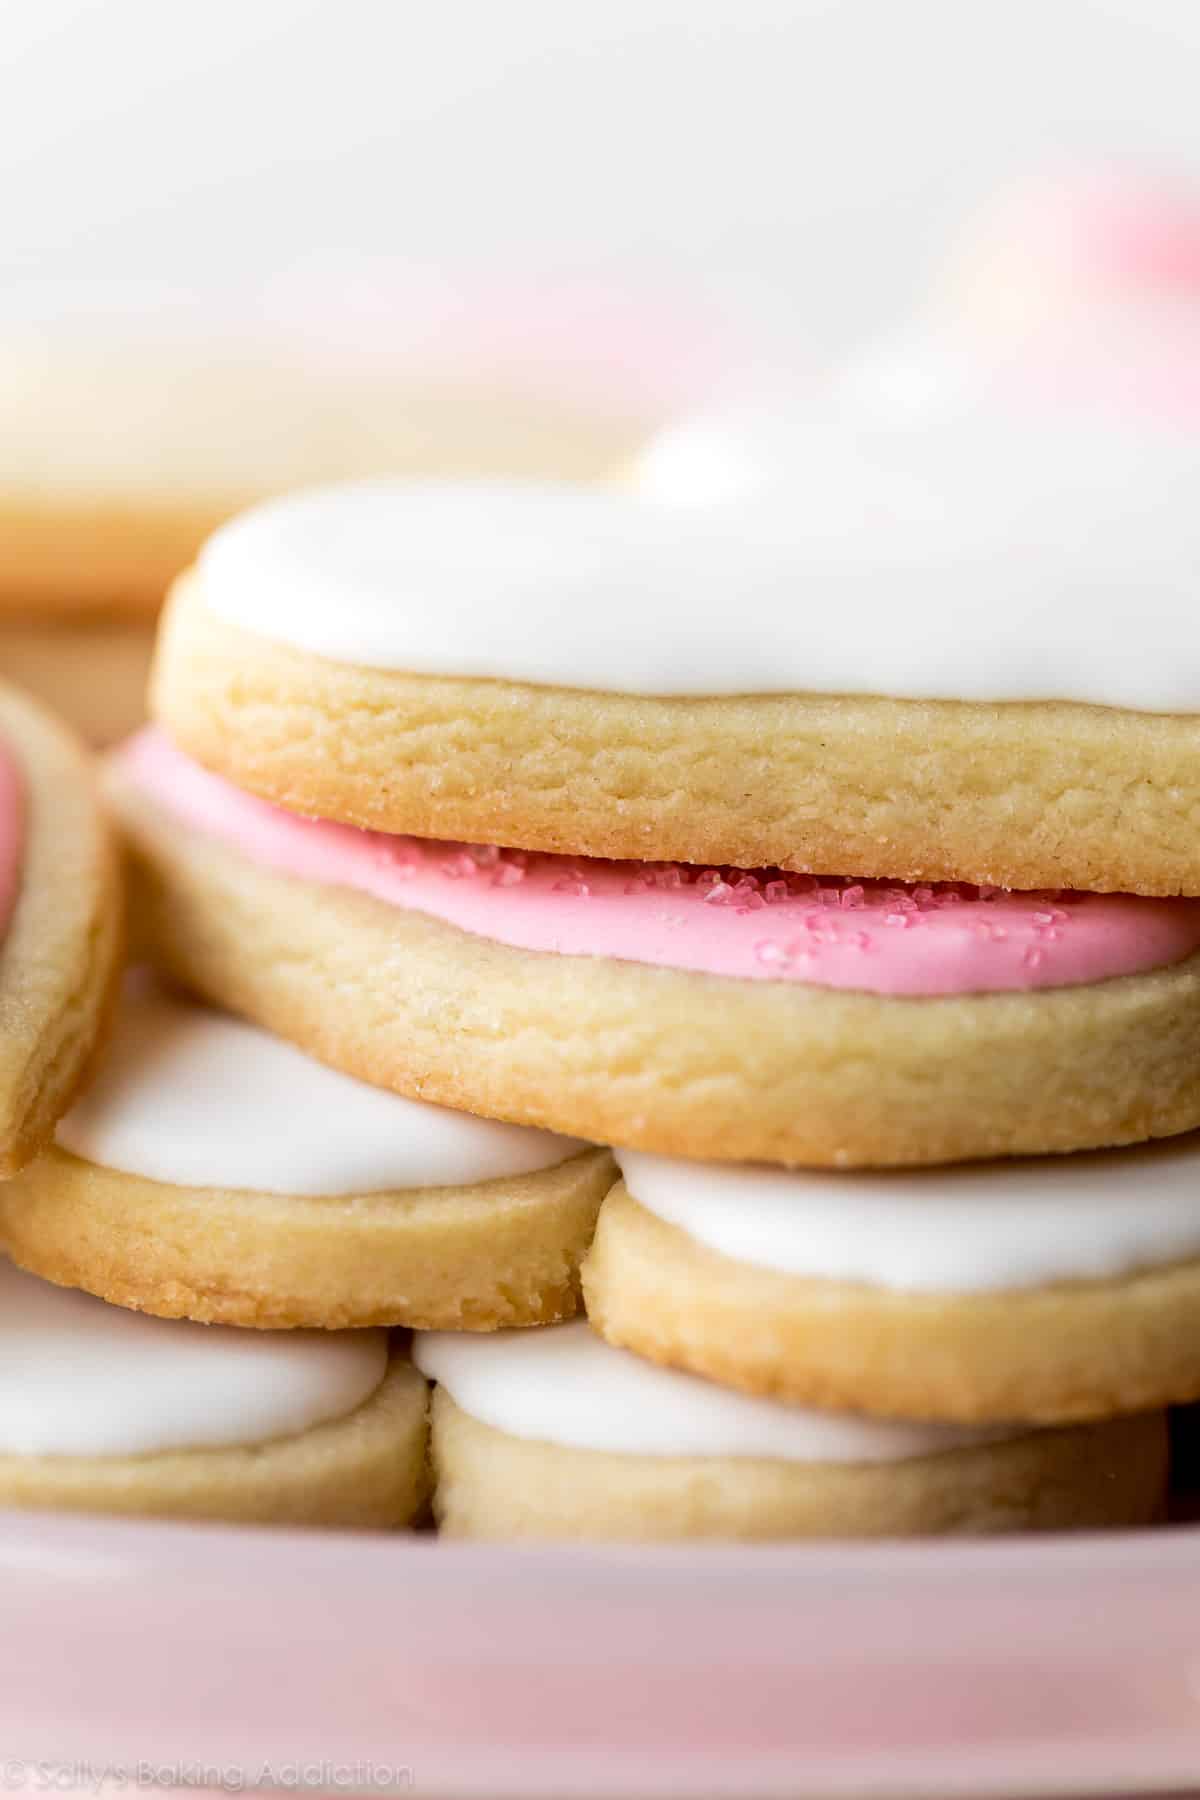
The pictured hearts are decorated with my royal icing using Wilton piping tip #4. If you’re not into piping tips, you can simply dunk the tops of the cookies into the icing like I do with my mini animal cracker cookies. 🙂
Sugar Cookie Tips & Tools
Before I leave you with the recipe, let me suggest some useful sugar cookie tools. These are the exact products I use and trust in my own kitchen:
- Electric Mixer (Handheld or Stand Mixer)
- Baking Sheets
- Silicone Baking Mats or Parchment Sheets
- Rolling Pin or this Adjustable Rolling Pin
- Food Coloring: Liquid food coloring can alter the consistency of the icing, so I recommend gel food coloring. For the pictured cookies, I used a few drops of dusty rose and 1 drop of sky blue. This Americolor Soft Gel Paste Color Kit is great to have if you do a lot of decorating and want to have a variety of colors on hand.
- Piping Tips/Squeeze Bottle: If you’re using royal icing, I recommend Wilton piping tip #4 for outlining and flooding. This is a wonderful basic piping tip to have in your collection. If you’re using my easy glaze icing, I recommend using a squeeze bottle.
- Piping Bag: If you’re using royal icing and a piping tip, you need a disposable piping bag or reusable piping bag.
- Couplers: Couplers are handy if you have multiple colors of icing and only 1 tip, and need to move the tip to the other bags of icing.
- Cookie Cutters: I like this heart-shaped cookie cutter, but you can use any shape you desire!
For even more recommendations you can see this full list of my favorite cookie decorating supplies.


Here’s What You Can Do With This Dough
- Christmas Sugar Cookies
- Striped Fudge Cookie Sandwiches
- Snowman Cookies
- Cinnamon Roll Cookies
- Stained Glass Window Cookies
- Valentine’s Day Cookies
- Maple Cinnamon Cut-Out Cookies
- St. Patrick’s Day Cookies
- Easter Cookies
- Fireworks Cookies
- Watermelon Sugar Cookies
And if you’re craving sugar cookies with a little extra tang, try my cream cheese cut-out cookies with Nutella glaze.
Print
Soft Cut-Out Sugar Cookies
- Prep Time: 2 hours, 30 minutes
- Cook Time: 12 minutes
- Total Time: 3 hours, 45 minutes (includes cooling)
- Yield: 24 3-4 inch cookies
- Category: Cookies
- Method: Baking
- Cuisine: American
Description
With crisp edges, thick centers, and room for lots of decorating icing, I know you’ll love these soft sugar cookies as much as I do. The number of cookies this recipe yields depends on the size of the cookie cutter you use. If you’d like to make dozens of cookies for a large crowd, double the recipe.
Ingredients
- 2 and 1/4 cups (281g) all-purpose flour (spooned & leveled), plus more as needed for rolling and work surface
- 1/2 teaspoon baking powder
- 1/4 teaspoon salt
- 3/4 cup (170g) unsalted butter, softened to room temperature
- 3/4 cup (150g) granulated sugar
- 1 large egg, at room temperature
- 2 teaspoons pure vanilla extract
- 1/4 or 1/2 teaspoon almond extract (optional, but makes the flavor outstanding)*
For Decorating
- Royal Icing, Easy Glaze Icing, or Cookie Buttercream (royal icing is pictured)
- Assorted sprinkles
Instructions
- Whisk the flour, baking powder, and salt together in a medium bowl. Set aside.
- In a large bowl using a handheld or a stand mixer fitted with a paddle attachment, beat the butter and sugar together on high speed until completely smooth and creamy, about 3 minutes. Add the egg, vanilla, and almond extract (if using) and beat on high speed until combined, about 1 minute. Scrape down the sides and up the bottom of the bowl and beat again as needed to combine.
- Add the dry ingredients to the wet ingredients and mix on low until combined. Dough will be a bit soft. If the dough seems too soft and sticky for rolling, add 1 more Tablespoon of flour.
- Divide the dough into 2 equal parts. Place each portion onto a piece of lightly floured parchment paper or a lightly floured silicone baking mat. With a lightly floured rolling pin, roll the dough out to about 1/4-inch thickness. Use more flour if the dough seems too sticky. The rolled-out dough can be any shape, as long as it is evenly 1/4-inch thick.
- Lightly dust one of the rolled-out doughs with flour. Place a piece of parchment on top. (This prevents sticking.) Place the 2nd rolled-out dough on top. Cover with plastic wrap or aluminum foil, then refrigerate for at least 1-2 hours and up to 2 days.
- Once chilled, preheat oven to 350°F (177°C). Line 2-3 large baking sheets with parchment paper or silicone baking mats. Carefully remove the top dough piece from the refrigerator. If it’s sticking to the bottom, run your hand under it to help remove it—see me do this in the video below. Using a cookie cutter, cut the dough into shapes. Re-roll the remaining dough and continue cutting until all is used. Repeat with 2nd piece of dough. (Note: It doesn’t seem like a lot of dough, but you get a lot of cookies from the dough scraps you re-roll.)
- Arrange cookies on baking sheets 3 inches apart. Bake for 11-12 minutes or until lightly browned around the edges. If your oven has hot spots, rotate the baking sheet halfway through bake time. Allow cookies to cool on the baking sheet for 5 minutes then transfer to a wire rack to cool completely before decorating.
- Decorate the cooled cookies with royal icing, easy cookie icing, or cookie decorating buttercream. Feel free to tint any of the icings with gel food coloring. See post above for recommended decorating tools. No need to cover the decorated cookies as you wait for the icing to set. If it’s helpful, decorate the cookies directly on a baking sheet so you can stick the entire baking sheet in the refrigerator to help speed up the icing setting.
- Enjoy cookies right away or wait until the icing sets to serve them. Once the icing has set, these cookies are great for gifting or for sending. Plain or decorated cookies stay soft for about 5 days when covered tightly at room temperature. For longer storage, cover and refrigerate for up to 10 days. If decorated with cookie buttercream, cover and store decorated cookies at room temperature for 1 day, or in the refrigerator for up to 5 days.
Notes
- Freezing Instructions: Plain or decorated sugar cookies freeze well up to 3 months. Wait for the icing to set completely before layering between sheets of parchment paper in a freezer-friendly container. To thaw, thaw in the refrigerator or at room temperature. You can also freeze the cookie dough for up to 3 months before rolling it out. Prepare the dough through step 3, divide in half, flatten both halves into a disk as we do with pie crust, wrap each in plastic wrap, then freeze. To thaw, thaw the disks in the refrigerator, then bring to room temperature for about 1 hour. Roll out the dough as directed in step 4, then chill rolled out dough in the refrigerator for 45 minutes – 1 hour before cutting into shapes and baking.
- Special Tools (affiliate links): Electric Mixer (Handheld or Stand Mixer) | Baking Sheets | Silicone Baking Mats or Parchment Paper | Wooden Rolling Pin or Adjustable Rolling Pin | Heart-Shaped Cookie Cutter | Americolor Soft Gel Paste Color Kit | Piping Bags (Disposable or Reusable) | Couplers | Wilton Tip #4 | Squeeze Bottle
- Room Temperature: Room temperature butter is essential. If the dough is too sticky, your butter may have been too soft. Room temperature butter is actually cool to the touch. Room temperature egg is preferred so it’s quickly and evenly mixed into the cookie dough.
- Flavors: I love flavoring this cookie dough with 1/2 teaspoon almond extract as listed in the ingredients above. For lighter flavor, use 1/4 teaspoon. Instead of the almond extract, try using 1 teaspoon of maple extract, coconut extract, lemon extract, or peppermint extract. Or add 1 teaspoon pumpkin pie spice or ground cinnamon. If using lemon extract, you can also add 1 Tablespoon lemon zest.
- Icing: Use royal icing, easy cookie icing, or cookie decorating buttercream. See post above to read about the differences.
- Can I Double the Recipe? Yes. Double all of the ingredients and divide the dough into 3 or 4 sections in step 4.
- Be sure to check out my top 5 cookie baking tips AND these are my 10 must-have cookie baking tools.


Reader Comments and Reviews
I have made this recipe and is wonderful. I had a question about freezing the dough. I had extra dough in which I already rolled out and put in freezer. On the day I want to bake the cookies, can I take it out the freezer and cut the shapes and bake straight away ?
Yes, you can bake the dough right from frozen. Your cookies may take an extra minute or two in the oven.
These sugar cookies look absolutely perfect—crisp edges with a soft center is exactly how I like them! I love how simple ingredients can create something so classic and comforting.
I roll the dough and cut out the cookies. Then I put the cookies in the fridge to chill. They seem to come out pretty good, is there a reason not to do it this way?
Hi Leslie! See the post above for the “why” behind our methods here. Hope you enjoy the cookies!
When adding the dry ingredients to the wet ingredients, should I mix until the dough is starting to pull away from the sides of the bowl? Or should I stop mixing as soon as I don’t see any streaks of flour in the mixture?
Hi Rachel, you don’t have to worry too much about over-mixing this dough, as opposed to a bread or cake recipe. It’s pretty forgiving. Make sure everything is completely combined. Enjoy!
My go-to recipe for years! They always come out perfectly. For an extra-tender texture I like to add 2 Tbs. of Cornstarch sifted in with the flour.
By far the best sugar cookies – recently I’ve found that they spread from the shape even with the chilling! Do they hold better using a silicone mat? Any tips appreciated!
Hi Jenn! So glad you love these. Are you starting with proper room temperature butter? We do recommend baking on parchment or a silicone mat – we find that they do help with spreading.
I have been making these cookies for years and they are a huge hit!
Only this time round my son is allergic to nuts.
I was thinking I could sub the almond extract for lemon extract. I know it will be a more zesty undertone but could that work?
Thanks!
Hi Sarrah, certainly! We’d recommend adding 1 tsp of lemon extract instead of the almond. Hope they’re a hit!
Shoot ! I put 2sticks of butter in the bowl..everything else the same amount. It’s getting cold for 2 hours right now in the fridge. I’m going to try to do the drop cookies. I hope it works!
I have been using this sugar cookie recipe FOR YEARS. Birthdays, Christmas time, teacher appreciation week, you name it! These cookies are so easy, and SO delicious. This recipe made sugar cookies my personal favorite thing to make in the kitchen.
Definitely my new favorite sugar cookie recipe! I am adding this one to my recipe box for sure. Thank you so much!
I am unsure why, but I have found when doubling the recipe at least it is necessary to add some more butter. I used a full stick rather than 3/4. When doubling the recipe using only 2- 3/4ths sticks made it super dry two full sticks was perfect.
Dear sally,Have you ever tried a vegan version of this recipe?
Hi Jack and DC, we haven’t tested a vegan version of this recipe, but let us know if you decide to do any experimenting. We’d love to know how it goes! And if you’re interested, here are all of our naturally vegan recipes.
I’ve been making this recipe for years and it’s the best but the last two times I’ve made it the dough is so crumbly it doesn’t form a ball. I spoon and level the flour and all the other measurements were right. Any troubleshooting ideas? Thinking of adding less flour next time.
Hi Christy! Do you happen to have a kitchen scale? That’s the most accurate way to measure!
Can these sugar cookies be easily made gluten-free by just swapping the all purpose flour with a GF version? I love the original recipe but will be making cookies with a friend who can’t have gluten. Thanks!
Hi Tabitha, we haven’t tested a gluten free version of this recipe, but some readers report success using a 1:1 gluten free flour blend without any other changes. If you give it a try, let us know how it goes!
If I were to bake these cookies (plain) let them cool and freeze. When I thaw in room temperature would it still be soft?
Also, do you recommend I frost and decorate after it has thawed in room temperature? Does it make a difference in taste or texture if I decorate prior to freezing or after freezing?
Hi Nafi, yes, these cookies are still soft once thawed. You can freeze them either before or after icing—whichever you prefer. Hope they’re a hit!
Once I have frozen the cookies can I take them out and leave in room temperature 2 days prior to serving to guests so I have enough time to frost and decorate?
Hi Nafi, yes, that will work just fine.
Can you explain why bake the cookies at 350 degrees F vs. 325 degrees F?
Thank you
Hi Chip, we bake the majority of our cookies at 350 degrees (unless otherwise specified). We find it to be just right for this particular recipe, however you can certainly bake at a lower temperature, keeping in mind that it will take a few minutes longer for the cookies to bake through.
I was curious about the use of vanilla bean paste in replacement of pure vanilla extract. Just curious!? Thank you!
Hi Ashley, yes, vanilla bean paste is lovely in these cookies!
Hi, I love your recipes. But I was wondering if…. Do cookies have to be refrigerated because they are made with butter? I’m thinking of Christmas gifts of cookie tins I send out each year. I’m hoping no one is throwing these out thank you
Hi Kathy, Plain or decorated cookies stay soft for about 5 days when covered tightly at room temperature. For longer storage, cover and refrigerate for up to 10 days.
Your website is always the first place I come to when I need a recipe or inspiration. This week, we are having a cookie baking and decoarting session with my dauthers Girl Scout troop. The Girls are so excited to make “pretty cookies”. While there are lots of recipes out there, I wouldn’t trust this experience to any other recipe than yours. Your cookies always result in perfect crisp edges with smooth, easy-to-decorate tops. And, they are delicious!
I just pre-ordered your book. Thanks for all that you to, and all of the content you share here on your website for free. It makes cooking and baking ever more fun! Thank you!