
These homemade bread bowls are crisp on the exterior and extra soft inside. They’re made from a basic, yet versatile bread dough using everyday ingredients. This recipe yields 6 bread bowls, but you could use this dough for pizza crust or smaller dinner rolls instead. See notes in the full recipe.
This recipe is brought to you in partnership with Red Star Yeast.
I originally published this recipe in 2018 and have since added some new photos, a video tutorial, and a few more success tips.
One reader, Kait, commented: “This bread bowl recipe is incredible. I’ve made it several times for my family and they all enjoy it. Your creamy chicken noodle soup worked great in the bowls. Thank you for sharing this recipe! ★★★★★“
Tie on your aprons, gather your determination, and heat up that creamy soup. Let’s dive right into homemade bread bowls!
Ingredients in Bread Bowls
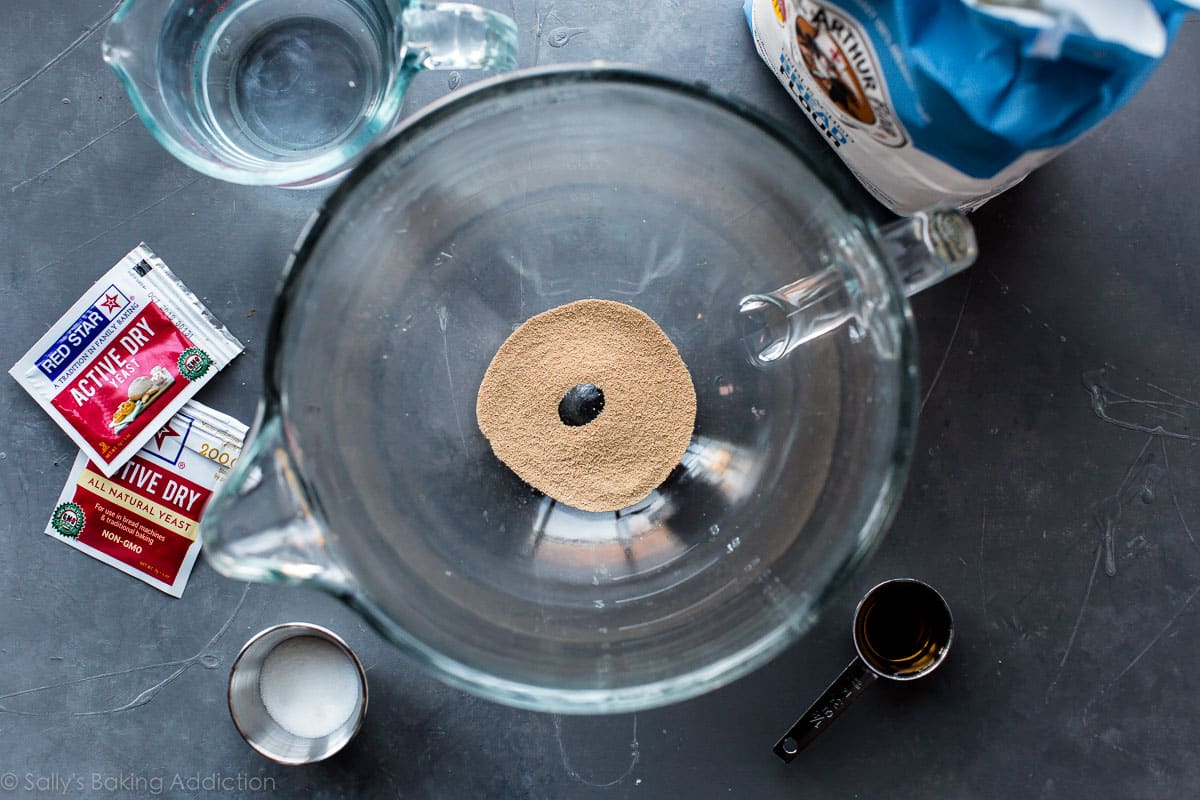
- Yeast: We use active dry yeast to make bread bowl dough. I highly recommend using a quality yeast like Red Star Yeast—it’s always my go-to brand for the best tasting breads!
- Water: 2 and 1/4 cups is the perfect amount. Use warm water to cut down on rise time, about 110-115°F. Anything over 130ºF kills the yeast.
- Sugar: 2 teaspoons of sugar “feed” the yeast which create carbon dioxide bubbles and allow the dough to rise.
- Salt + Olive Oil: Salt and olive oil add flavor and richness.
- Bread Flour: Bread flour contains a lot of protein which helps form a chewier, denser, and, well, more bread-like… bread. (Technical terms.) We want a strong and crusty bread for our bread bowls and bread flour will help us achieve that.
If you’re a bread beginner, don’t be nervous about yeast. It’s just another ingredient added to the dough. We’re not doing anything special with it. We’re just mixing it with water. The magic happens during hands-off time.
Overview: How to Make Bread Bowls
Bread-making probably seems impossible, but think of it this way: it’s one of the most basic foods. Just simple ingredients mixed together, left alone to work some magic, shaped, and baked. That’s the process and it’s 100% something you can handle.
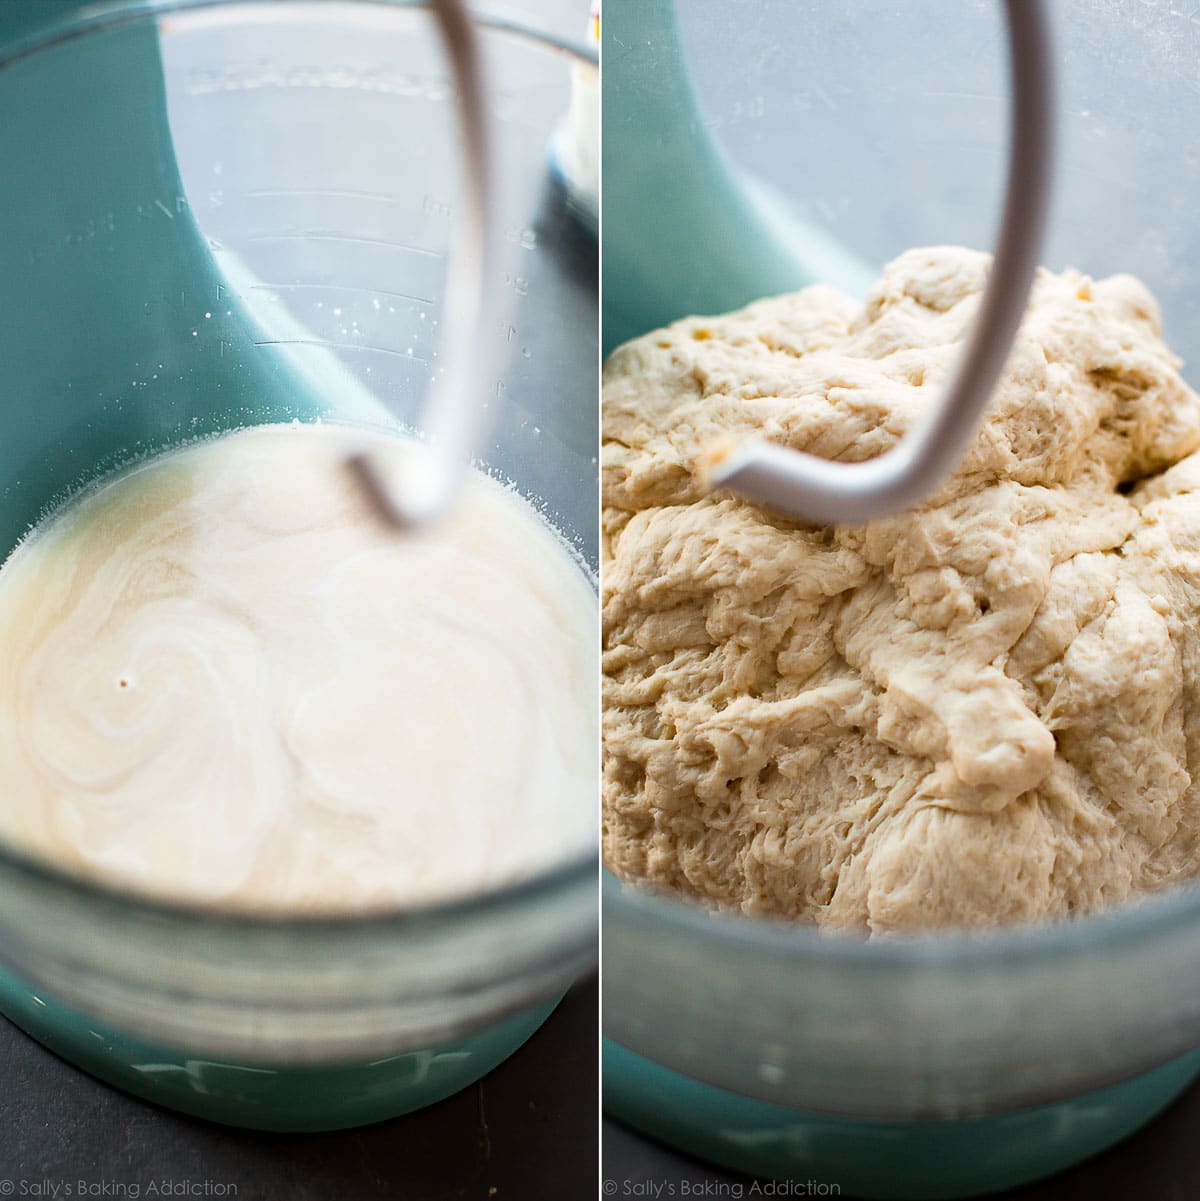
- Mix the dough ingredients together. You can use a mixer or do this by hand. The dough should be thick, yet soft—and only slightly sticky.
- Form the dough into a ball. On a lightly floured surface, shape the dough into a ball and place it into a large, greased bowl.
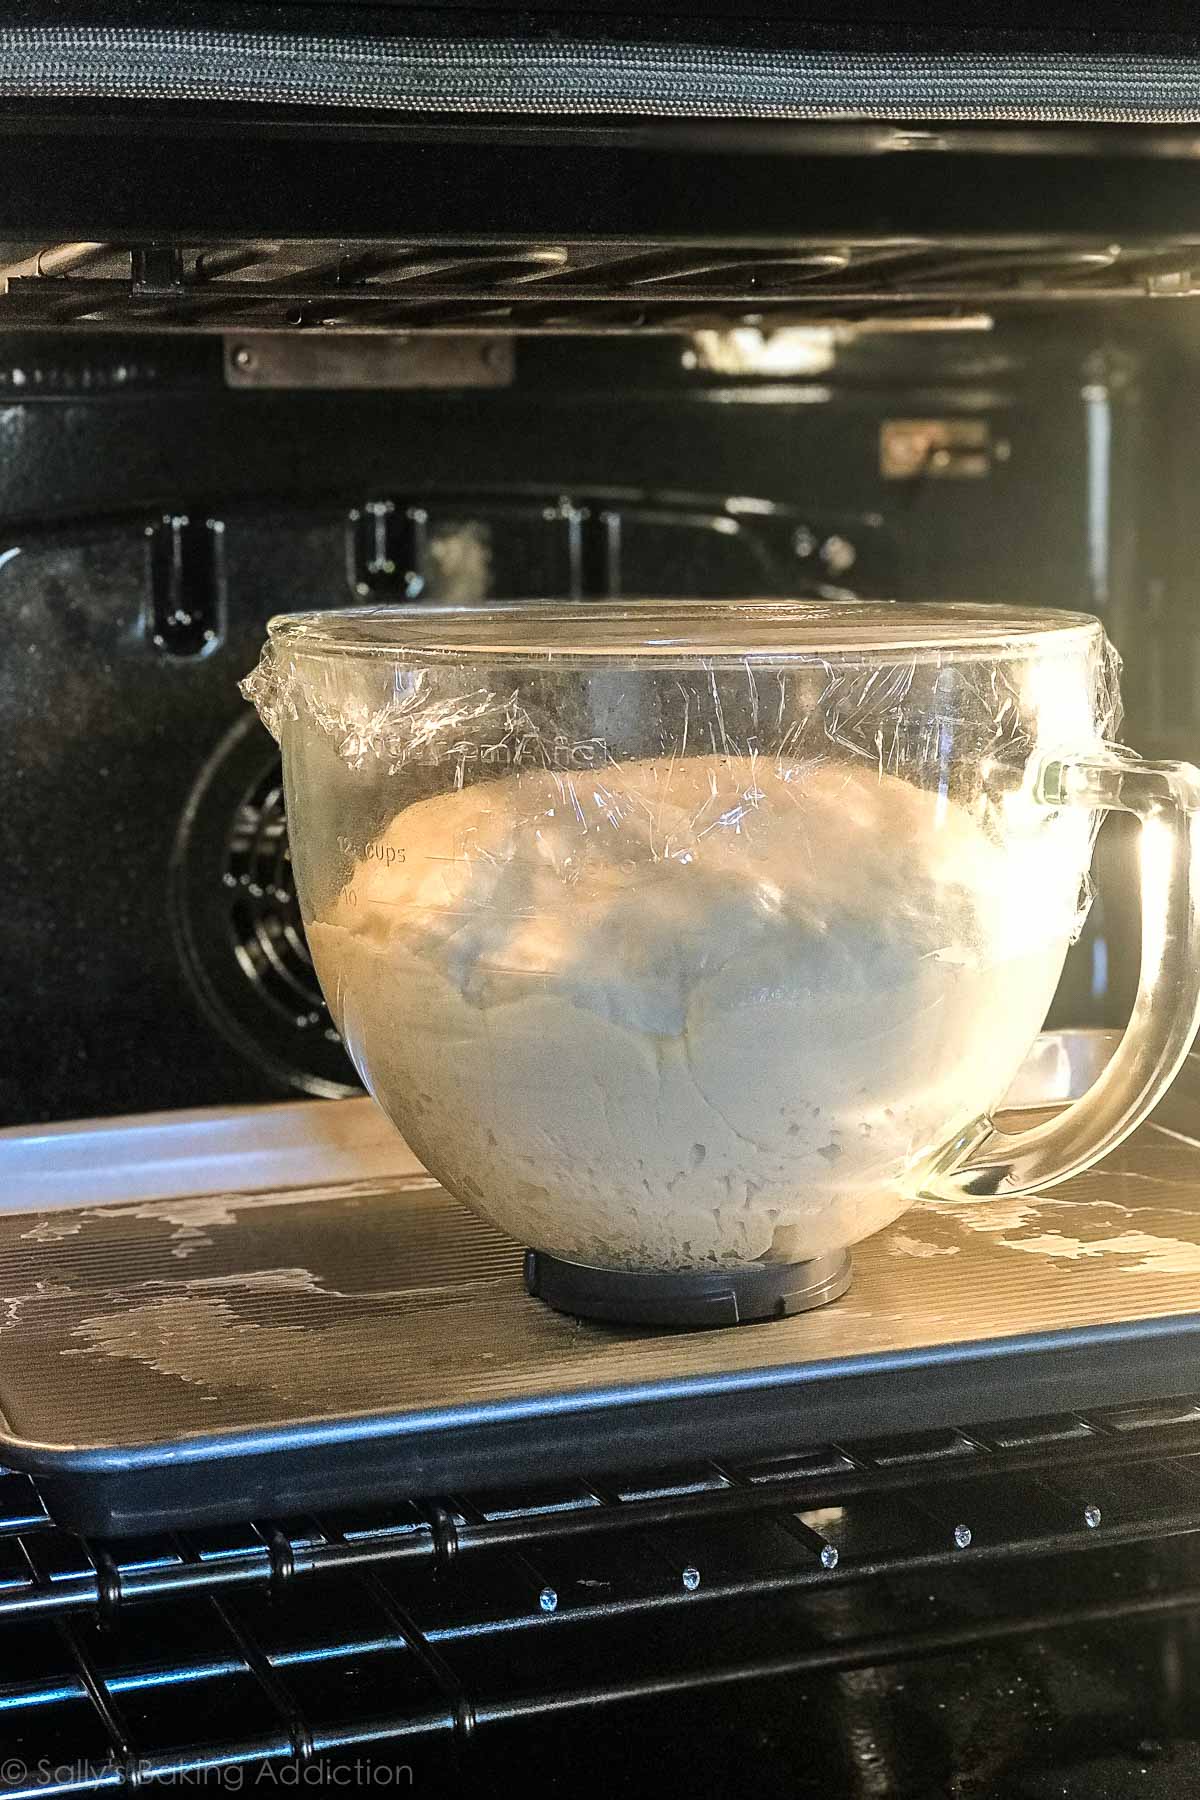
- Let the dough rise. Cover the dough and let it rise in a warm environment until doubled in size, about 90 minutes.
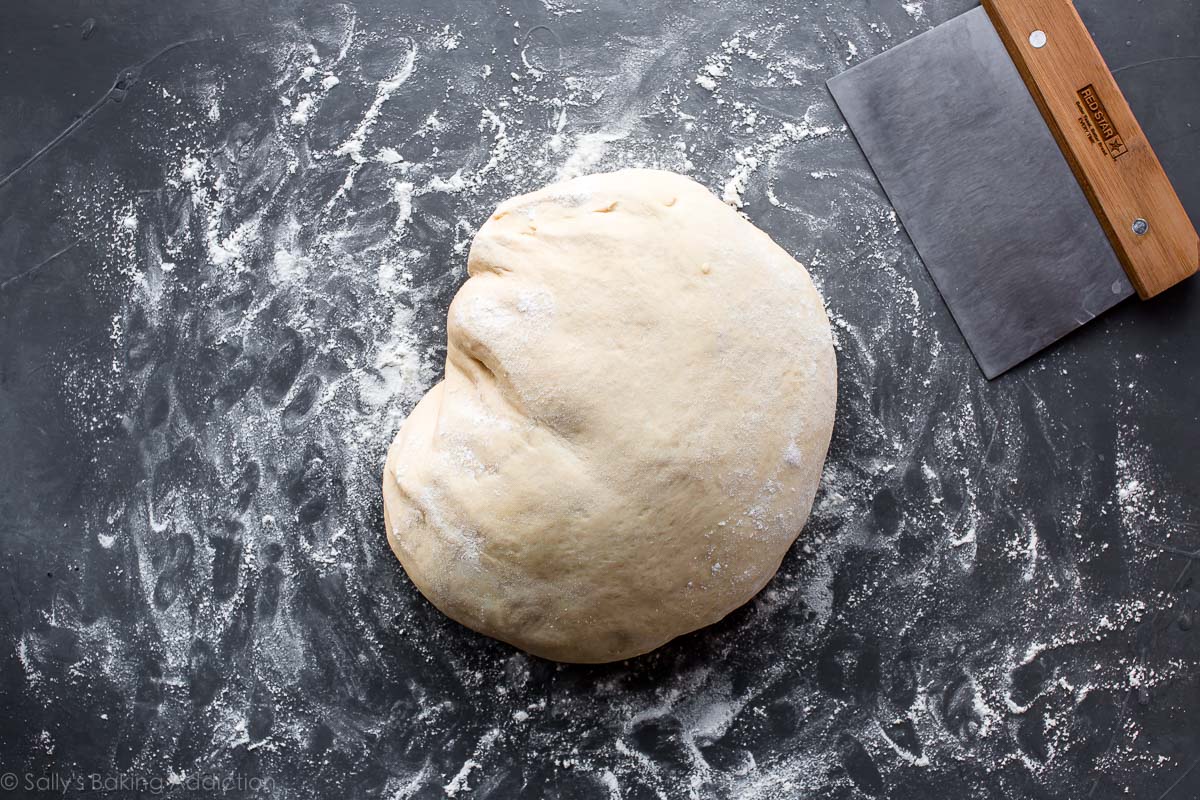
- Punch down the dough. Place it onto a lightly floured surface.
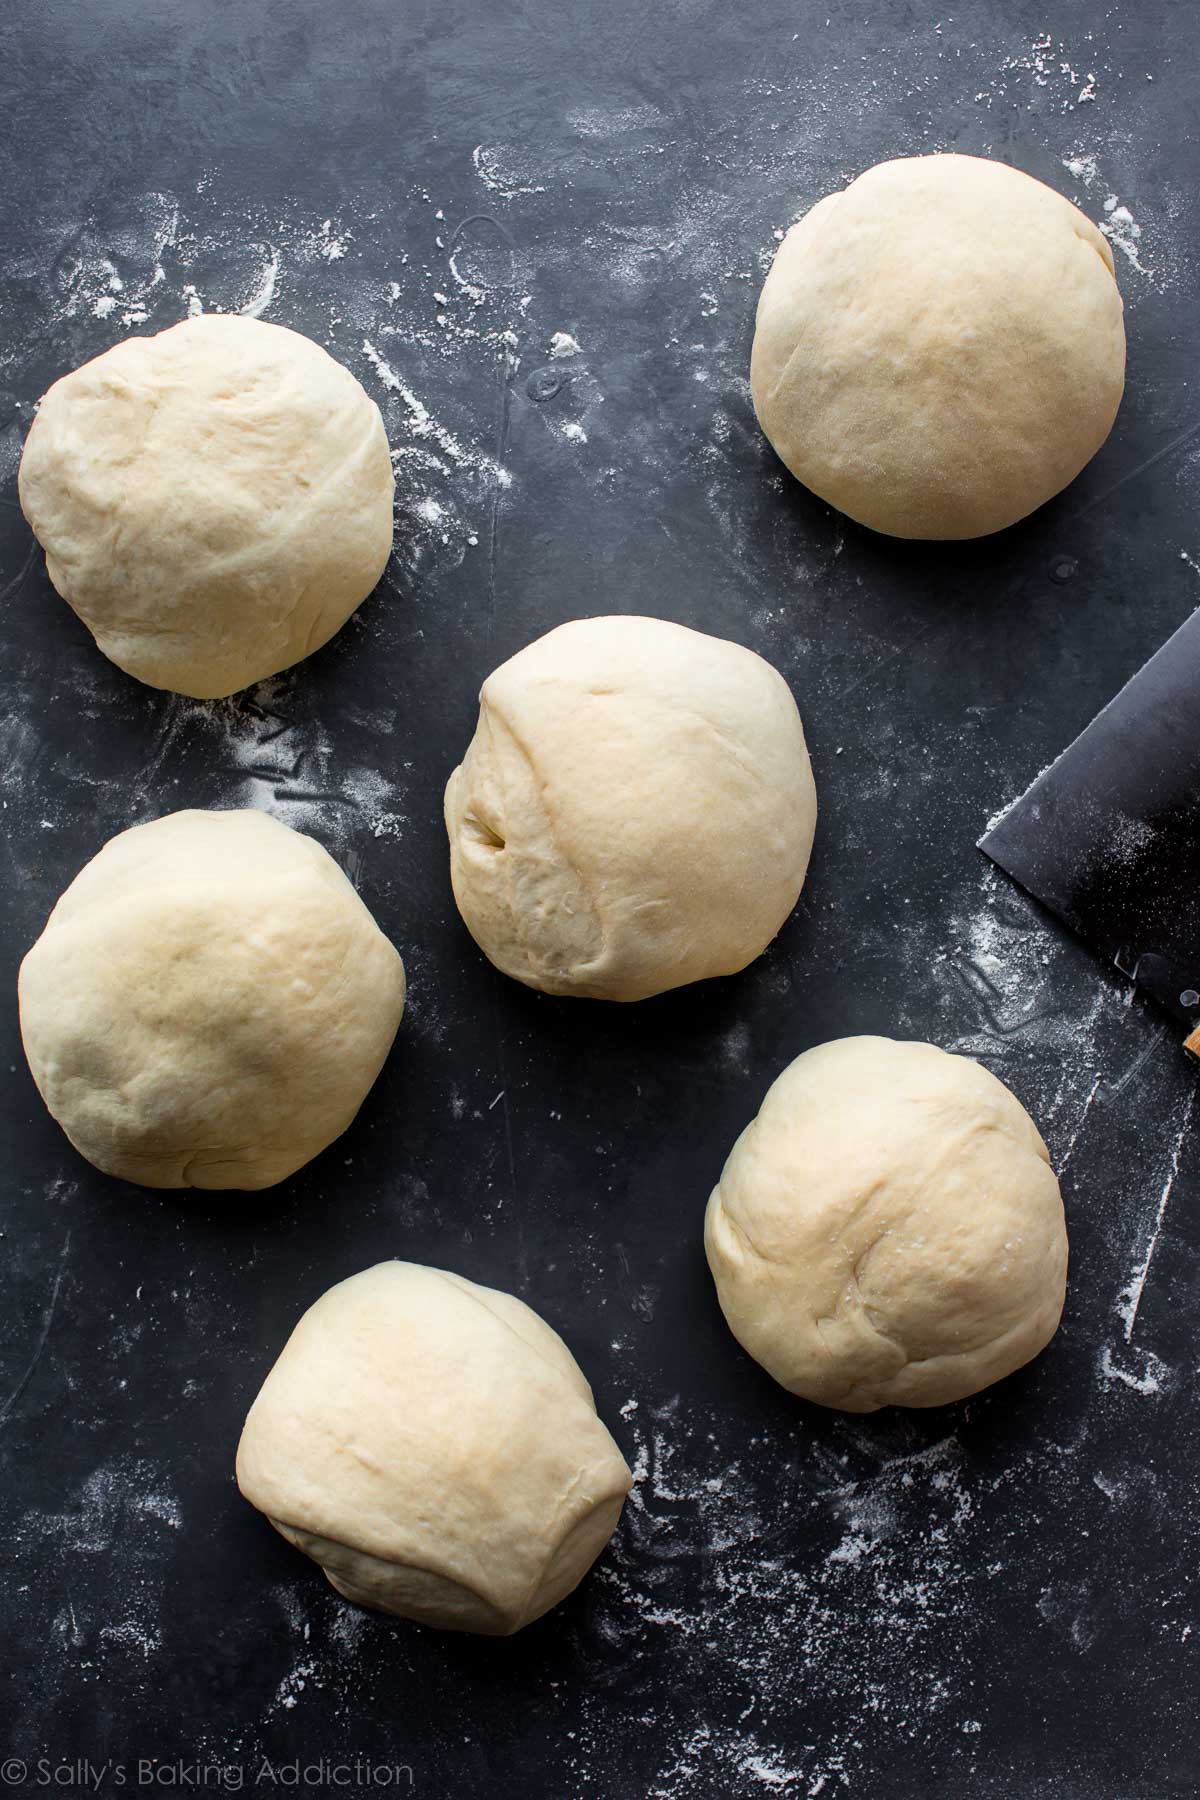
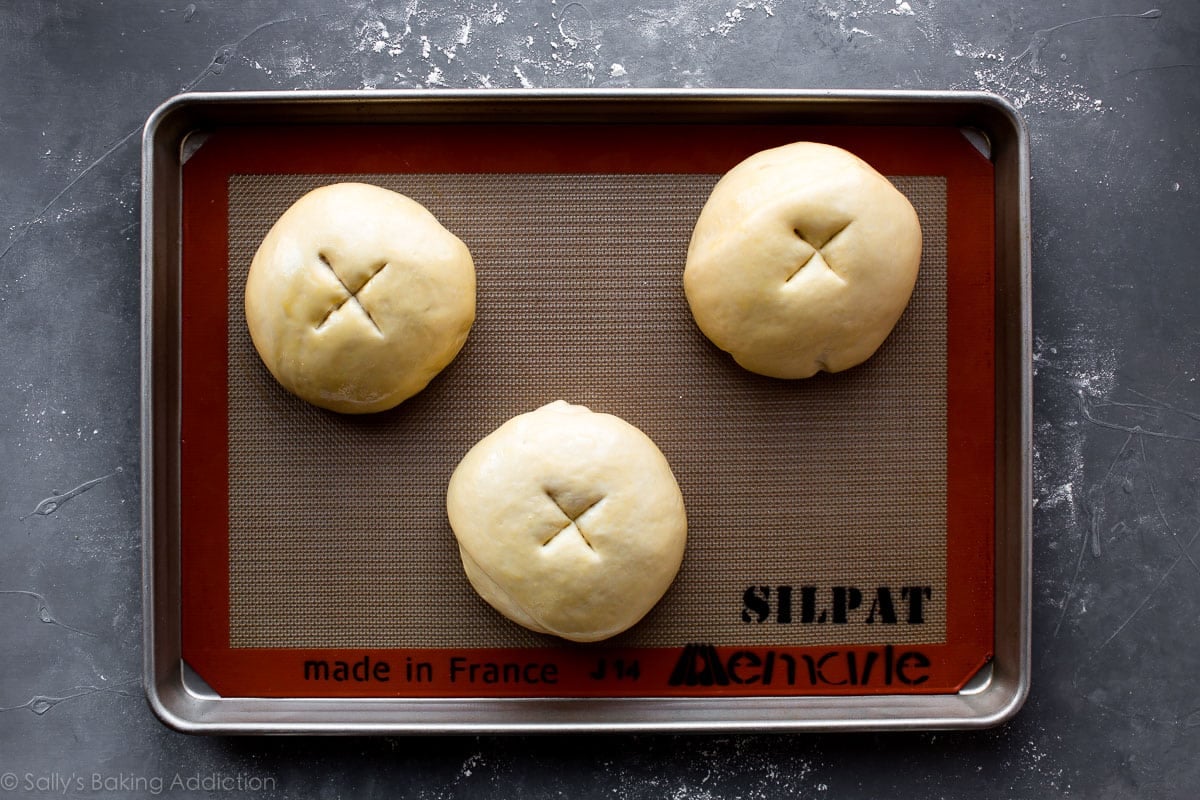
- Cut the dough into 6 even pieces. Form each into a ball. Place on prepared baking sheets—3 dough balls per sheet.
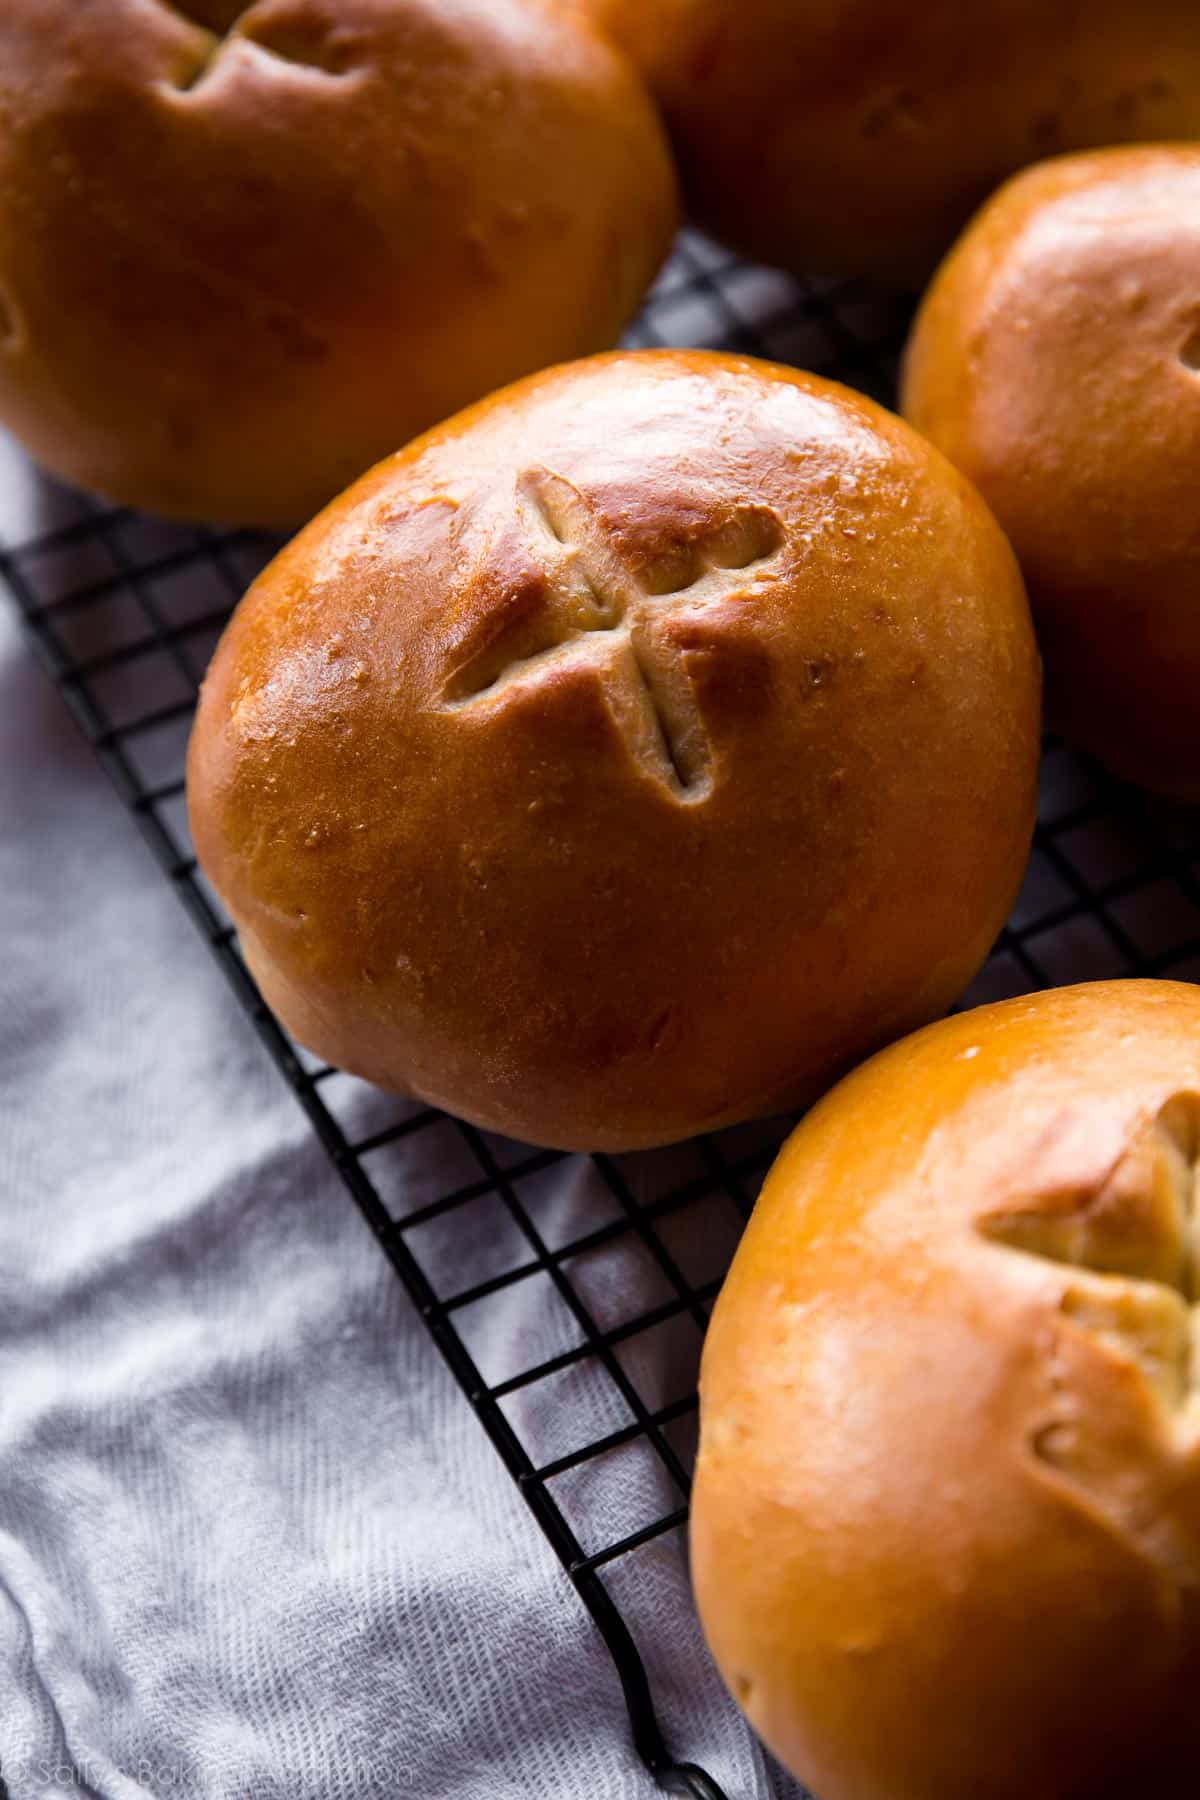
- Score an X into each. Lightly brush the tops of each dough ball with egg wash and use a sharp knife to score an X into the tops of each. The egg wash is what makes them so shiny! If not eating as a bread bowl, the X makes it easy to tear into pieces. Ease of breaking apart is crucial in a bread lover’s world.
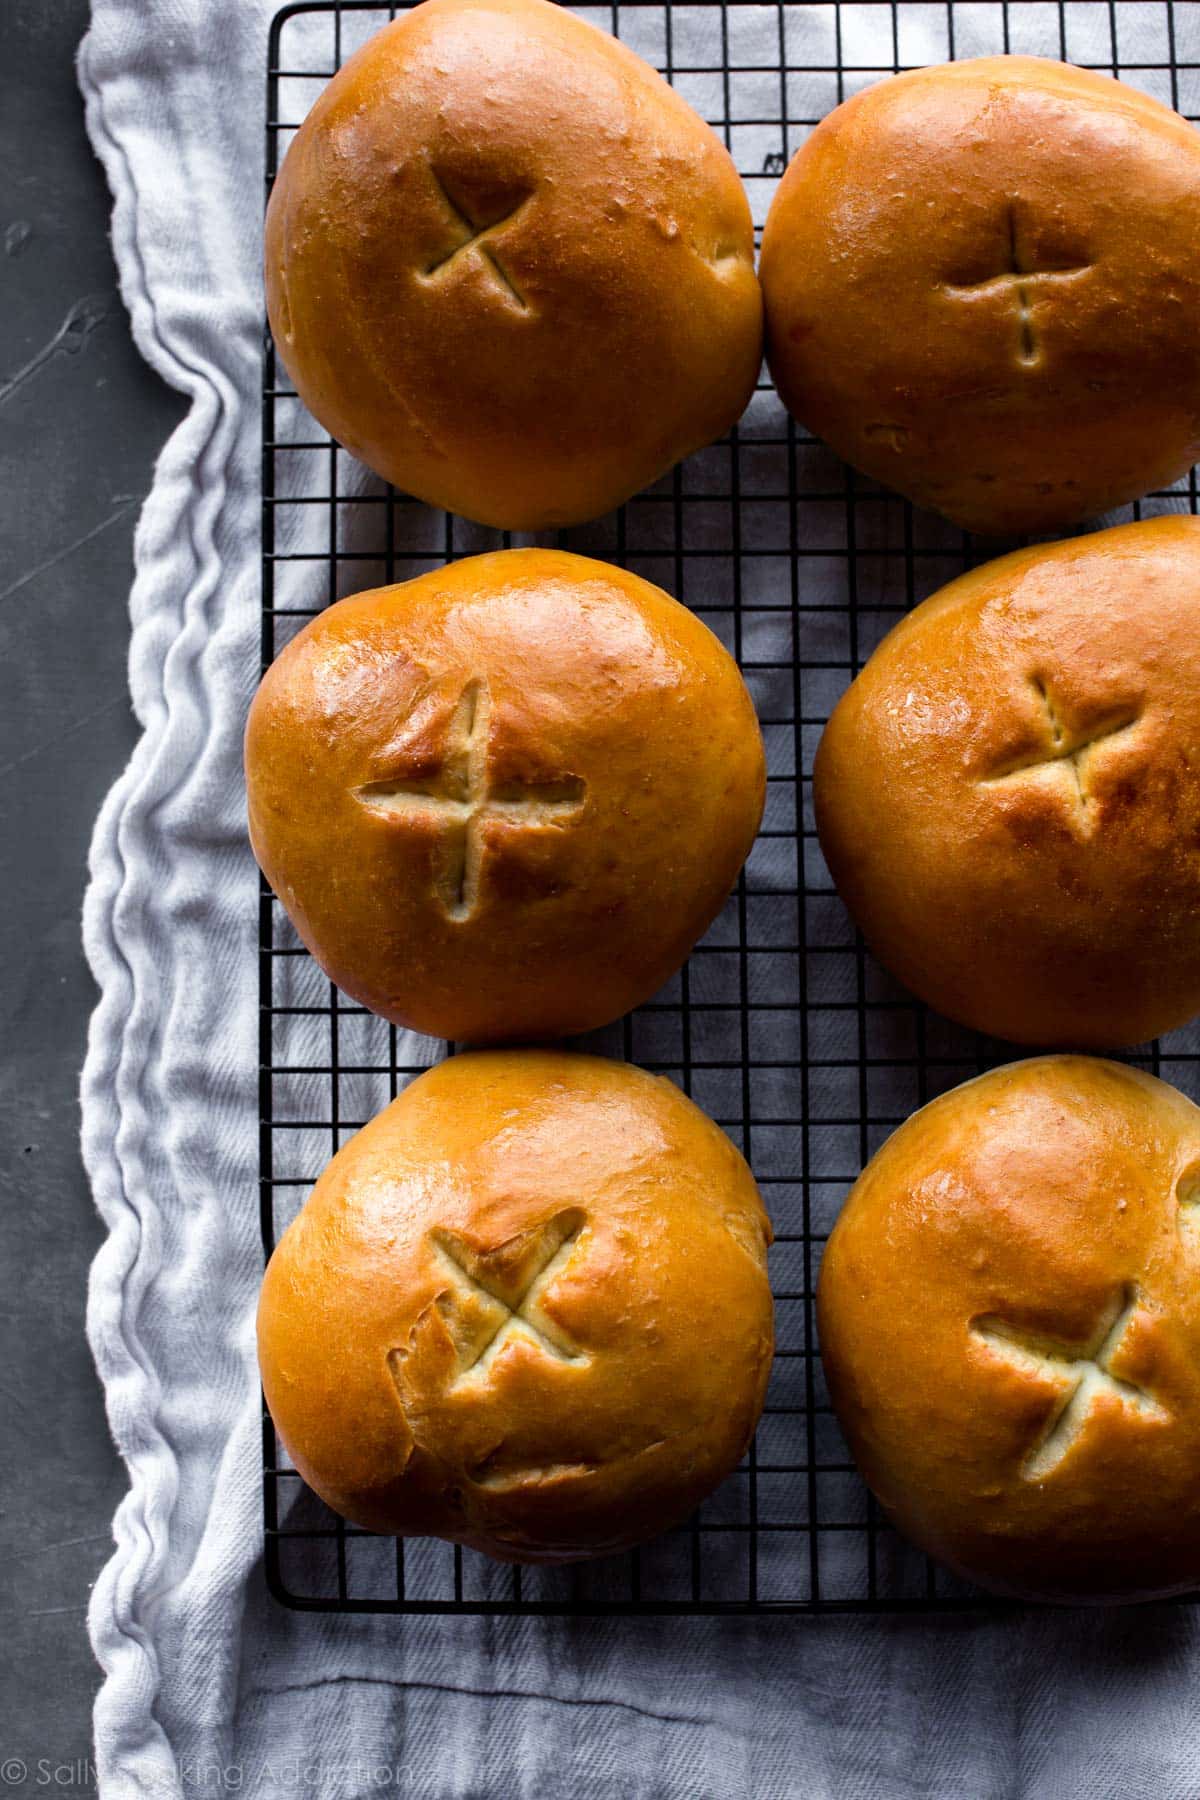
- Bake. These bread bowls take about 30 minutes to bake.
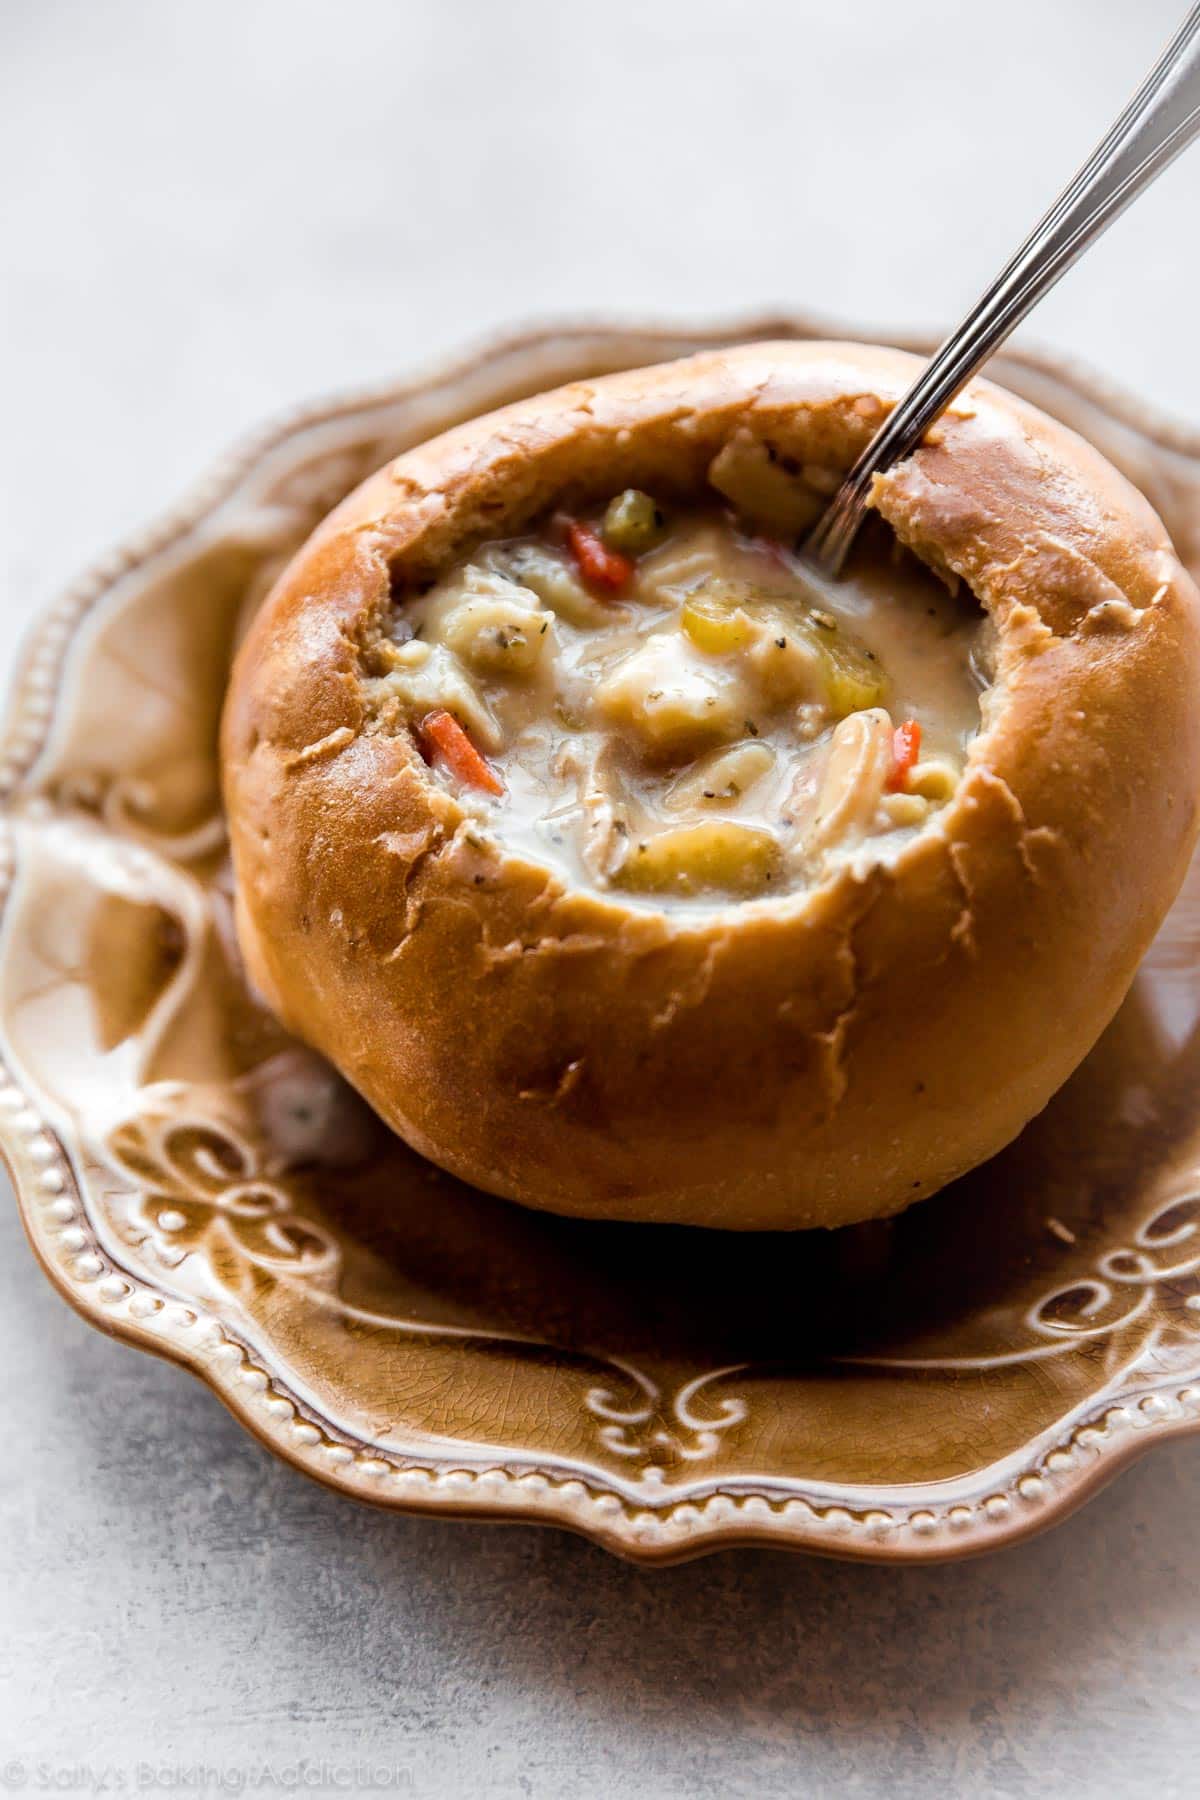
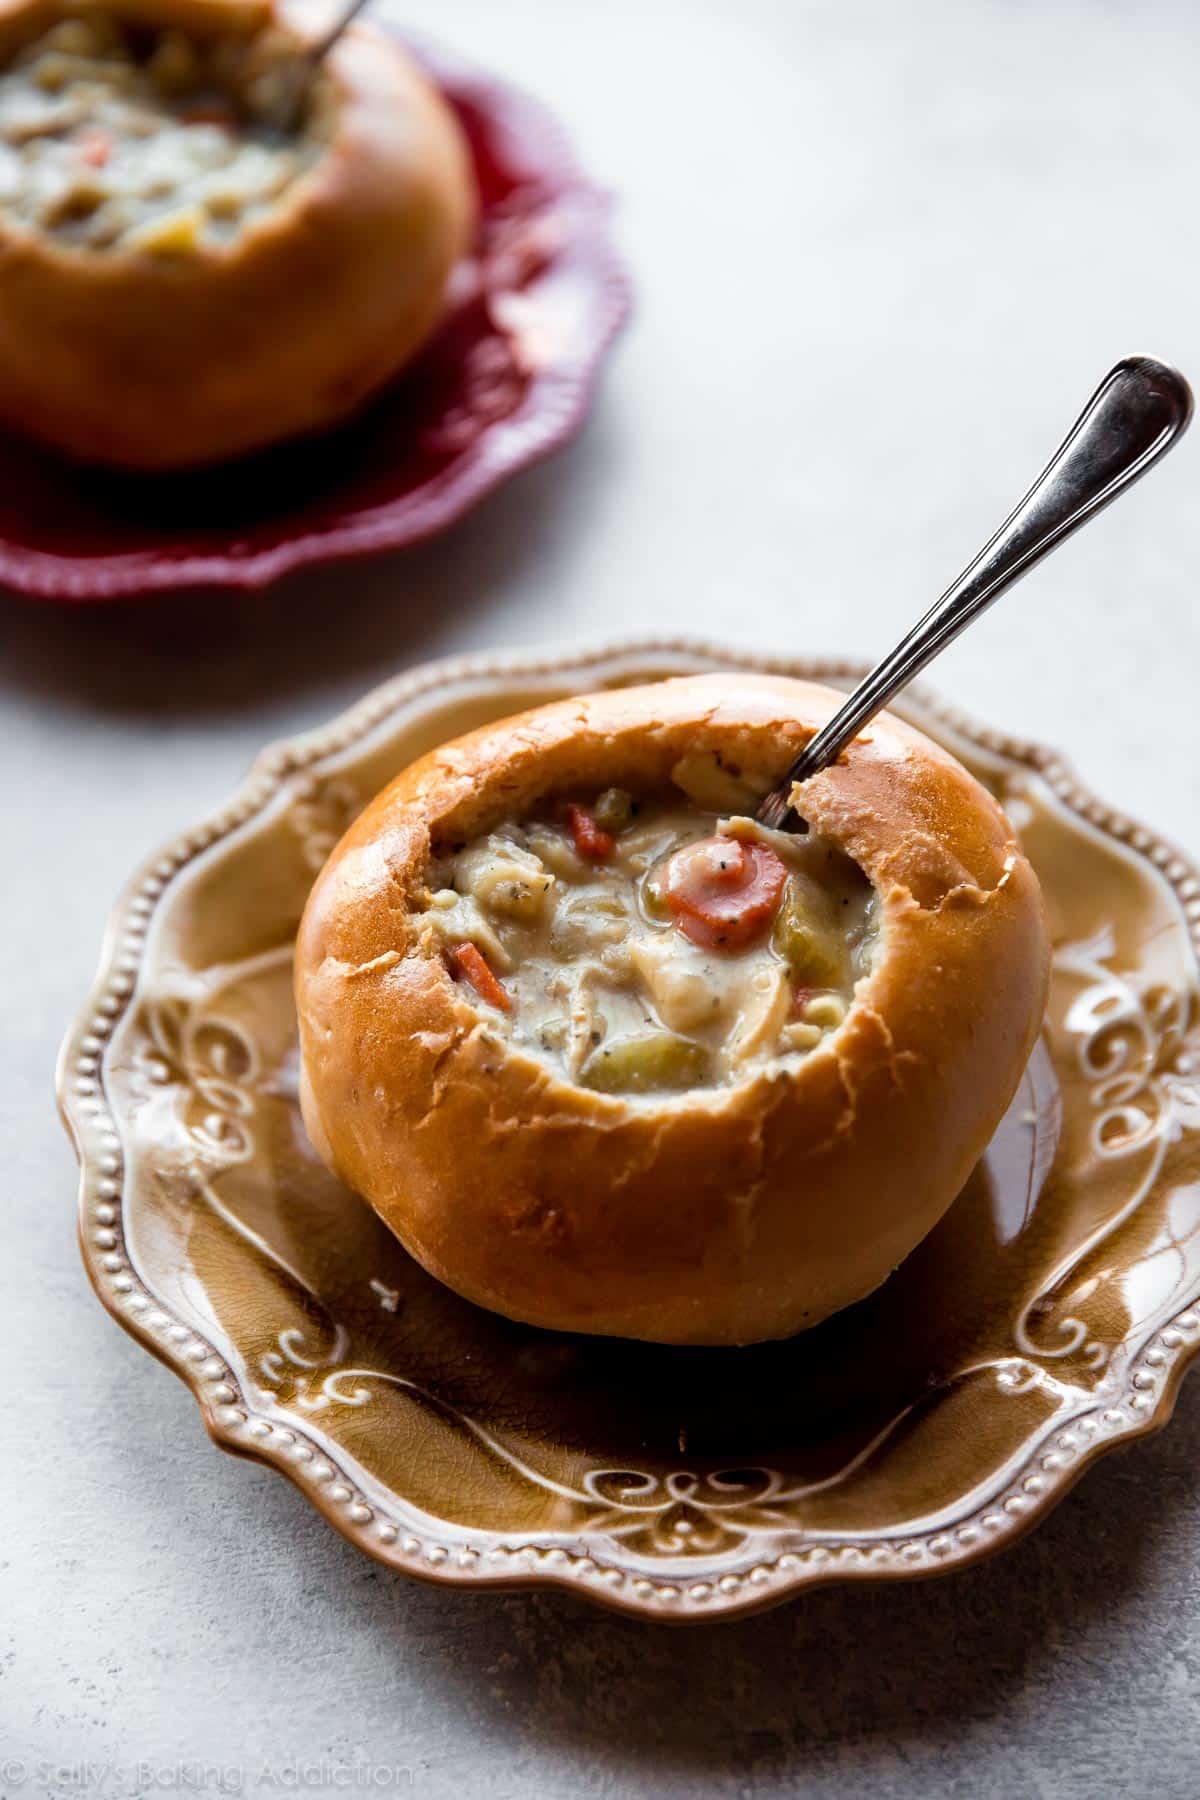
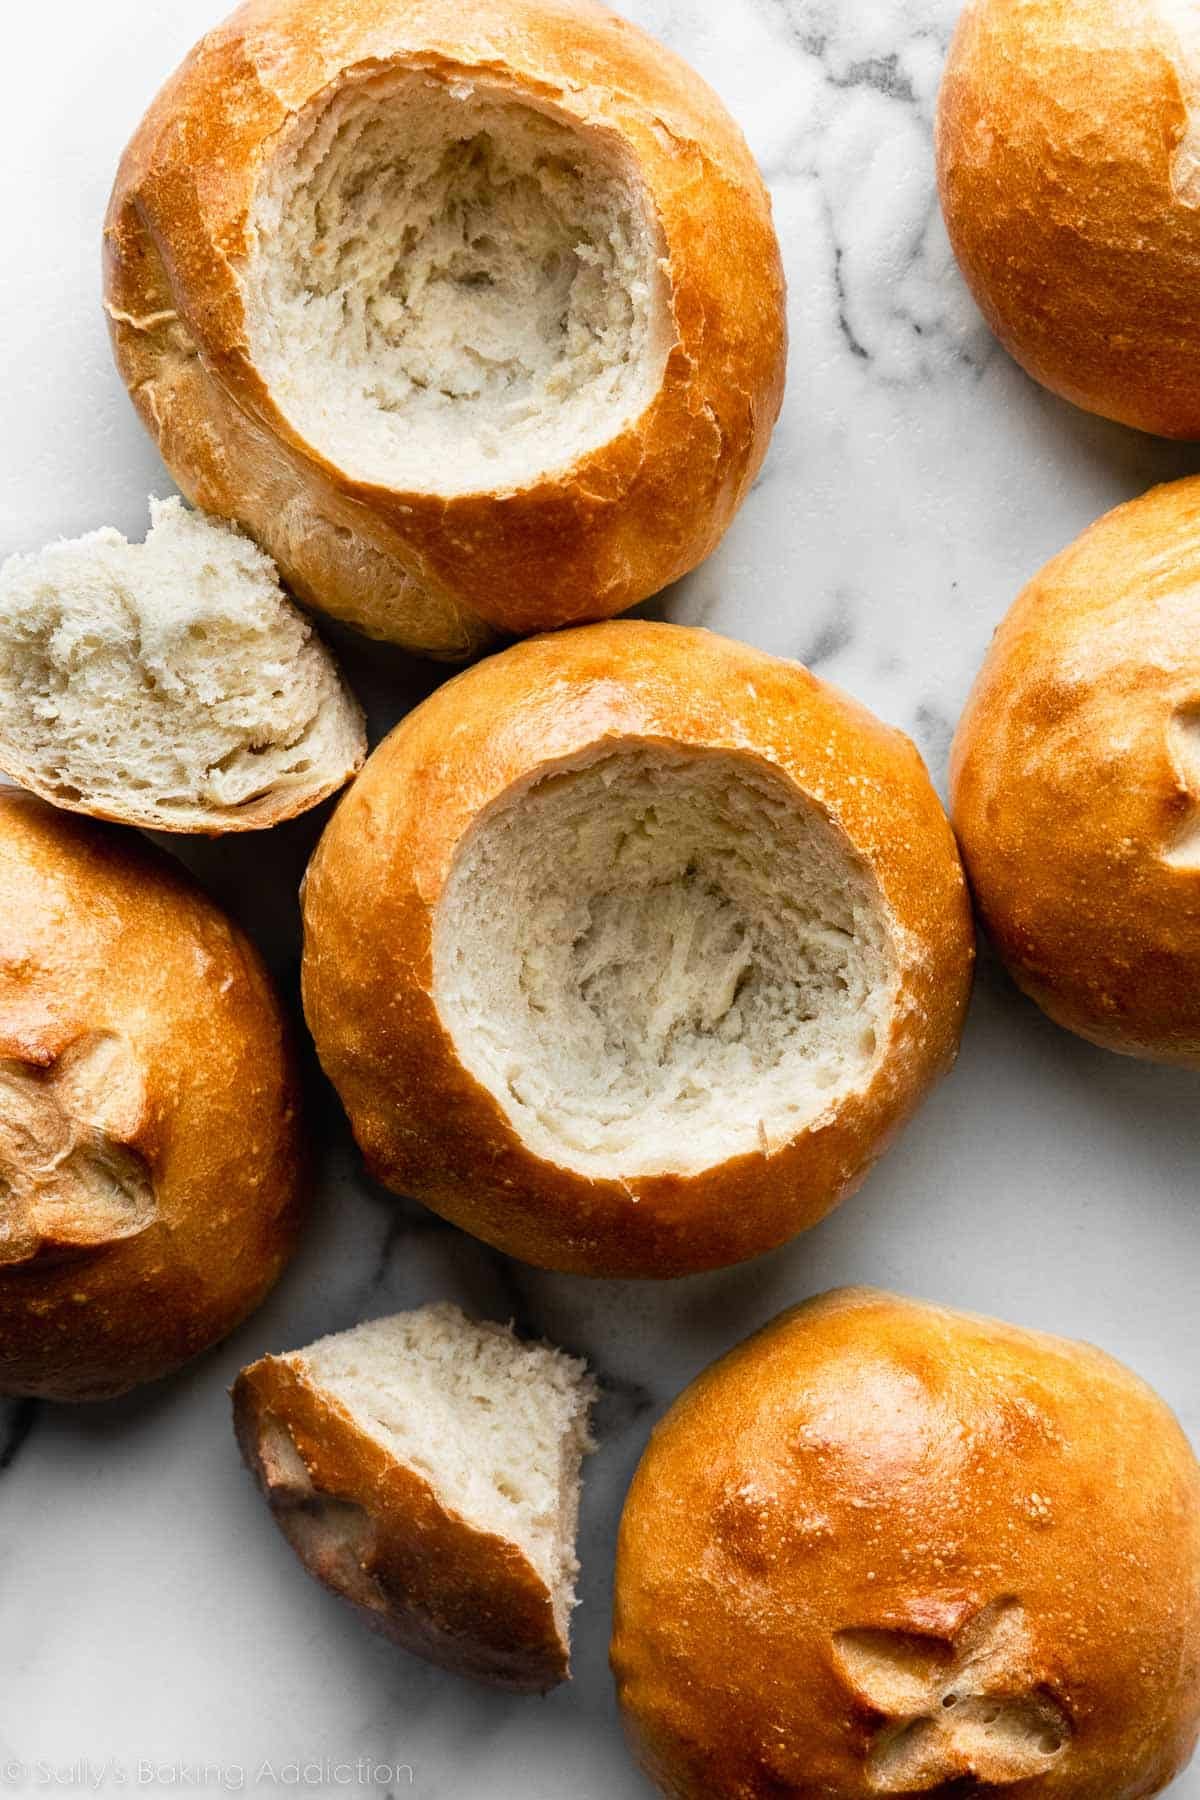
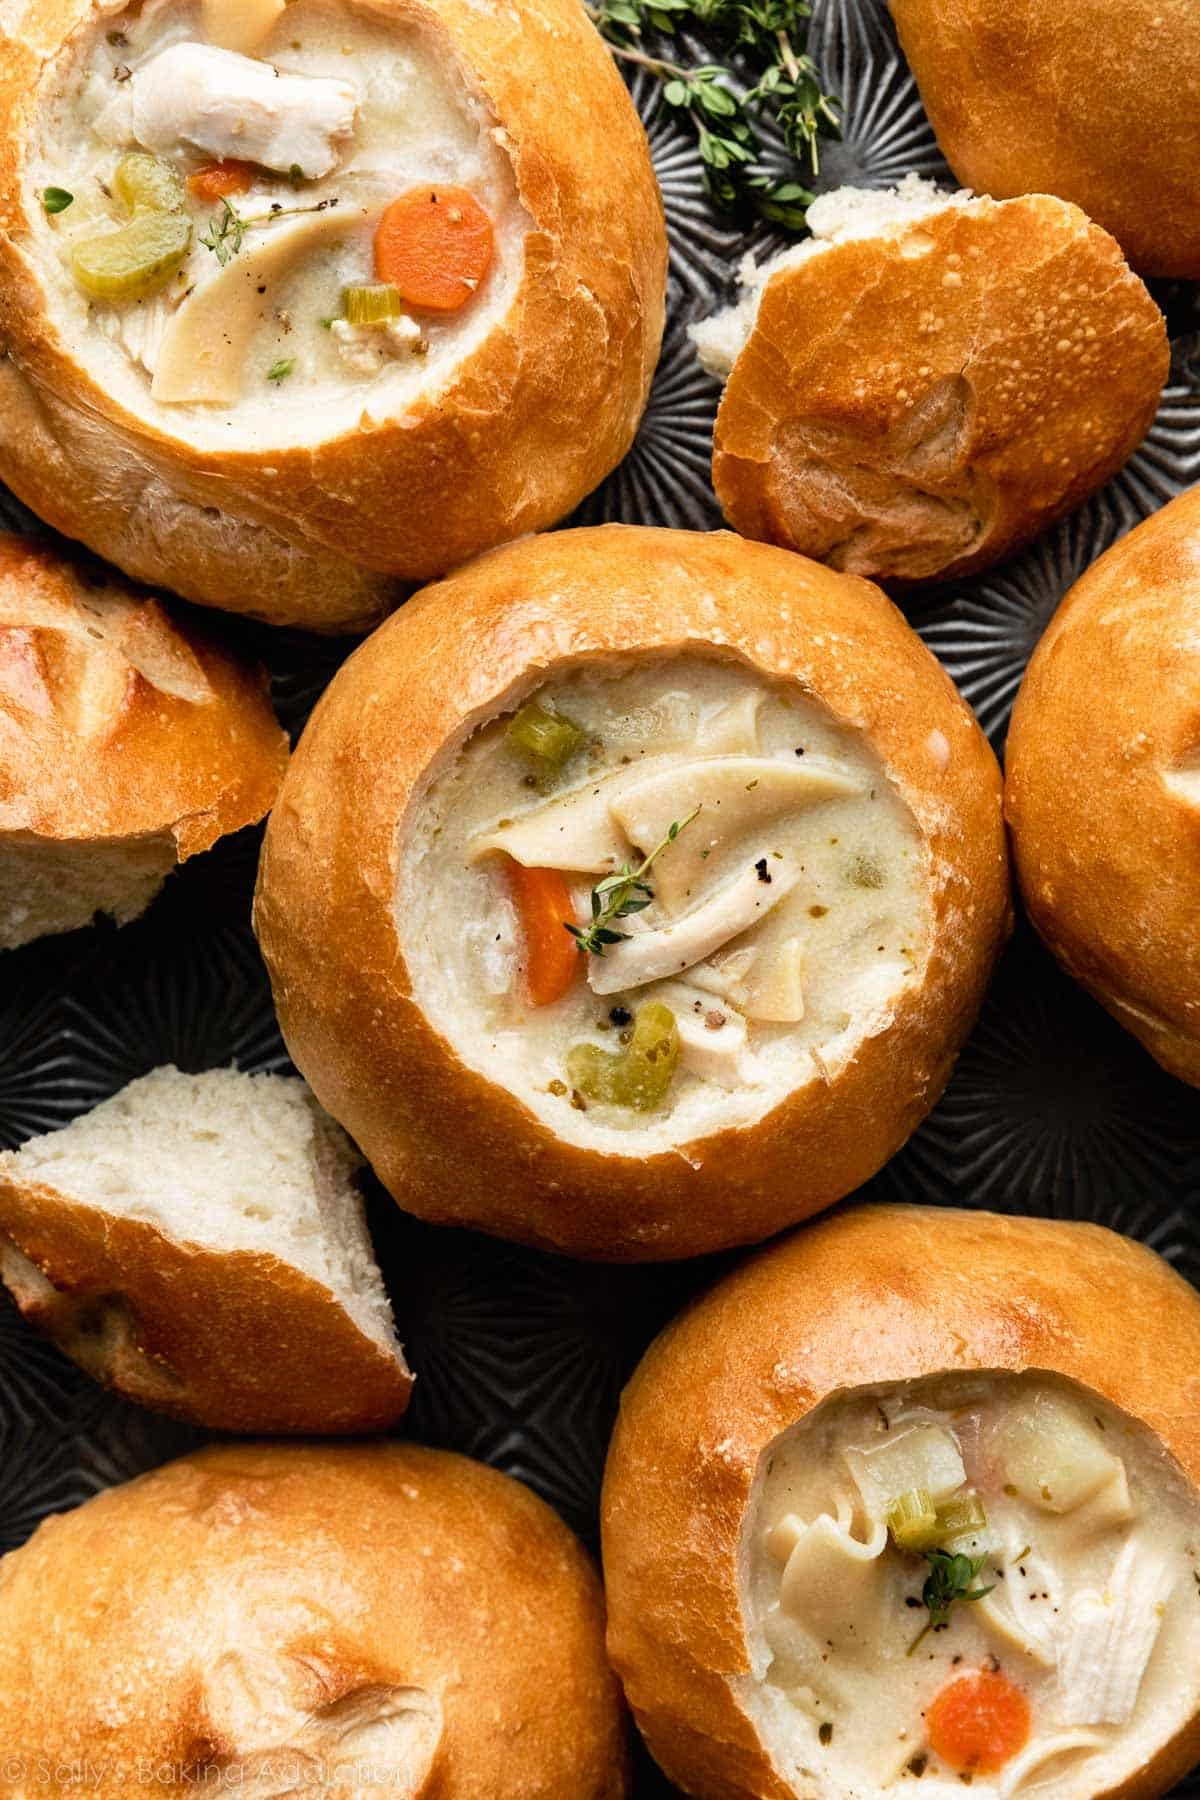
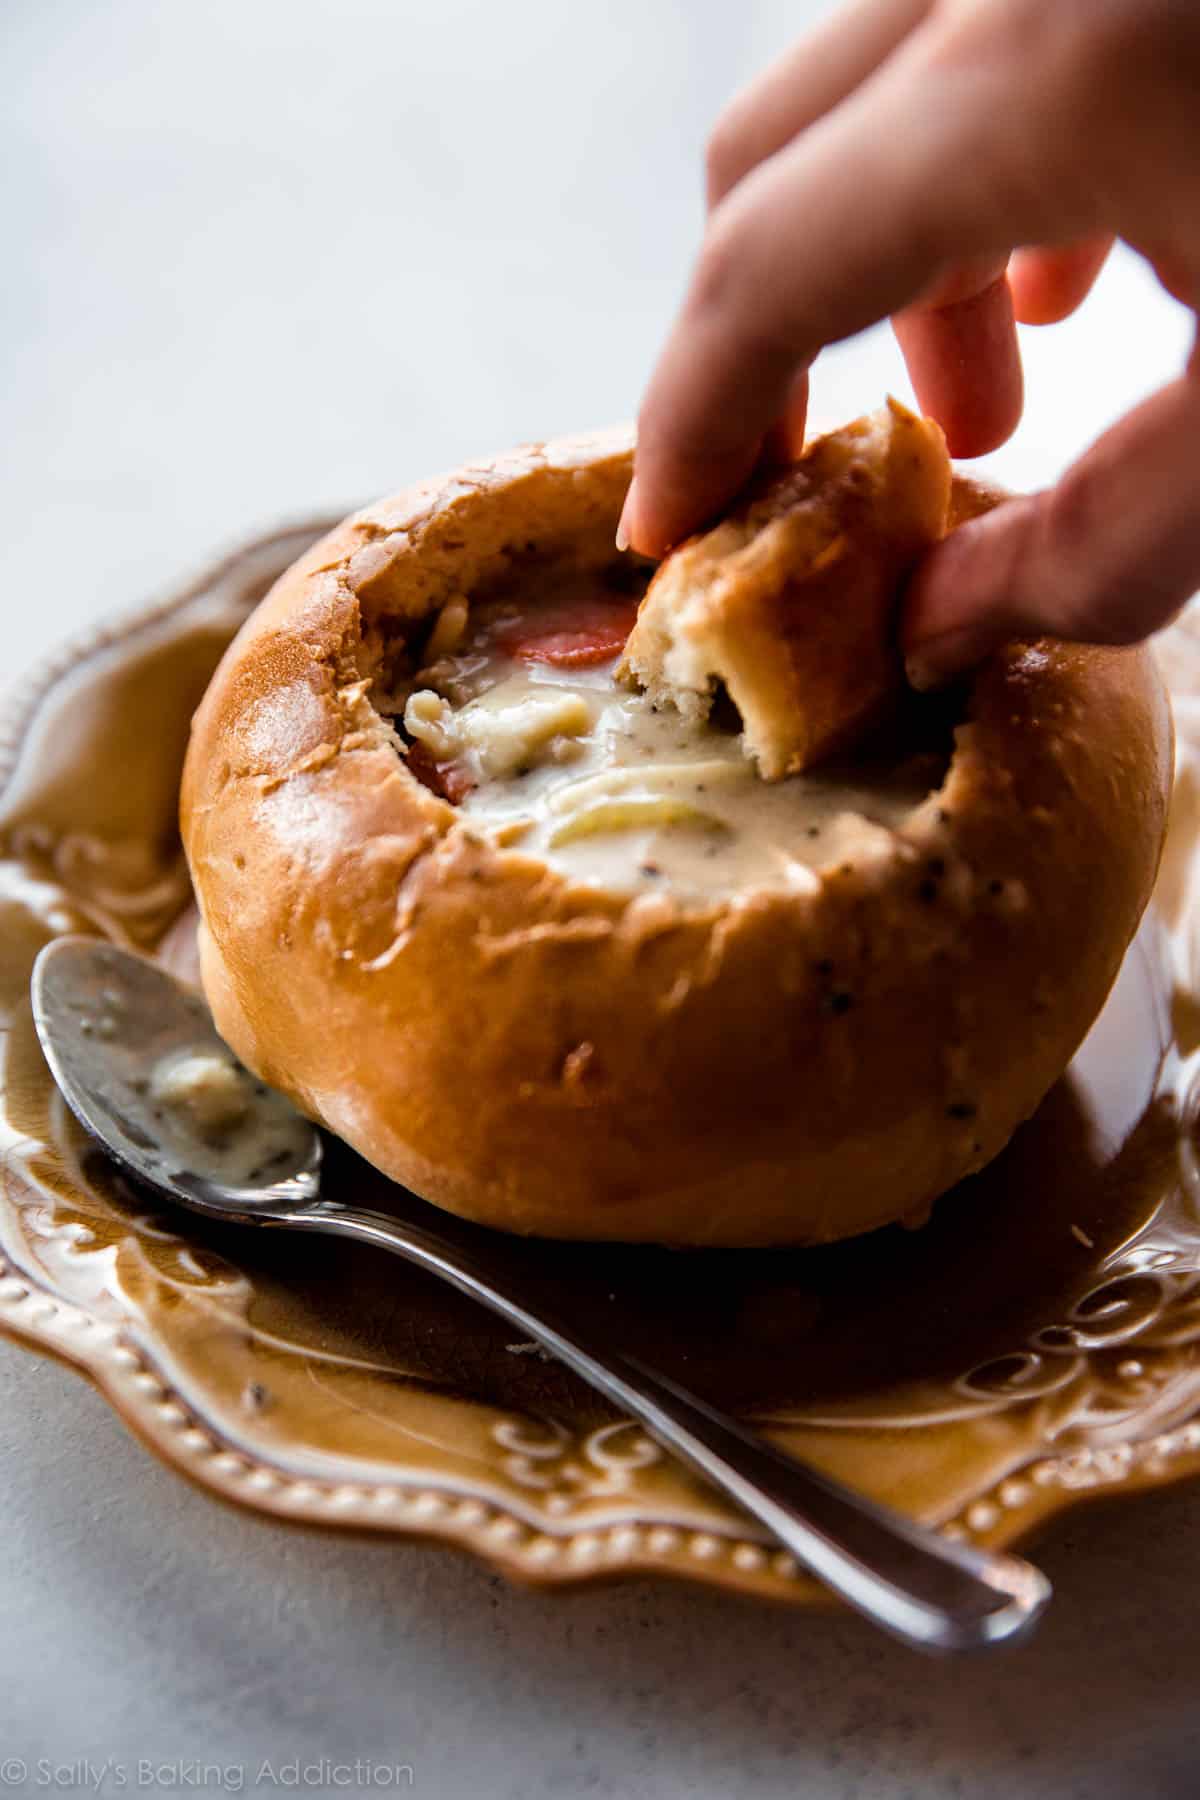
- Cut out the tops. When cool enough to handle, cut a large round out of the top of each bread bowl. Scoop out the center (save the center to dunk into soup!) and fill with soup.
This is A Basic Bread Dough
The dough we’re using to make bread bowls is a very basic bread dough. Made with common ingredients that most bakers have on hand, it’s simple, wholesome, and incredibly versatile. In fact, you’ll find the same ingredients in my sandwich bread and homemade pizza dough recipes. Using the same basic ingredients in varying amounts—like flour, yeast, water, and salt—produces incredibly different results!
Bread bowl dough is a lean dough, which means that it’s prepared without fat and produces crusty bread such as ciabatta bread, focaccia, homemade bagels, and artisan bread. On the other hand, rich doughs make soft breads such as Nutella babka, dinner rolls, and glazed doughnuts. When I’m making softer and fluffier bread, I typically use all-purpose flour, milk instead of water, and add additional fat like eggs and/or butter. More fat usually means the dough takes longer to rise. Today’s bread bowls are a particularly “lean” dough, so the rise time is quicker.
There’s no need to activate the yeast for this dough (basic, remember?)—which is when you add a pinch of sugar to the warm liquid/yeast to ensure that the yeast is active or not. Modern yeast is most likely active and ready to go. Just check the expiration date on the package.
Use This Dough for Anything
After the dough rises, you’ll shape the dough into 6 balls and bake them. You’re not limited to bread bowls though! This dough can easily turn into a couple pans of traditional dinner rolls, crusty loaves of bread (perfect for dipping in homemade Italian dressing!), or even a few pizza doughs. You can add seasonings like garlic powder (my suggestion!), Italian seasoning, onion power, rosemary, etc. So many ways we can enjoy fresh bread with this simple and versatile recipe.
One batch of bread bowl dough makes:
- 24 dinner rolls
- 3 crusty loaves of bread
- 4 12-inch pizza crusts
See my recipe notes below the recipe for detailed instructions for making each variation, as well as my make ahead and freezing tips.
What to Serve in Bread Bowls
The options are endless when considering what to serve in homemade bread bowls. A few of my favorites are crab dip or Maryland crab soup, garlic and bacon spinach dip, creamy cauliflower potato soup, minestrone soup, slow cooker chicken chili, and creamy chicken noodle soup (pictured inside today’s bowls). Here are all of my soup recipes for even more inspiration! If you have any extras, use them to make homemade croutons!
See Your Homemade Bread Bowls
Feel free to email or share your recipe photos with us on social media. 🙂
Print
Homemade Bread Bowls
- Prep Time: 2 hours
- Cook Time: 30 minutes
- Total Time: 2 hours, 30 minutes
- Yield: 6 large bread bowls
- Category: Bread
- Method: Baking
- Cuisine: American
Description
Homemade crusty and soft bread bowls- a delicious basic dinner roll recipe you should hold onto!
Ingredients
- 2 packets Red Star® Active Dry Yeast (4 and 1/2 teaspoons)
- 2 and 1/4 cups (540ml) warm water (110°F – 115°F)
- 2 teaspoons granulated sugar
- 2 teaspoons salt
- 2 Tablespoons (30ml) olive oil
- 6 cups (780g) bread flour (spooned & leveled), plus more for hands and surface*
- egg wash: 1 large egg beaten with 1 Tablespoon water or milk
Instructions
- Pour the warm water over yeast in the bowl of a stand mixer fitted with a dough hook attachment. Or, if you don’t have a stand mixer, a regular large mixing bowl. Whisk together and allow to sit for 5 minutes. Cover the bowl with a towel. The mixture should be frothy and foamy after 5 minutes.
- If you do not have a mixer, you can mix by hand in this step. With the stand mixer running on low speed, add the sugar, salt, olive oil, 4 cups of bread flour, and seasonings (if using, see recipe note). Beat on low speed for 1 minute, then add remaining 2 cups of flour.
- Knead the dough: Keep the dough in the mixer and beat for an additional 5-6 full minutes, or knead by hand on a lightly floured surface for 5-6 full minutes. (If you’re new to bread-baking, my How to Knead Dough video tutorial can help here.) If the dough becomes too sticky during the kneading process, sprinkle 1 teaspoon of flour at a time on the dough or on the work surface/in the bowl to make a soft, slightly tacky dough. Do not add more flour than you need because you do not want a dry dough. After kneading, the dough should still feel a little soft. Poke it with your finger—if it slowly bounces back, your dough is ready to rise. You can also do a “windowpane test” to see if your dough has been kneaded long enough: tear off a small (roughly golfball-size) piece of dough and gently stretch it out until it’s thin enough for light to pass through it. Hold it up to a window or light. Does light pass through the stretched dough without the dough tearing first? If so, your dough has been kneaded long enough and is ready to rise. If not, keep kneading until it passes the windowpane test.
- Turn it out onto a lightly floured surface and form into a ball. Then place into a large greased bowl, turning once to grease the top. (I just use the same mixing bowl—remove the dough, grease it with nonstick spray or olive oil, put the dough back in.) Cover the bowl with plastic wrap and place it in a warm environment to rise until doubled, about 90 minutes. Tip: For the warm environment on a particularly cold day, heat your oven to 150°F (66°C). Turn the oven off, place the dough inside, and keep the door slightly ajar. This will be a warm environment for your dough to rise. After about 30 minutes, close the oven door to trap the air inside with the rising dough. When it’s doubled in size, remove from the oven.
- Once doubled in size, punch down the dough to release any air bubbles. Remove dough from the bowl and turn it out onto a lightly floured surface. Punch down again to release any more air bubbles if needed.
- Using a sharp knife or dough scraper, cut into 6 even pieces. Form each into a large ball.
- Line 2 large baking sheets with parchment paper or silicone baking mats. Place 3 dough balls onto each. Cover lightly and set aside to rest for 20 minutes as the oven preheats.
- Preheat oven to 400°F (204°C). Brush each dough ball with egg wash and, using a sharp knife, score an X into the tops of each.
- Bake for 30 minutes or until golden brown. For a more accurate test for doneness, the bread bowls are done when an instant-read thermometer reads the center as 195°F (90°C).
- Cool until ready to handle. The longer you cool, the easier they are to cut open. For serving, cut a large round out of the top of each bread bowl. Scoop out the center (save the center to dunk into soup!) and fill with soup.
- Cover and store leftover bread bowls at room temperature for a couple days or in the refrigerator for 1 week. You can also freeze the baked bread bowls for up to 3 months, then thaw overnight in the refrigerator. Bring to room temperature before serving.

Notes
- Make Ahead Instructions: After dough has risen in step 4, punch down the dough inside the mixing bowl and cover the bowl tightly with plastic wrap. Refrigerate overnight or for up to 2 days, then remove from the refrigerator and continue with the second half of step 5. OR freeze for up to 2 months, then allow to thaw overnight in the refrigerator and continue with the second half of step 5.
- Special Tools (affiliate links): Stand Mixer or Large Mixing Bowl and Wooden Spoon or Silicone Spatula | Whisk | Dough Scraper | Baking Sheets | Silicone Baking Mats or Parchment Paper | Pastry Brush | Instant-Read Thermometer
- Whole Wheat Flour: I do not recommend using whole wheat flour in this dough. If desired, you can replace up to 1 cup of bread flour (about 130g) with whole wheat flour.
- Half Recipe: You can halve this recipe to make only 3 bread bowls. Or make the dough as written and freeze half for later use (see make ahead tip).
- Adding Flavor: I love adding a little flavor to the bread dough. I tested the recipe with a couple teaspoons of garlic powder and could hardly taste it. (Though I could certainly smell it.) I increased to 1.5 Tablespoons and it left a light and lovely garlic flavor. Adding garlic powder is optional, but tastes wonderful in the bread. If it pairs nicely with your soup of choice, definitely add it. You can also add 1-2 Tablespoons Italian seasoning or rosemary, or a Tablespoon of onion powder.
- Dinner Rolls: Makes 24 rolls, which is likely more than you need, but you can freeze half of the dough for later. Prepare dough through step 4. Instead of forming into 6 balls in step 5, divide the dough in half. Freeze half of the dough for later use (see make ahead tip) and form the other half into 12 balls. Place balls in a greased 9×13 baking pan. Cover lightly and set aside to rest for 20 minutes. Brush with egg wash, score with an X if desired (not necessary) and bake at 350°F (177°C) for 25-28 minutes or until the tops and edges are golden brown.
- Pizza Dough: Makes 4 12-inch pizza crusts, which is likely more than you need, but you can freeze half of the dough for later. Prepare dough through step 4. Instead of forming into 6 balls in step 5, divide the dough in half. Freeze half of the dough for later use (see make ahead tip) and form the other half into 2 large balls. Cover lightly and set aside to rest for 20 minutes. Flatten each ball of dough 1 at a time on a lightly floured surface or on a silicone baking mat. You could also do this directly on your greased pizza pan. Flatten and stretch into a 12-inch round circle. Brush with a little olive oil (no need for egg wash). Add toppings and bake in a super hot oven at 475°F (246°C). Pizzas typically take 12-15 minutes.
- Crusty Bread Loaves: Makes about 3 loaves of crusty bread. Prepare dough through step 4. Instead of forming into 6 balls in step 5, divide the dough into 3 pieces. You can freeze 1 or 2 pieces for later use (see make ahead tip). Round into a ball as best you can and place onto a lined baking sheet. Cover lightly and set aside to rest for 30 minutes. The dough will spread out a bit. Brush with egg wash, score with an X, and bake at 400°F (204°C) for 30 minutes or until the tops and edges are golden brown.
- Reference my Baking with Yeast Guide for answers to common yeast FAQs.
Begin with quality yeast.
Pour warm water on top, give it a minute to combine and froth up, then add the rest of the dough ingredients. You know the dough is ready when it no longer sticks to the sides of the bowl.
Let it rise in a warm environment until (roughly) doubled in size, about 90 minutes. I use my oven for this warm environment. See step 3 above.
The dough will be filled with air. Punch the dough down to release those air bubbles. You’ll be left with a super soft dough. ↓
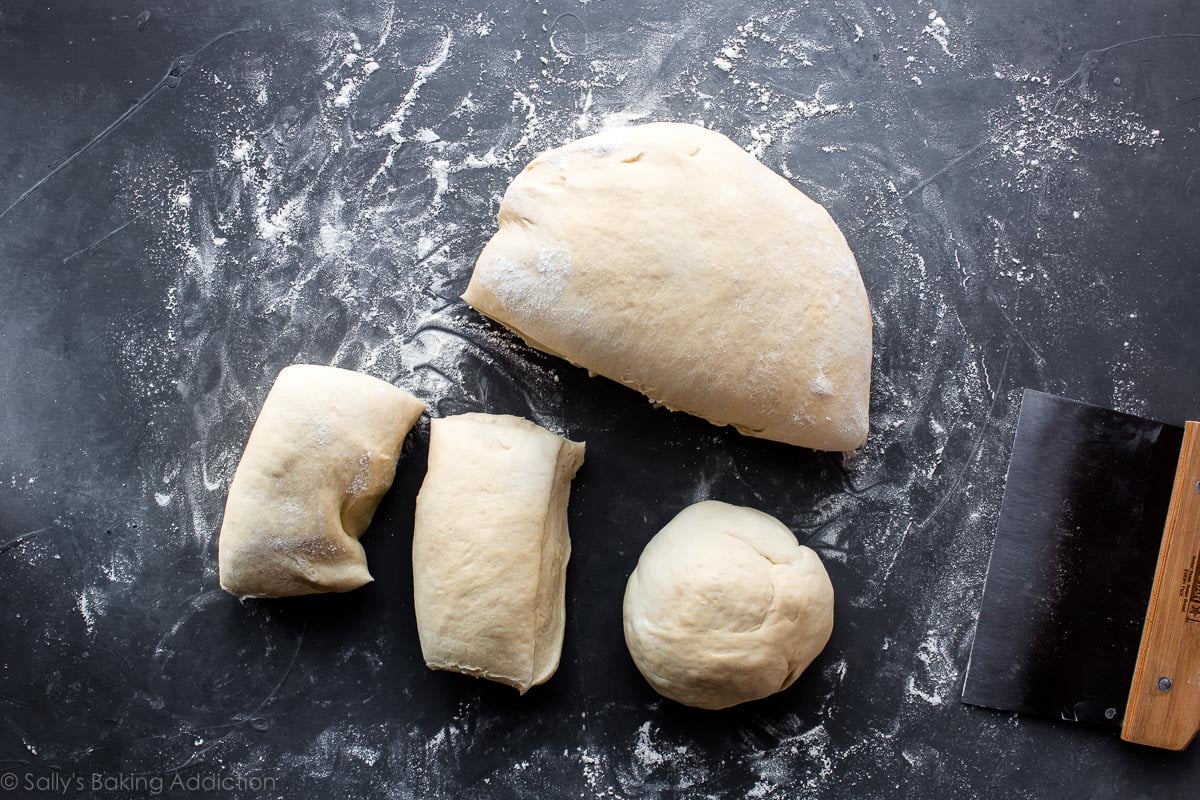
Divide the dough into 6 equal pieces, about the size of a softball, and round them into balls as best you can.
Use 2 baking sheets. Place 3 balls on each.
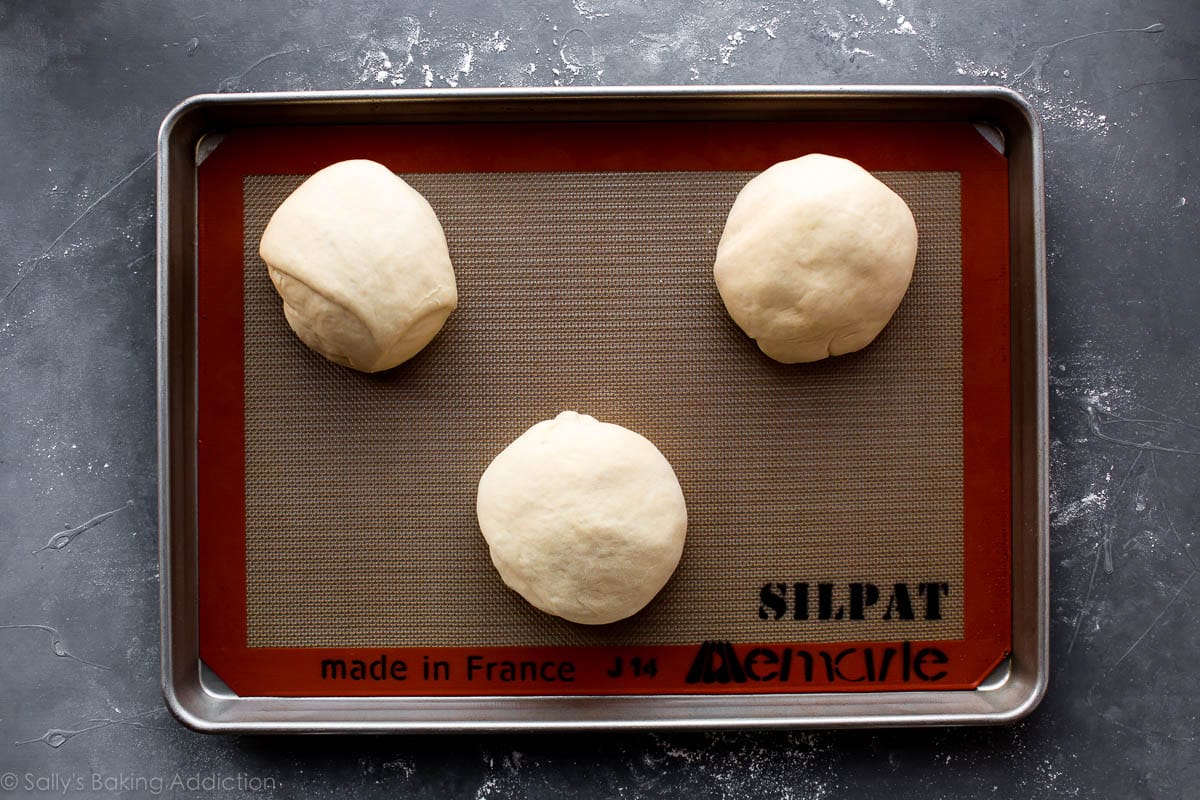
Cover lightly with a tea towel, plastic wrap, aluminum foil, etc. Let the dough rest for about 20 minutes.
Brush with egg wash. The egg wash helps create a crisp golden brown crust.
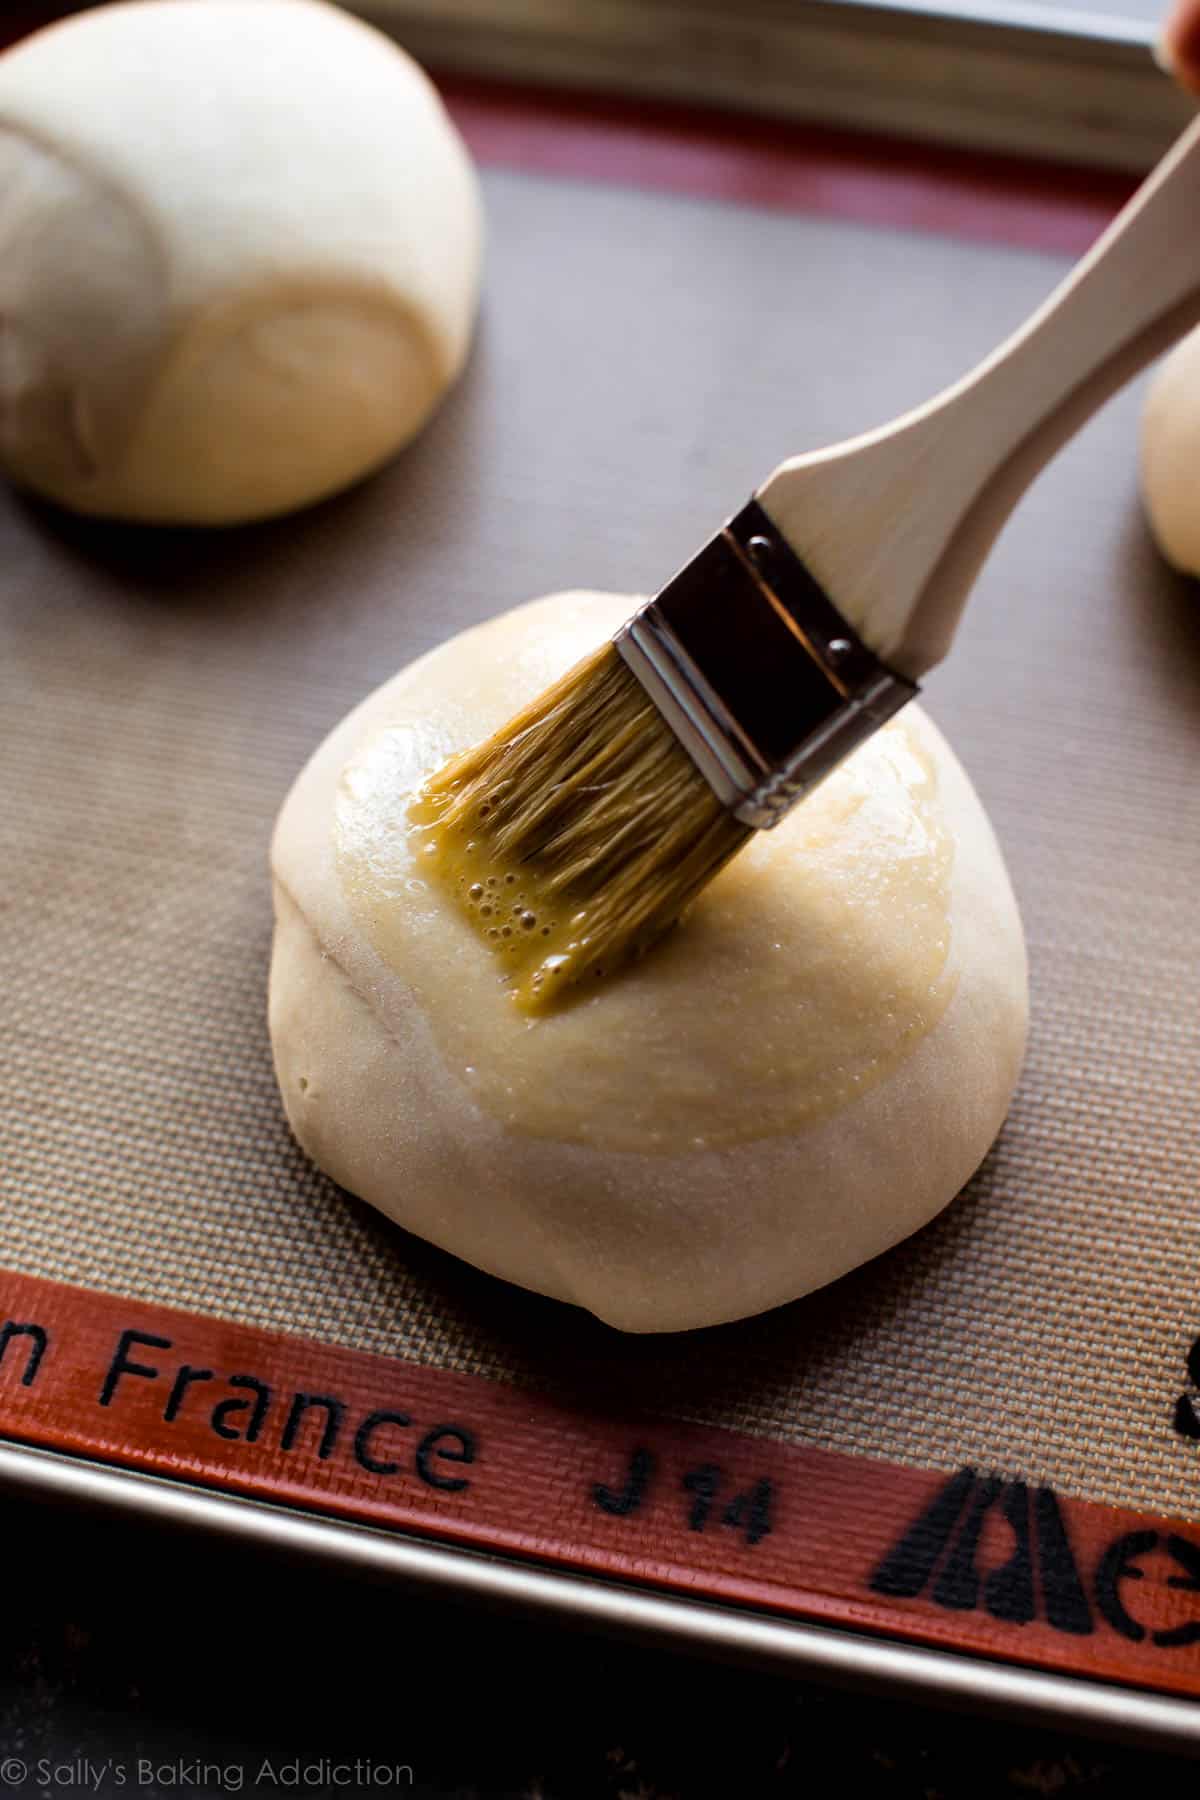
Score an X on the top of the unbaked rolls. This helps the rolls expand.
Bake until golden brown.
Carve out a deep hole in the bread. Doesn’t need to be perfect. Just use a knife.
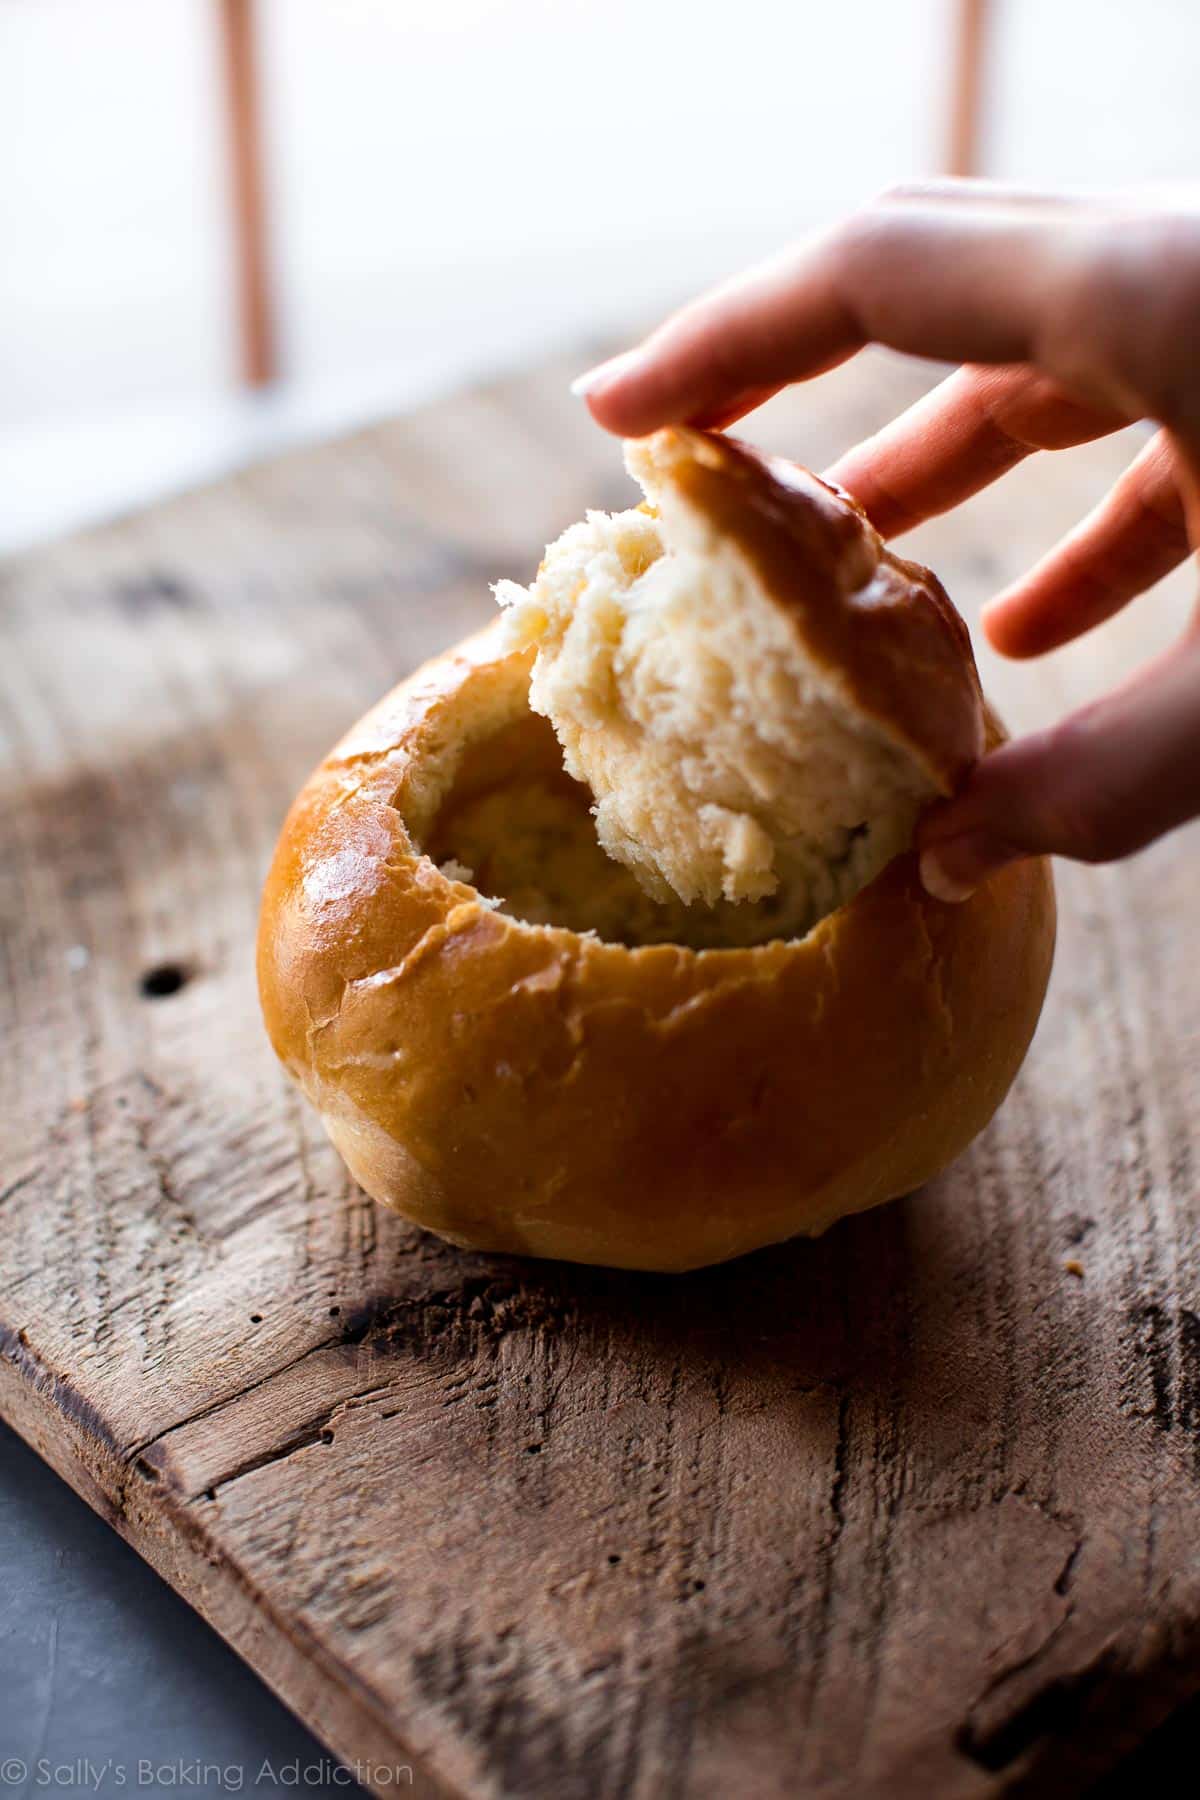
Add your soup and enjoy.


Reader Comments and Reviews
Hi, Sally! I love your recipes. Your sandwhich bread is my favorite. The recipe says in a warm environment, the dough will rise doubled in approximately 90 minutes. It’s 80 degrees outside and we don’t have the AC on so it’s pretty warm. It’s been about 40 minutes and the dough has definitely doubled. Do I need to wait the remaining 50 minutes or proceed now?
Hi Cheyenne, if the dough has risen that much you should go ahead and punch it down and continue with the recipe. A warm room will definitely make it rise faster.
The ingredients list asks for 6 cups of flour but the method accounts for only 4?
Hi Carrie, you will use all of the flour in step 2. In the last sentence, you’ll see you add the remaining 2 cups.
This recipe came out so good! I added seasonings as you suggested and they taste wonderful! We couldn’t wait for the soup to get finished before we ate one of the bowls. So yummy!
These were exceptional-perfect shape and texture. Made croutons out of of the centers for a fish stew!
Making this recipe for the first time to go with our venison burger soup. Instead of the salt, I use beef soup base and dehydrated onions which I place in a bowl then I add olive oil. Also, I use a heating pad on low, covered in old towel to allow my dough to rise.
This is a great, pretty fool proof recipe if you have a stand mixer. I love it! Made these about 5 times already and everyone was raving about how good they were each time. First time I used whole wheat bread flour and forgot to halve the salt when halving the recipe, but they were excellent anyway for stew. Made little dinner rolls a couple time with only white bread flour, soooo tasty! Next time will try with seasonings. Always solid recipes from Sally’s Baking Addiction, thank you so much!
Found the recipe and they will come out great! Have passed this recipe onto family members.
Can I bake both sheets in standard household oven at same time?
Sure can, Jim!
Question: would this work out the same if I divided the dough into four instead of six, for a bigger bowl? Would the baking time change? I made the recipe for six bowls. They were beautiful and delicious, but the kids complained they were too small—not like the bowls we got at a bistro in Reykjavik.
Yes, you can make them larger. We recommend following the dough as written and dividing into 4 sections for 4 bread bowls. We’re unsure of the exact bake time for the larger size.
The first bread recipe I ever tried. I followed the kneading video and my bread rose beautifully! I divided the dough into equal sections and shaped into balls……my bowls were flat, unleavened looking. I was clueless that ‘shaping’ the dough balls meant stretching and tucking the dough into tight, tense little balls that force the dough to rise. I had to research a video on ‘shaping’ bread dough! I got right back on that horse and tried again, cutting the recipe to 1/4 and made one larger soup bowl and it turned out PERFECT!! I could not bake it as long as the recipe said. It was quite brown and the instant temp read was above the ‘done range.’ Maybe my oven is off.
I also made my first Perfect Butter Pie Crust from your recipe and on my first attempt, it turned out WONDERFUL!
So, fueled by success, today I am going to attempt the white sandwich bread.
I made these today. My first making bread experience that hasn’t been a total failure.
But my bread rise high when it baked. When I let it rest before baking, it spread out, not up.
But it tastes good. What did I do wrong?
Hi Susan, it could have been an issue with shaping, but sounds like they turned out well anyway!
Made these with the creamy chicken noodle soup. Absolutely delicious and relatively simple!! Will definitely make these again and again.
Question about the make ahead instructions. It states, “after dough has risen in step 3, punch down the dough inside the mixing bowl and cover the bowl tightly with plastic wrap.” But the dough only rises in step 4. So are we letting it rise as stated in step 4 and then refrigerating the dough and continuing with step 5 once we are ready to use it? I currently have it in the fridge to bake tomorrow, so I’m hoping I did it right. Thank you!
Hi Chrys, thank you for letting us know about that mistake! I’ve updated the recipe card now to correct it.
I am eager to make this recipe but I am wondering if I can just make one larger bread bowl for a dip party?
Hi Anne, You can make them larger — some readers have had success making four large bread bowls, but we are unsure how just one giant bowl would bake up. We’re unsure of the exact bake time for the larger size. You can also turn our Artisan Bread into one large boule. Let us know what you try!