Homemade Whipped Cream

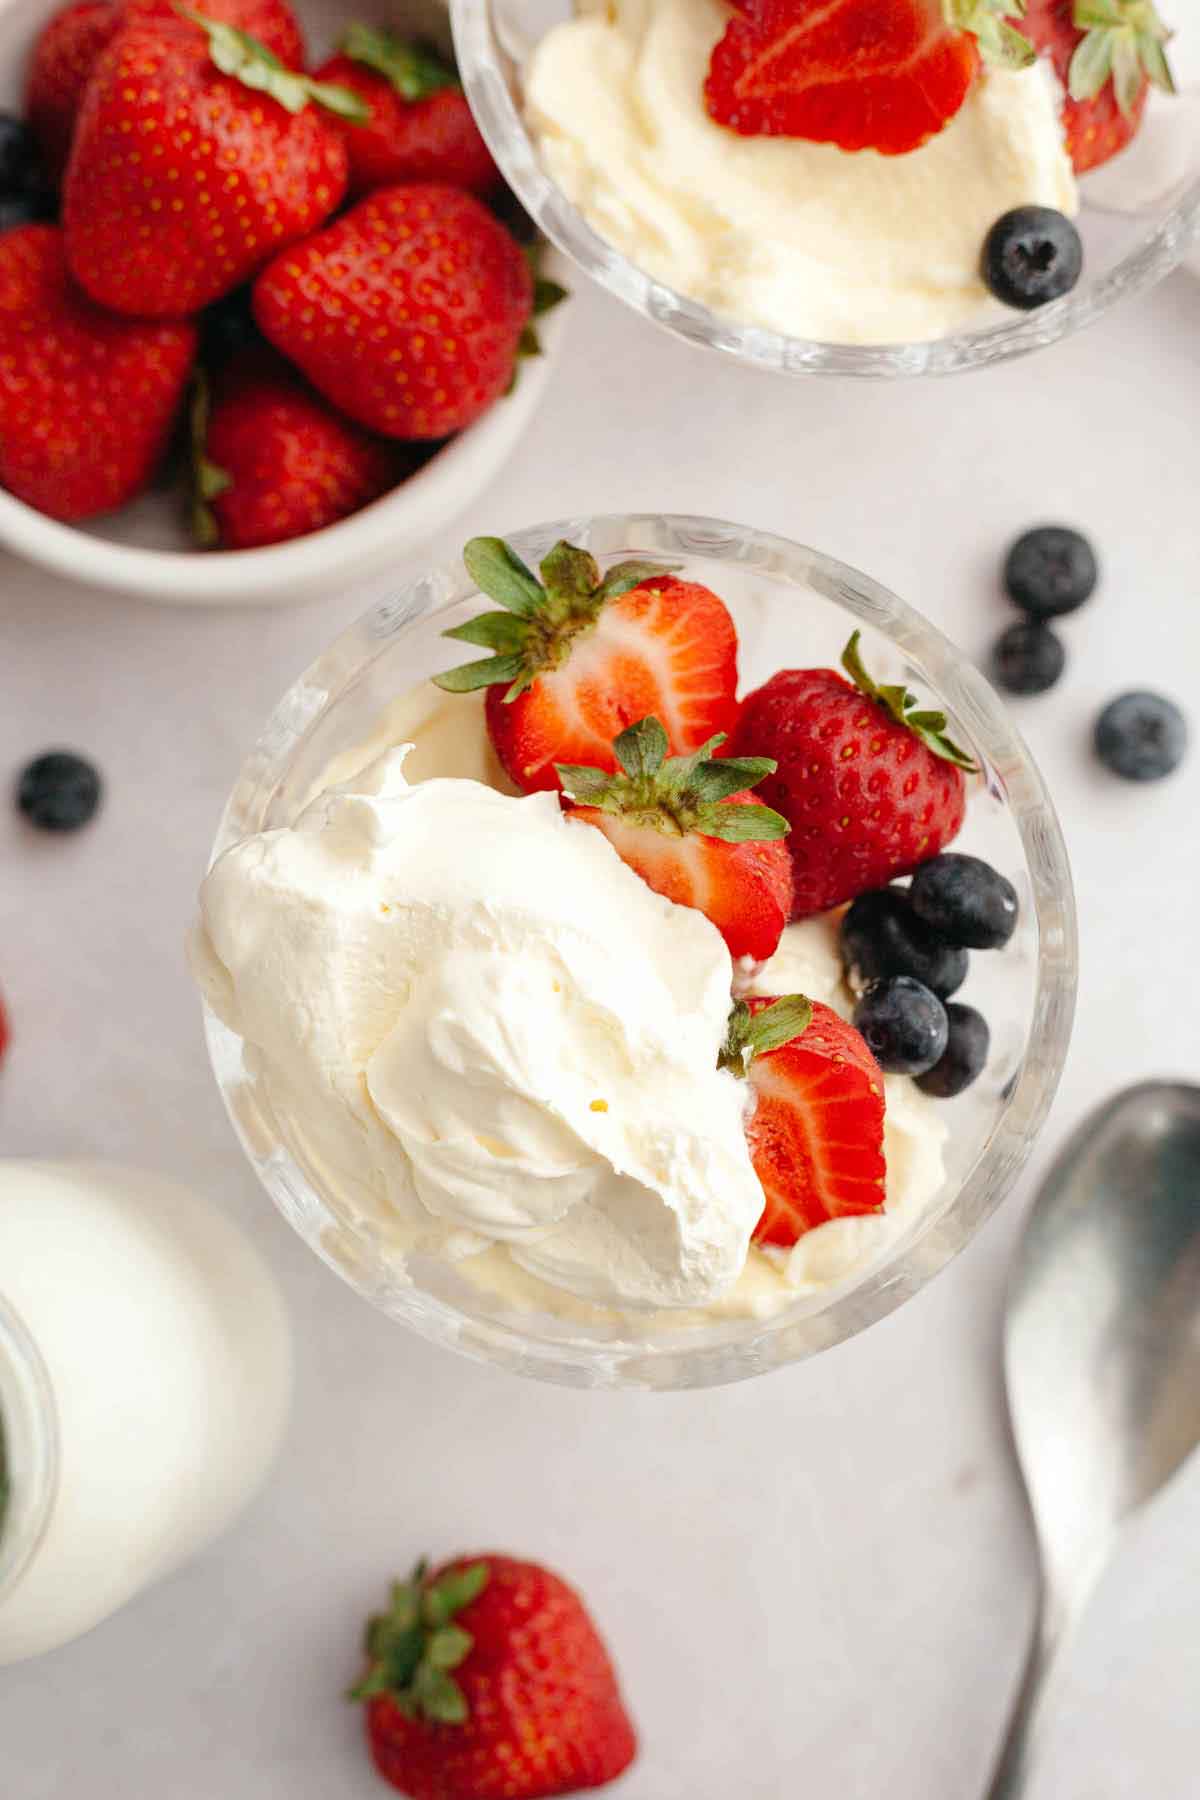
Make homemade whipped cream with just three ingredients in only 5 minutes! Once you taste fresh, sweetened whipped cream, you’ll never want to grab a tub or can from the grocery store again. It’s the perfect accompaniment to fruit, to top your favorite cakes or pies, and to add as layers in pretty trifles.
I originally published this recipe in April 2014 and have since updated the recipe, added new photos, and included more helpful tips.

Fresh whipped cream might seem like second nature to most people, but when I first started making it myself years ago, I was admittedly intimidated. While there’s nothing better than a pie piled high with clouds of fresh whipped cream, there is certainly a sweet spot when it comes to getting it whipped up perfectly. If you stop too soon, you’ll end up with watery whipped cream; if you whip it for too long, you’ll end up with butter.
Once I landed on the perfect combination of ingredients and technique, I’ve never looked back. This may seem basic to many, but I’m sure there are others out there like me who may be intimidated by it or who can never get it quite right.
Homemade whipped cream definitely deserves its own little corner of the Internet, and whether you choose to top a pie, dollop it on a bowl of fruit, or pipe some rosettes on a cake, this recipe will serve you infinitely well.
Simple List of Ingredients
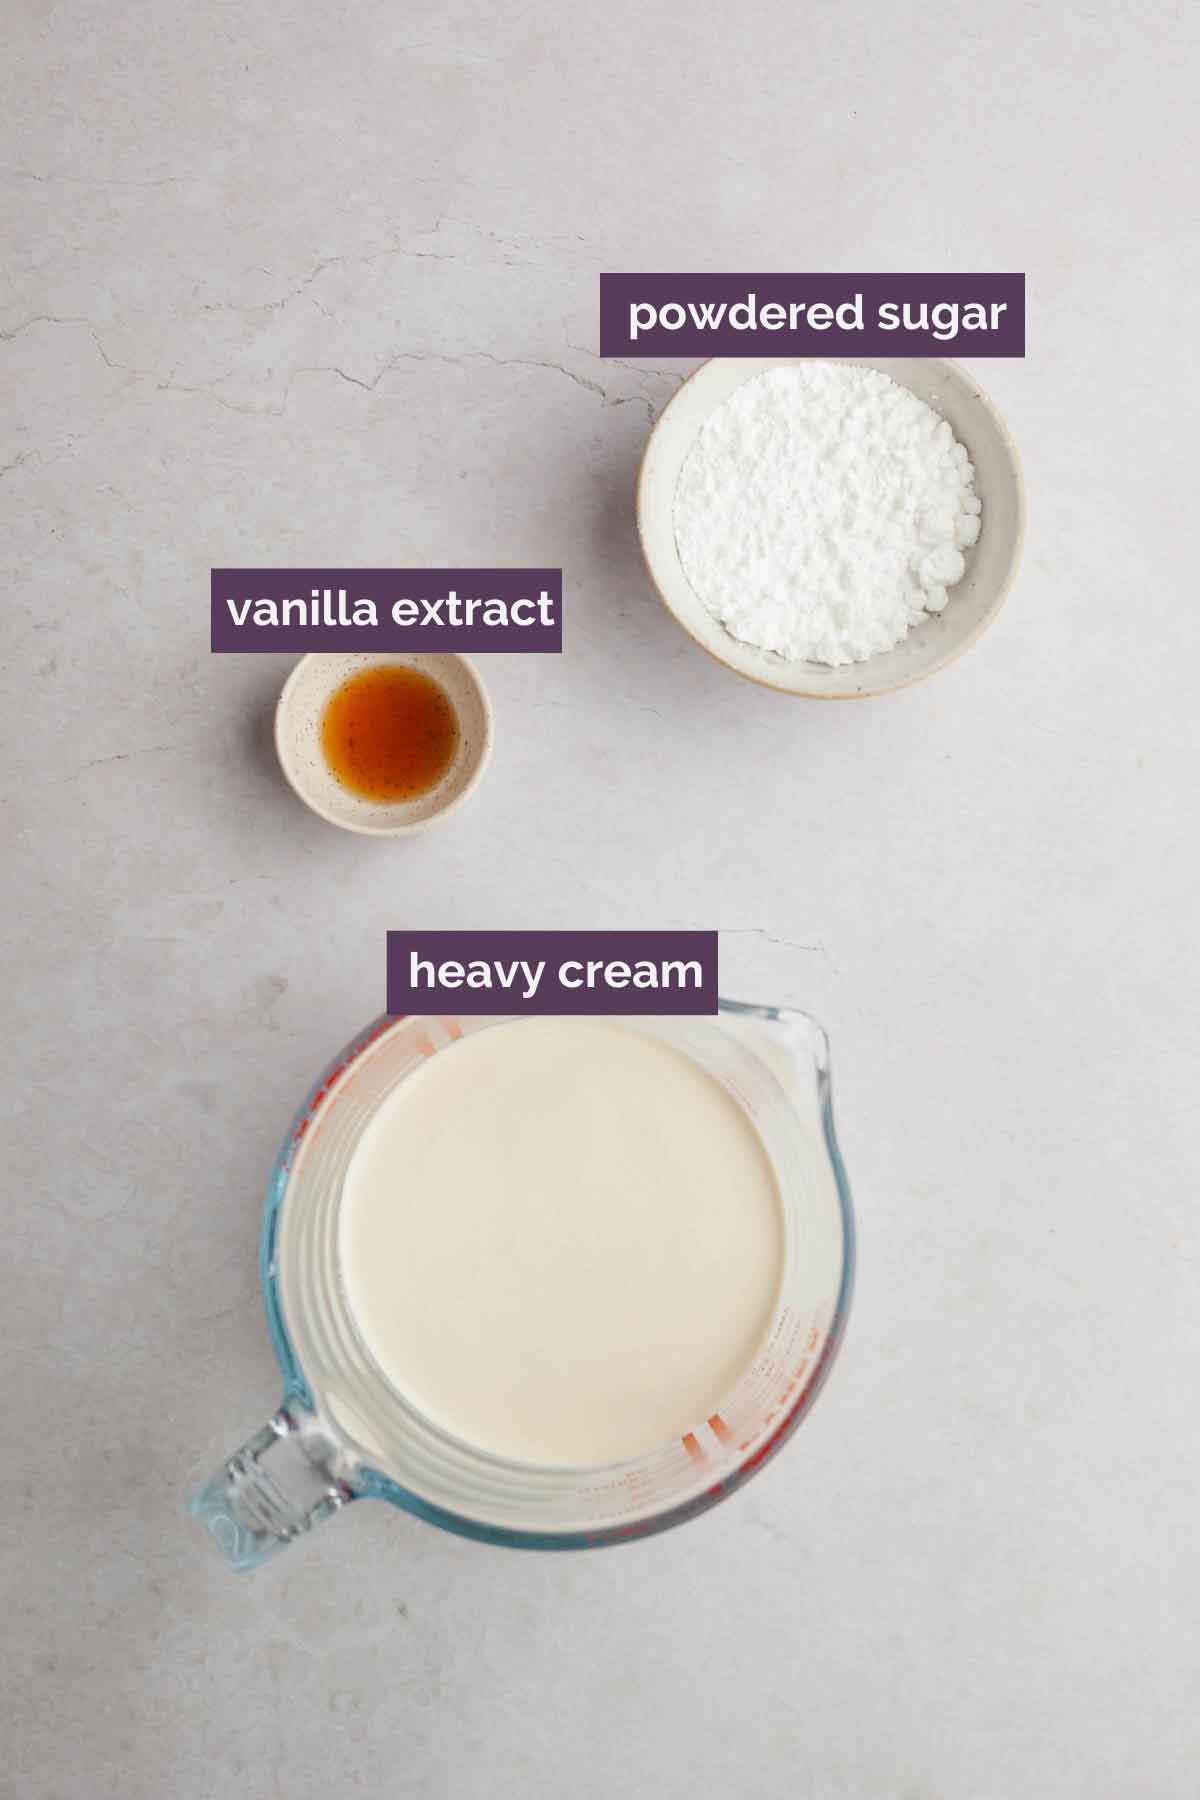
Technically, you only need one – heavy cream! But if you want something at least a little bit sweet (you do, trust me!), then you need three total ingredients:
- Heavy cream (or heavy whipping cream)
- Powdered Sugar (also known as confectioners’ sugar)
- Vanilla extract
You may have seen both heavy cream and heavy whipping cream at your grocery store and wondered if they are the same thing, or if they can be used interchangeably. Let’s discuss…
The Difference Between Heavy Cream and Whipping Cream
This all comes down to fat content. Heavy cream has a slightly higher fat content than whipping cream; they will both turn into delicious bowls of fresh whipped cream, but heavy cream will hold its shape for a longer period of time, while the whipping cream will give you a lighter, softer texture. I always use (and recommend!) heavy cream.
How to Make Homemade Whipped Cream
This comes together easily and quickly! Here’s how we do it…
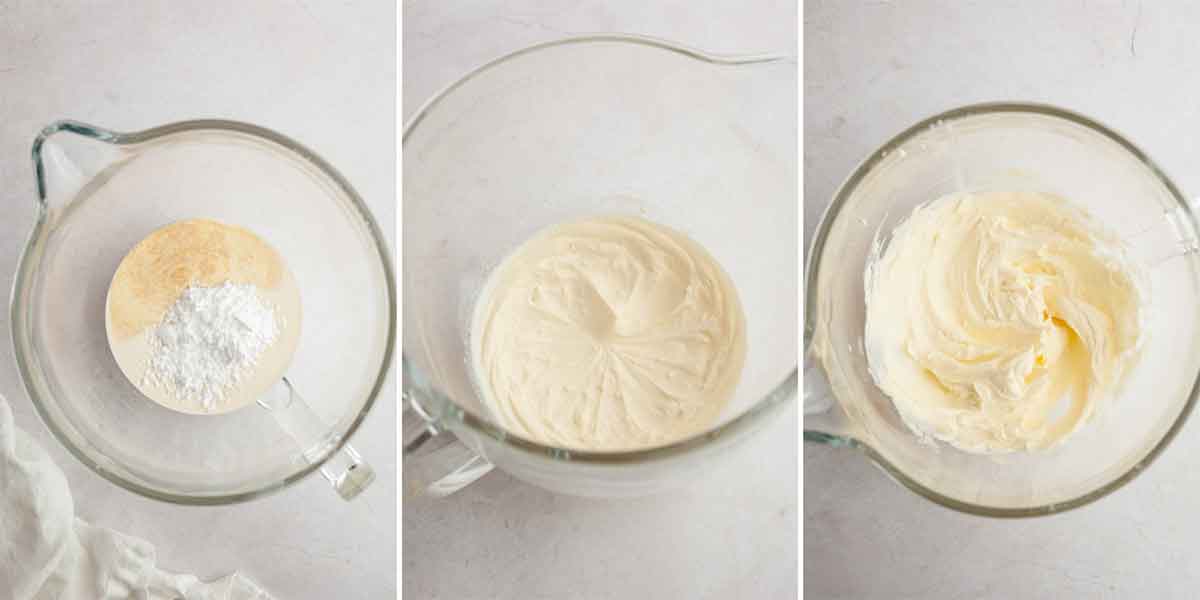
- Place the heavy cream, powdered sugar, and vanilla in a mixing bowl (you can use a stand mixer with a whisk attachment or use a hand mixer).
- Beat at medium until frothy and beginning to thicken, then increase to medium-high speed and beat until the mixture reaches soft peaks and you start to see trails left by the beaters.
- Stop and scrape the bowl. I find that sometimes the cream along the sides and bottom of the bowl don’t get whipped up very well, so once we’re close to finished, I like to scrape the bowl so the straggling cream gets whipped in well too!
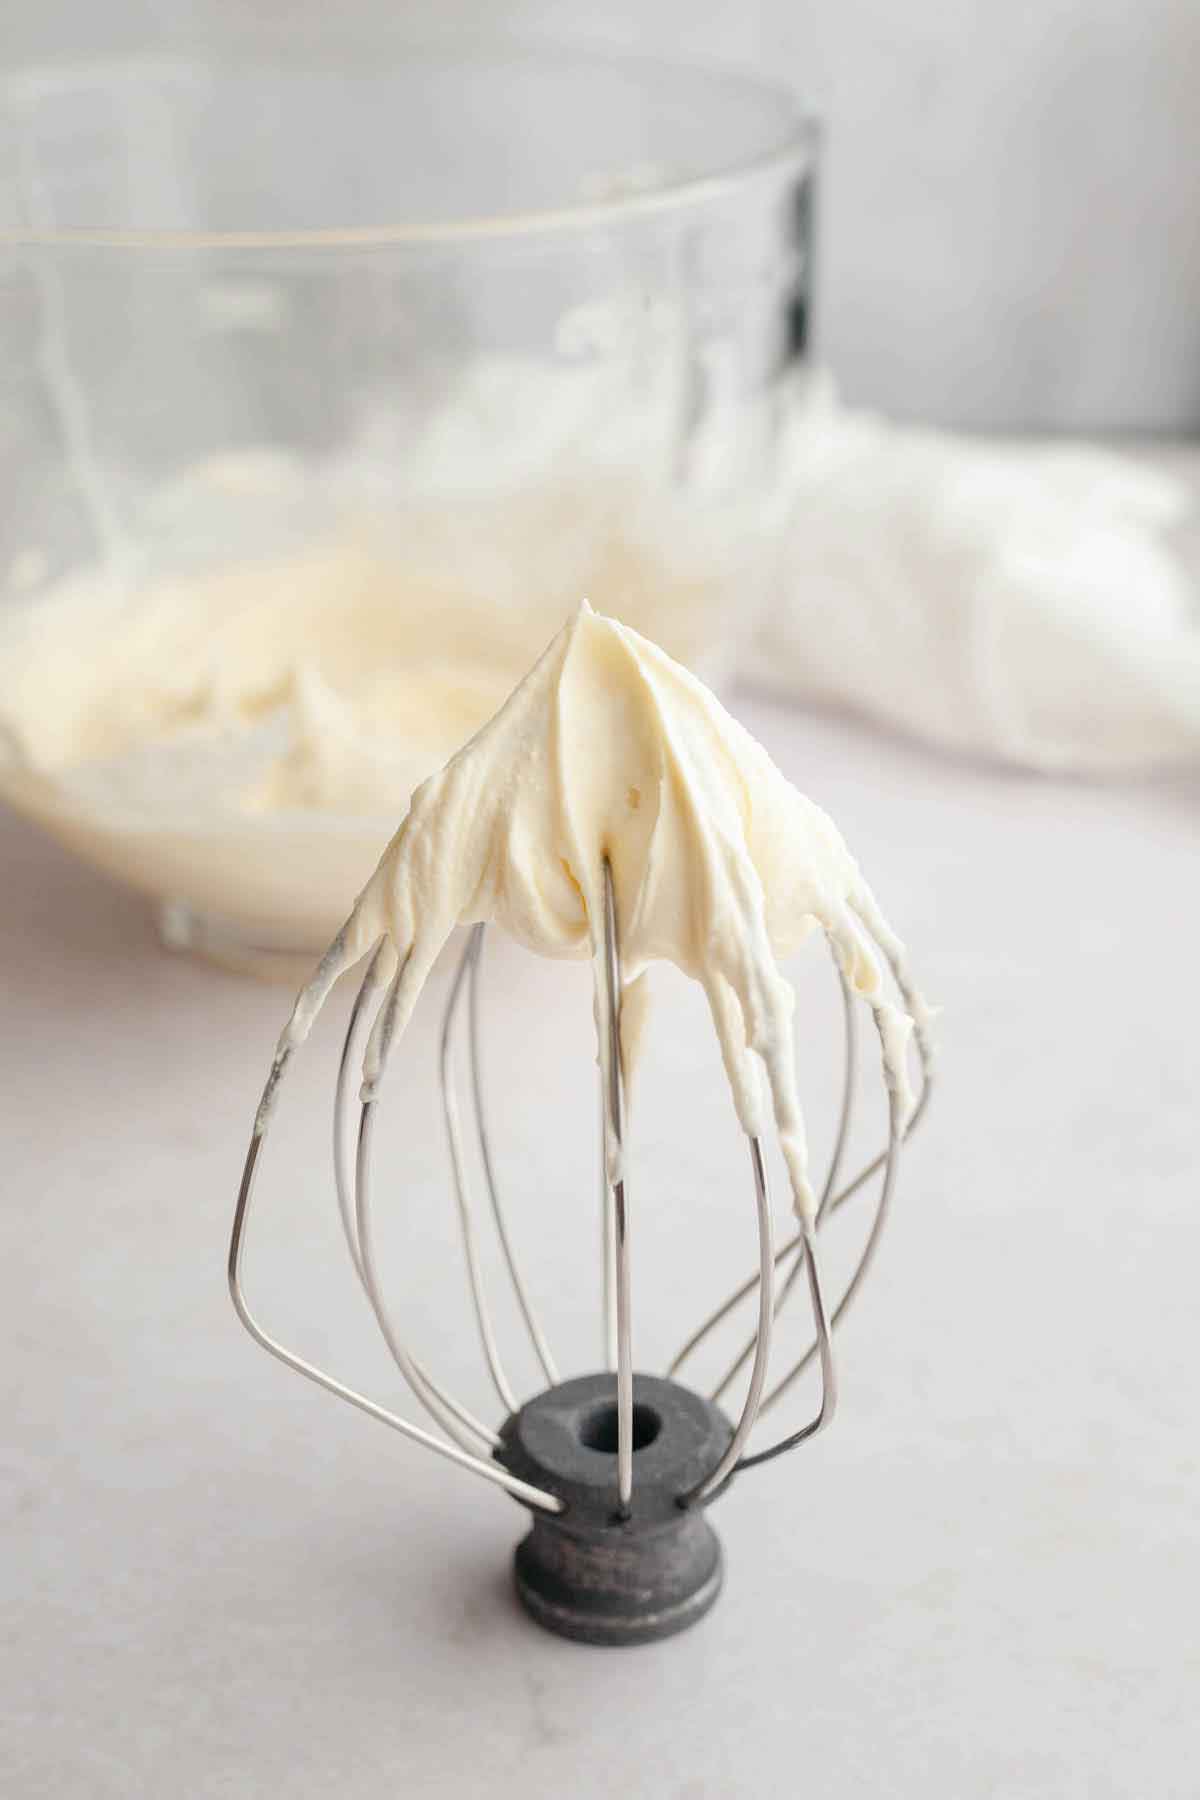
- Beat until stiff peaks form – I like my whipped cream nice and thick, but you don’t want it to become curdled. It’s important to watch closely at the end so you don’t overmix it (if you’re new to making whipped cream, I find that a hand mixer allows for more control and lessens the chance of overbeating it). If you take the beater out of the cream, it should hold its shape and not droop off of the beater.
Flavor Variations
While this homemade whipped cream recipe is absolutely perfect as-is, you can definitely experiment with different flavorings, spices, etc. Here are some ideas:
- Stabilized Whipped Cream Frosting – For a whipped cream-based frosting that is sturdier and will hold up longer, I use a cream cheese base. You can find this version in my pumpkin spice latte cupcakes recipe.
- Cinnamon Whipped Cream – Start by adding ½ teaspoon of ground cinnamon and go from there, tasting and adjusting to get as much or as little flavor as you’d like.
- Maple Whipped Cream – This would be perfect on just about any fall-inspired treat! Reduce the powdered sugar to ¼ cup, add 2 tablespoons of pure maple syrup, and keep everything else the same. You could also choose to use maple extract (I would recommend 1 teaspoon) and keep everything else the same in the recipe instead of using maple syrup.
- Honey Whipped Cream – You can choose to use just honey as a sweetener (the whipped cream will be thinner and not hold up as long as with the powdered sugar as a stabilizer). You can use 2 tablespoons of honey with the cream, or play around with the ratios of powdered sugar and honey.
- Salted Caramel Whipped Cream – Add a couple tablespoons of salted caramel sauce, just as you did with the honey above.
- Vanilla Bean Whipped Cream – If you love seeing those flecks of vanilla bean, substitute vanilla bean paste for the vanilla extract. You can substitute 1:1, meaning use the same amount of vanilla bean paste as extract called for in the recipe.
Recipes that Use Fresh Whipped Cream
Aside from topping fresh fruit, hot chocolate, pancakes, or waffles, you can use it for all of these delicious desserts:
- Easy Strawberry Shortcake
- Pavlova Layer Cake with Whipped Cream & Berries
- Caramel Tres Leches Cake
- Strawberry Pie
- Chocolate Cream Pie
- Tres Leches Cake
- Banana Cream Pie
- No Bake Peanut Butter Lover’s Pie
- Banoffee Pie
- Salted Caramel Apple Cheesecake Pie
- Coconut Cream Pie
- Add a dollop to your favorite pie (hello, pumpkin pie!)
Storing and Freezing Instructions
Short-Term Storage – While best used the same day it is made, homemade whipped cream can be stored in the refrigerator in an airtight container for up to 2 days. It may soften while in the fridge; use a large balloon whisk to re-whip it briefly before using.
Freezer Storage – Whipped cream can be stored in the freezer in an airtight container for up to 2 months. Thaw in the refrigerator overnight, then re-whip with a balloon whisk to stiffen it up again before serving.
Watch the Recipe Video:
If you make this homemade whipped cream recipe and love it, remember to stop back and give the recipe a 5-star rating – it helps others find the recipe! ❤️️

Homemade Whipped Cream
Ingredients
- 1 cup (240 ml) heavy cream, or heavy whipping cream
- ½ cup (57 g) powdered sugar
- ½ teaspoon vanilla extract
Instructions
- Pour the heavy cream, sugar and vanilla extract into the bowl of a stand mixer fitted with the whisk attachment.
- Turn the mixer to medium speed and whip. The cream will start to get frothy, and then will begin to thicken (around the 2-3 minute mark).
- Increase the speed to medium-high and beat for another 30 seconds to 1 minute, or until the cream looks billowy and there are distinct trails left by the whisk in the whipped cream. If you remove the whisk from the mixer and turn it upside down, the whipped cream should remain upright and not droop off.
- Top your favorite fruit or pie! The whipped cream can be kept in the refrigerator for up to 2 days.
Notes
- You can use a stand mixer with a whisk attachment, a hand mixer, or make the whipped cream by hand with a whisk!
- I recommend using heavy cream (vs whipping cream) for thicker whipped cream that holds its shape better.
- See post above for ideas about different flavorings and uses for fresh whipped cream.
- You can make fresh whipped cream up to 2 days in advance. Cover and refrigerate, then whisk briskly before using.
- You can also freeze homemade whipped cream in an airtight container for up to 2 months. Thaw in the refrigerator overnight, then whisk briefly before using.
Did you make this recipe?
Leave a review below, then snap a picture and tag @thebrowneyedbaker on Instagram so I can see it!


Very good. The use of vanilla was new to me. I have always used superfine sugar instead of confectioners, but confectioners works well too. A tip, especially if working in a hot kitchen – throw the bowl and beaters in the freezer for about 15 minutes. The w/c whips up faster!
Delicious, I also did a version of low sugar by using a tablespoon of maple syrup instead of powdered sugar, it turned out delicious as well, especially topping it over something that may be sweet.
I chill the bowl before whipping.
4 a half stars! We made the homemade powdered sugar and modified the recipe by adding only 1/4 cuo of sugar. Delicious! Topped our pancakes with coolwhip and strawberries. Thanks for the recipe.
Absolutely delicious much better than store bought and super easy to make my family love it! Thanks!
Came out perfect! Thanks for sharing
I wasn’t sure about it since it took longer than expected to bake, but it was a major hit! I made 2; 1 with powdered sugar and the other with fresh whipped cream. (Both garnished with raspberries and blueberries.) ❤️
You really had to put the quantities ALL THE WAY AT THE BOTTOM?
I grew up with whip cream in an aerosol can! Yay Redi Whip-not. My brother would stick the tip into his mouth and spray the whip cream (who else has done that? lol). That always ruined the aerosol so had to throw it away b4 mom got home.
My first taste of real whip cream was at my mother in laws. She only made real whip cream. She only used a spoon to put two in the whip cream. Don’t think it was 1/4 cup. I haven’t gone back to spray can whip cream but when my brother visits I always have a can for him!!
1/2 cup of powdered sugar is quite a bit of sugar. Assuming that the whipped cream is being paired with a sweet dessert like apple pie or fresh strawberries, or ice cream sundae, that seems overkill. I would recommend you start with no more then two tablespoons of powdered sugar and add a bit more if not sweet enough for the occasion. It order of precedence, it is the cream flavor, the vanilla flavor then the sweet flavor that should be strived for.
i do not see heavy cream that doesn’t say heavy whipping cream could you provide a brand
It is the first ingredient listed in the ingredients list, directly under the word ingredients, and in step 1 it is this first thing we are directed to add to the bowl. As far as a brand… just go to your nearest grocery store (Walmart, Kroger, Albertsons, Bashas etc) and go to the dairy department. If you can’t find it yourself, ask someone that works there to help you locate it. Depending on what part of the country you’re in, the brands will be different – even for the name brand dairy products, so giving a brand name in the recipe isn’t really going to help anyone not in the recipe Authors same region. If you aren’t able to see the recipe properly (because of the videos or ads that pop up or take a long time to load, there are a couple of options. If you are viewing this on your android phone, and you found the recipe via the Google search bar, go to the three vertical dots in the upper right. Click “open in browser” choose chrome if prompted. It will open up in a chrome browser. Then a little white bar pops up at the top saying “view simplified version of this page” choose that and it will open up without the ads. If it does not prompt you to open simplified, then just find the button on this page saying “print this recipe” or “print”, or choose “print” from the 3 dot menu in the upper right. It will open the page in printer friendly mode and then there will be no ads. If you need more help than this then you really shouldn’t be using technology because you’re beyond help and you need to just go to the store and buy a can of whipped cream. Don’t leave critical comments like this on good recipes, especially when the problem is YOU and not the recipe.
Yummy! Takes just like store bought but know its probably better
Can you make this chocolate as well by adding the cocoa baking powder?
Since ive been making this my wife notr I have purchased store bought whipped cream anymore. Its unbelievable how much better..we keep it in a glass bowl with clear wrap for 4-5 days…it holds up well. This is a staple at our house now. Thank you
I’ll never buy cool whip again
this is so fresh and so easy.
I use clear vanilla btw
thanks for another great keeper Michele! Hugs to your cute kiddos and prayers for continued improvement
I used a measured pinch of salt due to the high sodium in the baking powder and soda. They turned out delicious, and putting them in the oven at 300 F was fantastic because it crisped them up on the outside!
Ha ha, this comment was meant for the Belgian Waffles I have open on another tab!
It’s done like charm. I’ve done it with the help of my newly purchased hand blender with whipper blades. It took a bit longer but it got done. Thanks for sharing. Deserves 5 Stars.
Super easy and perfect for pies for fruit. This will be my go-to from here on out!
1/2 cup sugar? Hurts my teeth already,wow!
Quick easy to follow recipe. So much better than store bought. I put my stand mixer bowl & whisk in freezer while getting my ingredients together. Used powder sugar & it came out very light & fluffy. I will definitely use your recipe again :)
Do you put the bowl & beaters in the freezer for a little while? I’ve done that in the past.
Yes, that is what I did. :)
OMG Michelle!!!! I’ve been making homemade whipping cream for 40 years and always with whipping cream, and then adding the powdered sugar after I had peaks . The idea of dumping it all in and using half and half is a game changer. And, the fact that I can make it a day ahead is a BONUS. Can’t wait to try this. THANK YOU for all your help-even to us experienced bakers.
From a fellow Michele :-)
My grandmother always made this with heavy cream too. I’m going ditch the commercial variety this Christmas and make this recipe. Thanks!
Whipped cream can also be also be stored in a colander or sieve. Any whey will drip out and keep the cream thick
I actually like to make stabilized whipped cream and then it lasts for 3 DAYS in the fridge. It holds up so well and can be made ahead of time and not have to be rewhipped. There are several ways of doing it (adding gelatin, cornstarch, cream of tartar or powdered milk)…but my favorite is to just add a T. of instant pudding mix to the cream with your powdered sugar. You can use any flavor you want too…I love adding white chocolate pudding mix…I’ve done chocolate whipped creams, cheesecake flavor is lovely atop pumpkin pie or spice cupcakes…but any flavor of instant pudding will do the trick.
Hi Michelle! How much cocoa powder would you add for a chocolate version? I am thinking maybe 1 tablespoon?
Add 1 T. of chocolate instant pudding mix. You will have a stabilized chocolate whipped cream.
Thanks Michelle
Can we use granulated sugar as well?
Yes, definitely!
Although I didn’t read all the comments, I noticed someone pointed out one of the most important details.
Absolutely to increase chances of success…. the bowl and beater should be placed in the freezer in order to keep the cream as cold as possible.
The heavy cream should NOT be at room temperature. Keep it in the fridge while you gather all your “stuff”.
Warm cream…. beaten = BUTTER.
Since not everyone reads the comments (and rarely all of them!) I think you should put this info into the actual recipe.
Love all the recipes I try from your site. Love reading about your family!
Hi Michele – I see there are various methods to make stabilized whipped cream. What method do you lean towards? Thanks in advance.
I use this recipe all the time! I make it with dark chocolate cocoa for a special treat. I make a parfait with vanilla whipped cream, chocolate whipped cream, and chopped or flaked dark chocolate!
You’ve left out the most important instruction. Place the bowl and the beater in the freezer for at least 30 minutes prior to whipping. They must be chilled to maximize whipping. Also, if you can find it, go with pasteurized, not ultra-pasteurized, cream.
Which is better powder or granulated sugar. I saw on Tresleche recipe, you state granulated sugar and here powdered sugar. Thanks.
Cindy
Can’t seem to “pin” your recipes to Pintrest lately. Even in the browser(chrome). I use various sites… without issues.
Just wanted to see if it’s just me…
Thank you! This is delicious!
I wish I had known that something this delicious was so easy to make. EVERYONE Loved it! For winddown Sunday, it was perfect with summer fruit. Thank you so much! I can’t imagine buying store bought again.
Brilliant post.
Thanks for all the information.
Really great recipe to make fresh and tasty whipped cream .
Your post is very helpful for me.
Thanks for posting ..
Keep Blogging !
Normally we buy fresh Whipped cream from Market , Home made fresh whipped cream great initiative, thanks for sharing
Try the ISI dispenser…stays fresh in fridge for about two weeks. Fresh heavy cream, sugar syrup or maple syrup, vanilla and a CO2 cartridge….away you go! Pretty dispensing too!
I love my dispenser.
I “weep” and, no, it isn’t the butter separating from the whey…one of the most basic and ancient skills is whipping cream to delightful sweet fluffiness (as is butter making ~ the best BTW, far and away from what is on offer in the stores)…before the coming of the pressurized cans of “convenient” and fast toppings laden with gawd knows what chemical preservatives! A median solution is the ISI dispenser, using heavy cream and vanilla and sweetened with simple syrup (or maple syrup) and a CO2 canister). Perfect ( and decorative) every time! And it lasts weeks in the fridge.
I am really surprised that this basic process needed to be explained…but I’m old school……
I am intrigued by your process, Michelle. You put all the ingredients in the bowl to start. I always whipped the cream, then added the sweetner. Excited to try your way for Easter dinner. Thanks for sharing….
You left out what I consider the most important information. Your cream will whip much more easily if you put your bowl and beaters in the freezer for about 30 minutes before whipping. Your cream should be very cold as well.
I frequently whip up cream for desserts, but I always use powdered sugar, and much less, only a tablespoon or two.
If a recipe calls for whipping cream (liquid), and we only have heavy cream, how do we make a liquid whipping cream out of it. I’ve come across this many times, and I have to use up my heavy cream.
There is a slight difference in the fat content between whipping cream and heavy cream, but they can generally be used interchangeably. I’ve used both for making whipped cream.
I like to make this in advance, so I usually add some bloomed gelatin or piping gel right before final whipping. It makes the whipped cream easy to pipe and holds its shape for 24 hrs.
can we use eggs yolk in whipped creem
I’m not sure why you would?
I tried making this(first time), but it turned to liquid with like with curdles in the bowl. Did I over mix it? How can I fix this?
Hi Amy, Yes, if that happened it was overmixed and separated into butter and whey. Unfortunately you can’t fix it at this point, you will need to start over.
Just wanted to mention that you actually can save over-whipped cream. Just pour in a little more cream – half a cup or so. It will loosen it up and bring it back to the stage before butter. It’s a shame how unknown this is!
Perfect and was so easily. My very first whipped cream
Wt if r cream left behind we hv to use it later on n it becomes thick?? Hw can we reuse it??
Wt if sm cream is left in refrigerator n we r using it afterwords it become thick can we use it nw?? N if yes hw??
Placing the mixing bowl and beaters in the freezer until ice cold help the cream whip
Hi! I live in India where we make cream from raw milk our own cows.. The cream separated from the top of the boiled cooled milk is stored in the refrigerator. We easily get a cup or two of thick cream within a few days. I tried your recipe for whipped cream with this homemade cream using an electric hand beater on low speed. But within hardly a few seconds it all turned to butter ???? can you please tell me how I can avoid that happening again? I have no idea how to estimate the amount of fat in the cream we make.. please help!
Hi Bindhu, Oh no! If you’re mixing on low briefly and it’s already turning to butter, I’m not sure what else you can do. Usually you would need to mix on high speed for a few minutes to get cream to turn to butter.
I would think that it is because the cream isn’t homogenized .
Is there a recipe for homemade cool whip?
It’s really a stabilized sweetened whipped cream, so you could add more sugar, and some people add a little cream cheese or gelatin (although I’ve never done either). The closest I’ve come is this cream cheese whipped cream: https://www.browneyedbaker.com/pumpkin-spice-latte-cupcakes/
I love this recipe. So easy. I live on a sailboat and this was a breeze to make. I used a hand mixer and it was perfect.
How long can fresh raw milk whipped cream sit atop a pie kept in the refrigerator? Should I make the whipped cream just before serving the pie? I made a chocolate banana coconut cream pie and the recipe says to top with whipped topping. I am not going to serve the pie until the next day. I want to use fresh raw milk cream to make whipped cream and I don’t know how it will hold up atop the pie for a full 24 hours. Thank you for your knowledge!
Hi Michele, I never use raw milk, but I would say the same as any other fresh whipped cream – serve it same day.
Hi, this came out perfect and delicate. I normally use powdered sugar and was surprised this recipe called for granular. But it came out smooth. I used a hand mixer, and the cream did not begin to thicken till about the 4-minute mark, which worried me at first. I blended at medium speed 3 minutes, then medium-high for last 2. Thanks. Love your blog. I often return here. :)
I made banana creme pie last night, and my whipped creme turned out perfect as shown in your photos, however today when I cut the pie, the whipped creme turned runny when I cut it. Why does this happen. Should Knox Gelitan be added to prevent this? Thanks
Hi Christine, Fresh whipped cream is best served the day it is made – it’s not meant to keep for longer-term storage. If you want to keep a dessert for a few days, then yes, I would recommend using a stabilized whipped cream recipe.
Christine, I learned a new trick recently. Use some skim milk powder with the other 3 ingredients. For every 1 cup of heavy whipping cream use 1 tbsp of skim milk powder. I made a maple and lime pie since learning this and my cream doesn’t deflate after a couple of days on the pie that’s been in the fridge. Hope this helps you or anyone reading my comment. I know how frustrating it can be to get it thick and stable without having to use gelatin. Happy baking…
Can i make whipping cream in another type of mixtures? Actually i dont have blender and i have mixtures
?
I use powdered stevia :)
Hi Michelle!
Great recipe! I had really thick cream in the blender then it thinned back to liquid. What happened? Thank you!
Hi Ayana, It sounds like you may have beaten it just a little too long. When cream is whipped too long, it actually starts to turn into butter, and then separates.
How long can you keep homemade whipped cream in the fridge before it goes bad?
Hi Lynette, I think 1-2 days is max before it starts to get watery.
Do you think this could be done with nut milk (ie almond, cashew, hemp)? Maybe with boiling it down first then chilling? I don’t drink or eat dairy/soy/rice milk.
Hi Bobi, I honestly have no idea; I don’t regularly use nut milk.
Hi Bob,
If you are looking to make “whipped cream” out of nut milk, you will need to start by blending the nuts with water and straining them to produce a very thick nut milk. Next, you will add to about 2 cups nut milk a thickening agent. I like agar flakes (1/2 tsp should do it). You will simmer the milk and the agar in a pot until it dissolves (at least 20 minutes). Refrigerate until solid. Then put your milk jello in the food processor (not the blender). Blend for 15 seconds until creamy.
As an alternate, you can use a full fat can of coconut milk (refrigerated) and blend (in the blender) until fluffy. I’m a chef and learned this in culinary school. Here’s a fresh fruit with orange liqueur recipe to compliment this whipped cream that everybody is making! :)
https://www.thefrayedapron.com/berries-and-cream/
is this the easiest way to make whip sream? if not what is?
Sorry my reply is 10 years late… blame Goggle for posting this article as if it’s much more recent. How else to make whipped cream? My wife says a Vitamix will cut the time to minites, so I tried my Nutribullet Pro+, and it is also fast and effortless. Certainly “beats” the hour I spent with a bowl and a whip! As for how much sugar, there are Internet suggestions that the (powdered) sugar helps fluff up and sustain your whipped cream from turning watery, so less sugar may be healthier, but too little sugar and it will flop. Hope this helps somebody out there! (Why can’t this crappy review section do a decent word-wrap??)
Add a teaspoon or so (fiddle with it to taste) of cocoa per cup of cream and get chocolate whipped cream! Its heaven when you need a chocolate ice cream fix and don’t have any in the house! (I knew there was a reason I couldn’t seem to loose weight!)
My favorite whipped cream recipe uses 1 cup of heavy cream and 2 tablespoons of powdered sugar. The directions read “whip until it almost becomes butter”.
I got excited when I read Fresh Homemade Whipped cream. What is so “homemade” about this whipping cream? And here I was thinking, milk, butter, sugar, vanilla, some thickening agent, churning etc. I didn’t see anything homemade about this, except for purchasing a carton of whipping cream from the grocery store. very disappointed.
…How else would one make whipped cream? There’s no need for a thickening agent, because whipping the heavy cream makes it thicker. You churn butter, you whip cream. The recipe does call for sugar and vanilla, but whipped cream does not contain butter (though you can, as stated before, make butter from cream). I’m not sure how this can be different from what you expected. Whipped cream is just that–cream that one has whipped.
How long do you think it would last if you freeze it?
Hi Brittany, I do not recommend freezing whipped cream, it will become watery when it thaws.
If all you want is a dollop of whipped cream for your coffee every morning (or hot chocolate occasionally) dollop the whipped cream by the spoonfull onto a parchment lined cookie sheet and place the sheet into the freezer for a couple hours. After about 2hrs, without actually removing the tray from the freezer (it thaws FAST), bag up the dollops into a ziplock type bag and stash that into the freezer (now you can remove the tray!). Drop one frozen dollop into your coffee at your leisure.
Otherwise no, it doesn’t freeze well.
Will ultra pasteurized heavy whipping cream still whip, or pasteurized whipping cream? That’s the closest thing I’ve found in my grocery store but I’m not sure.
Hi Jane, The only type of cream that my grocery store sells is pasteurized, so that’s all I use. It whips up just fine!
I really love your website, all the recipes are wonderful- as well as the pictures! I have the advice as for powdered sugar- you should add it to the cream very slowly WHILE mixing it, not before. The later, the better. Know that by experience- I am from Poland where there is no packed whipped cream (really) and everyone just makes it at home out of sweet heavy cream (with 30 or 36% of fat). It was kind of funny (in a nice way, of course) for me to see the recipe for a whipped cream (becasue here, in Poland, everyone just knows how to prepare it and people probably can`t imagine that you can buy it in a way like in the US)- as funny as my first time when I saw it in the States in a plastic container, bought by my mother-in-law (who is American). I was really shocked :)
Also, one more thing- “pierogi” is already a plural form, a singular is “pieróg”. So there is no need to add “pierogiS”, it is actually a common mistake- I see it very often in foreign websites.
Lots of kisses from Poland! :) :)
One way to make a delicious stable whipped cream that can top a cake (like a Black Forest) and sit out for a couple of hours is to whip in some cream cheese.
I absolutely LOVE homemade whipped cream. I do love pie, but to me it’s just an excuse to eat homemade whipped cream. :) I’ll definitely be making some to top a nice big slice of derby pie come Saturday!
Homemade whipped cream is the best! It makes all the difference to top off a dessert!
Another way to achieve perfect stiffness (not underbeaten). Try flipping your bowl upside-down after beating. If it wants to slide out even the slightest bit, beat some more and check again. It should remain right where it lay right side up.
I love making my own whipped cream! I remember shopping with a friend who was confused when I said I was serving something with whipped cream but only had the pint of heavy cream – no can, no tub, just the cream. I don’t know how she thought whipped cream was made but she sure loved it when she joined us for dessert! I generally use my hand mixer – it’s easier to take out on a whim (when you have a brownie crying for whipped cream) and there’s no fighting with quality control folks over who gets to lick the beater! Thanks, Michelle!
I always chill my bowl and beaters and if I want the whipped cream to hold better I add 2-3 tablespoons of meringue powder.
I L-O-V-E fresh whipped cream. So yummy. I never realized there was a recipe for it – i’ve been making it since i was a kid. I like it straight – no sugar, no vanilla – but….my family does not, so i add a little granulated sugar.
This is such a coincidence, my mother was just reminiscing how my son had asked her to make sure she wrote down her recipe for whipped cream, and we all chuckled about how there is no “recipe” for whipped cream. I guess we put it in the same category as toast or boiling water :-) I do know that my mom always chills her bowl and beaters, but I usually forget (plus – my KA bowl takes a lot of frige or freezer room). I rarely measure any amounts when I whip cream, but I’m guessing it’s pretty close to the above measurements. I may not put as much sugar – a little goes a long way.
There’s nothing better than homemade whipped cream! Love the addition of vanilla extract :)
Thanks for this recipe. I always forget how much vanilla and sugar I’m supposed to put in and then always end up having to taste it a couple of times. I can’t remember the last time I bought canned whipped cream, I always mix it by hand though, never with a mixer. This way I always get it right by feeling it when it is ready :)
I too prefer powdered sugar and if you like chocolate whipped cream add a tablespoon of unsweetened baking cocoa along with your powdered sugar! It is the bomb! (In coffee, on scones or other baked goods, or straight off the spoon.
Now that I’m used to fresh whipped cream, I can’t eat Cool Whip anymore….I used to love the stuff! There’s nothing like fresh whipped cream to make fruit, pies, etc. extra special. I’ve made butter before, too, so this post is definitely useful!
Chill the bowl and the beaters in the freezer for at least 20 minutes before whipping and the cream will always whip up better.
Soo funny that you just posted this. I made whipped cream with my daughter for the first time this weekend. Although I didn’t add vanilla and my sugar was still a little grainy so I thought I’d try powdered next time. No more cool whip for us!!
If you do accidently over whip heavy cream and end up with butter do not despair. The liquid that is left over is genuine “buttermilk” and can be used in many recipes. For more information – look here: http://dinersjournal.blogs.nytimes.com/2012/09/13/how-to-find-or-make-real-buttermilk/?_php=true&_type=blogs&ref=dining&_r=0
You’ll never mix vinegar with milk and think you have the real thing again.
Liz Biss
Houston, TX
Thanks for sharing! I never knew that’s what buttermilk was made from!
Anisa – The Macadames.
http://www.themacadames.com
Homemade whipped cream is the best! Love the tutorial!
I made whipped cream for a pie the other day, and my son in law told me he had never had fresh whipped cream before! I was floored! My mom only used fresh whipped cream. Never a can and definitely never cool whip. I usually use powdered sugar when I make it and I like to use gelatin to stabilize it so it doesn’t separate. You just soften 1/2 tsp gelatin in 1 Tbsp water, and then ads it when the cream starts to get frothy. It works so well, especially if you’re piping it.
I always chill the bowl and whisk before making whipped cream.
I’ve always used powdered sugar, it helps stabilize the cream and always, always chill the bowl and beater!
I always use powdered sugar since it dissolves in the cold whipping cream much faster without being grainy. I don’t usually use additives but with the work involved and the height, I make my Black Forrest Torte with 4 layers and use 2 chopsticks to hold the cake layers in place, this is one recipe where I use a packet of Dr. Oetker whip it stabilizer to keep the whipped cream from seeping into the cake. It can last several days with no problem..
I’ve also always used powdered sugar and have great results. Additionally, when I want to frost a cake with whipped cream icing, I use more powdered sugar to stiffen the cream and it seems to last for days in the fridge – doesn’t slide down the cake or soak in! For Angel Food cake, I sub pure almond extract for the vanilla and it is KILLA!
Never could understand why anyone would buy canned, fake whipped cream when homemade recipes like the Brown Eyed Bakers are so easy and quick.
Because I keep failing to get it right? I got butter, then another try seems to be working but next moment it turns watery.
It’s very frustrating and hence we are reading on internet to find out what’s wrong? Meantime while the kids wail, we use canned whipped cream to shut the kids up first.
There is also less to clean and do if you just want some whip cream to top hot cocoa or waffles and pancakes.
Making whip cream yourself is easy if you get the hang of it but there are benefits to using store bought whip cream too :).
I always use powdered sugar, it stabilizes the whipped cream so it holds up longer…
Took great interest in your notes…if using a hand mixer, you would still do medium? I can’t imagine the time involved would a factor. Thanks.
Hi Debra, Yes, I still use medium. If you find that it’s taking too long, you could bump it up one level once the cream has thickened, just keep a close eye on it.
I have always used granulated sugar but have recently noticed many people using powdered sugar. Is there a reason to use one as opposed to the other?
Thanks!
Hi Marla, If you want to actually frost a cake with the whipped cream (which I never do), the powdered sugar will make it a little more stable.
Wasn’t the Black Forest cake made with a whipped cream frosting?
Yes, it’s the only one I’ve ever done ;-) And I used powdered sugar for that frosting.
I use powdered sugar with my whipped cream, is there any difference in the end result?
Hi Jessica, I’ve done both and they both turn out well, but I feel like the granulated sugar whips up just a little bit more reliably than the powdered sugar.
I find the whipped cream stays stiff longer if using powdered sugar.
Wow, will be trying this soon! Thanks for step by step recipe :)